You’ll create stunning Valentine’s nail art with just basic supplies like red, pink, and white polish plus simple tools like toothpicks or dotting tools. Start by prepping your nails with proper filing and cuticle care, then apply a base coat. Try easy designs like polka dots using a bobby pin, heart shapes by dragging a toothpick through two dots, or crisp stripes with tape. These beginner-friendly techniques will transform your nails into romantic masterpieces in minutes.
Key Takeaways
- Start with clean, filed nails and apply base coat before creating simple Valentine designs like polka dots or hearts.
- Use dotting tools or toothpicks dipped in red and pink polish to create easy hearts, dots, and love-themed patterns.
- Try minimalist French tips with tiny red hearts along the smile line using striping tape for clean edges.
- Create accent nails featuring simple envelope designs or heart clusters on one or two nails for subtle Valentine flair.
- Seal all designs with top coat, clean mistakes with acetone on cotton swabs, and allow proper drying between layers.
Essential Supplies and Tools You’ll Need for Valentine’s Nail Art
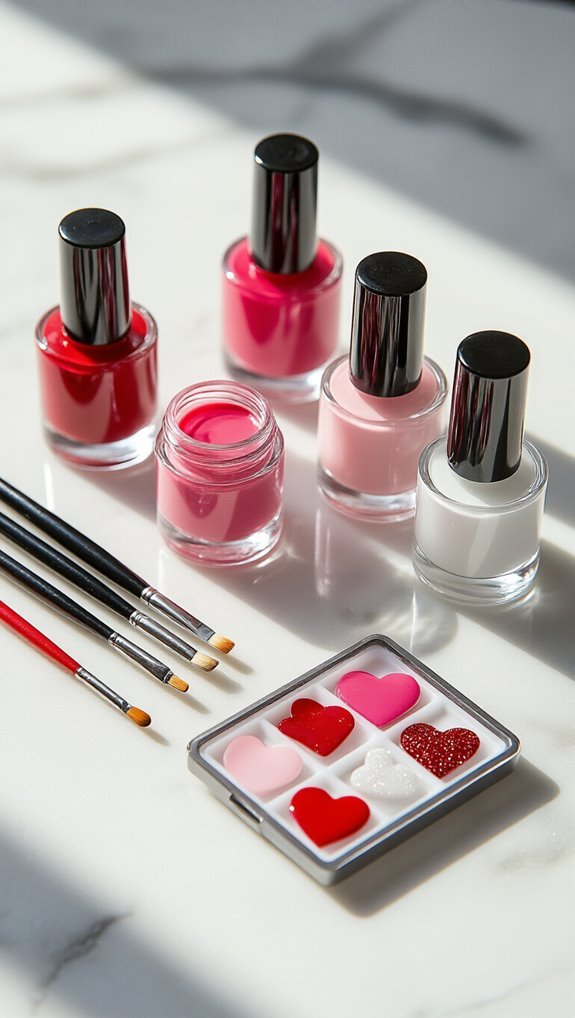
Before you dive into creating romantic nail designs, you’ll need to gather the right supplies to ensure your Valentine’s manicure turns out perfectly. Start with quality base and top coats to protect your nails and extend your design’s longevity.
You’ll want red, pink, and white polishes as your core Valentine’s palette, plus a clear polish for mixing custom shades.
Don’t forget essential nail care items like cuticle oil, nail files, and buffer blocks to prep your canvas properly. You’ll need dotting tools or toothpicks for creating hearts and details, plus thin brushes or striping tape for clean lines.
Consider investing in nail art stickers or stamps if you’re not confident with freehand designs yet.
Keep everything organized with proper storage solutions like compartmented cases or magnetic boards for your polishes. This prevents bottles from tipping over and makes finding specific colors quick and easy during your creative process.
Preparing Your Nails for the Perfect Valentine’s Manicure
Now that you’ve gathered your supplies, it’s time to create the ideal foundation for your Valentine’s nail art. Start by removing any existing polish with acetone-free remover. File your nails into your desired shape—oval or rounded edges work beautifully for romantic designs. Always file in one direction to prevent splitting.
Next, focus on cuticle maintenance. Soak your fingertips in warm water for three minutes to soften the skin. Gently push back your cuticles with an orange stick, then trim any hangnails with sanitized nippers. Don’t cut living tissue—you’ll risk infection and uneven polish application.
For optimal nail hydration, massage cuticle oil into each nail bed and surrounding skin. This step prevents chipping and ensures smooth polish application. Wash your hands with soap to remove excess oils, then swipe each nail with rubbing alcohol. This final cleansing step helps your base coat adhere properly, setting you up for long-lasting Valentine’s nail art.
Classic Red and Pink Polka Dot Design Tutorial
Now that you’ve prepped your nails, you’re ready to create a charming polka dot design that’s perfect for Valentine’s Day.
You’ll need red and pink nail polish, a dotting tool or bobby pin, base coat, top coat, and nail polish remover for cleanup.
Let’s walk through each step to achieve this classic, romantic look that’ll make your nails pop.
Essential Supplies Needed
Setting up your workspace with the right tools makes all the difference when creating this charming polka dot design. You’ll need a base coat, top coat, and nail polishes in red, pink, and white. Choose eco friendly polishes that won’t damage your nails or release harsh chemicals. These seasonal palettes capture Valentine’s Day perfectly while keeping your manicure safe.
Grab a dotting tool or bobby pin for creating uniform circles. You’ll also need nail polish remover, cotton swabs for cleanup, and a small piece of paper to practice your dots. Don’t forget cuticle oil to prep your nails and hand cream for aftercare. Keep paper towels nearby for quick spill management. Having everything within reach ensures you won’t smudge your work while searching for supplies.
Step by Step Process
After gathering your supplies, you’re ready to create this festive polka dot manicure that’ll turn heads all February long.
Start by applying a base coat to protect your nails. Once dry, paint two coats of soft pink polish, allowing each layer to dry completely.
Next, you’ll create the polka dots using a dotting tool or bobby pin. Dip it into red polish and gently press onto your nails, spacing dots evenly.
Don’t worry about perfection—slight variations add charm to these date themes.
For extra romance, add tiny floral accents by creating small clusters of dots that resemble petals. You can place these near your cuticles or tips.
Finish with a top coat to seal your design and add shine. Let everything dry thoroughly before showing off your Valentine’s masterpiece.
Easy Heart Shapes Using a Toothpick Method
| Step | Action |
|---|---|
| 1 | Apply base coat and let dry |
| 2 | Dip toothpick in polish |
| 3 | Create two dots side by side |
| 4 | Drag down through dots’ center |
| 5 | Seal with top coat |
For mini heart clusters, you’ll repeat this technique using smaller dots positioned at different angles. Try grouping three to five hearts on accent nails, or scatter single hearts across all ten nails. You can’t mess this up – imperfect hearts look intentionally whimsical. Practice on paper first if you’re nervous about working directly on your nails.
Simple Striped Valentine’s Pattern With Tape
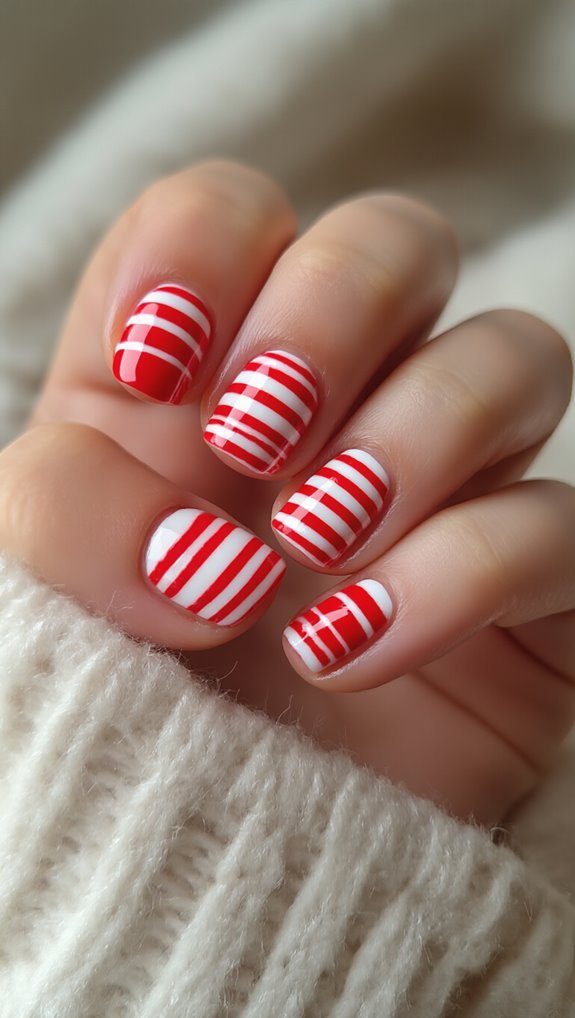
With just painter’s tape and two polish colors, you’ll create professional-looking diagonal stripes that scream Valentine’s chic.
Start by applying your base coat and letting it dry completely. Cut thin strips of painter’s tape and place them diagonally across your nails, leaving gaps for your stripes. Press the edges down firmly to prevent polish from bleeding underneath.
Apply your second color over the exposed areas. For an ombre stripe fusion effect, dab a makeup sponge with two colors and press it onto the stripes before they dry. Remove the tape while the polish is still slightly wet for crisp lines.
- Use striping tape for ultra-thin lines or regular tape for bold stripes
- Create tape free stripes by painting them directly with a thin brush after practicing the motion
- Mix metallic and matte polishes for dimension
Finish with a quick-dry topcoat to seal your design and prevent chipping.
Creating Romantic Ombré Nails With a Makeup Sponge
You’ll achieve stunning ombré Valentine’s nails using a simple makeup sponge technique that blends colors seamlessly.
First, you’ll gather a few basic supplies including nail polish in complementary shades, a disposable makeup sponge, and protective tape for your cuticles.
Once you’ve mastered the sponging method, you can experiment with romantic color combinations like pink-to-red gradients or white-to-lavender fades.
Essential Supplies Needed
Before diving into the ombré technique, gather these essential supplies to ensure your Valentine’s nail art turns out perfectly. You’ll need quality base and top coats to protect your natural nails and seal your design.
Choose at least two complementary polish colors—consider a scented polish for an extra romantic touch that’ll make your manicure experience more enjoyable.
Here’s what you’ll need:
- A clean makeup sponge cut into small triangular pieces
- Valentine’s themed colors (reds, pinks, whites)
- Cuticle oil for pre and post-application care
Don’t forget acetone or polish remover for cleanup, cotton swabs for precision work, and tape or liquid latex to protect your skin.
Having these supplies ready means you won’t interrupt your creative flow once you’ve started creating your romantic gradient effect.
Step By Step Process
Now that your supplies are organized and within reach, let’s create those dreamy ombré nails.
Start by applying a white or nude base coat and let it dry completely. Dab pink and red polish onto a makeup sponge in overlapping stripes. Gently press the sponge onto your nail, rolling it slightly for seamless blending. You’ll need 2-3 layers for opacity.
Once dry, add seasonal motifs like tiny hearts using a dotting tool or toothpick. These celebrity inspired designs are trending everywhere this February.
Seal your artwork with a glossy topcoat, ensuring you cap the free edge to prevent chipping. Clean up any polish on your skin with a small brush dipped in acetone.
Your romantic ombré nails are complete and ready to impress.
Color Combination Ideas
Several color combinations can transform your Valentine’s ombré nails from ordinary to extraordinary. You’ll create stunning gradients by blending complementary shades with your makeup sponge.
Classic red-to-pink transitions remain timeless, while pastel neutrals offer subtle romance perfect for everyday wear.
Try these winning combinations:
- Blush to White – Start with soft pink at the base, fading to pristine white tips
- Ruby to Gold – Blend deep jewel tones for luxurious, eye-catching nails
- Lavender to Pink – Merge these dreamy hues for a whimsical Valentine’s look
You can’t go wrong mixing warm and cool tones either.
Experiment with burgundy melting into rose gold, or coral transitioning to peach.
These color pairings work beautifully whether you’re attending a romantic dinner or celebrating with friends.
Quick Love Letter Accent Nails Using Basic Tools
You can whip up adorable love letter accent nails in minutes with just a toothpick and regular polish.
Start with a nude or light pink base coat on your accent nail. Once dry, use white polish to create a small rectangle shape that’ll become your envelope.
Dip your toothpick into red polish and carefully draw a triangle flap at the envelope’s top. Add a tiny heart seal where the flap meets the envelope body.
For handwritten envelopes effect, use the toothpick’s tip with black polish to create squiggly lines mimicking addresses.
Don’t forget the tiny postage stamp detail. Simply dot a small square in the corner using any contrasting color, then add miniature lines inside with your toothpick.
You’ll achieve professional-looking results without expensive tools or steady hands. This technique works best on ring fingers or thumbs as statement nails.
Seal everything with a glossy top coat to make your love letters shine.
Minimalist Valentine’s French Tips With a Twist
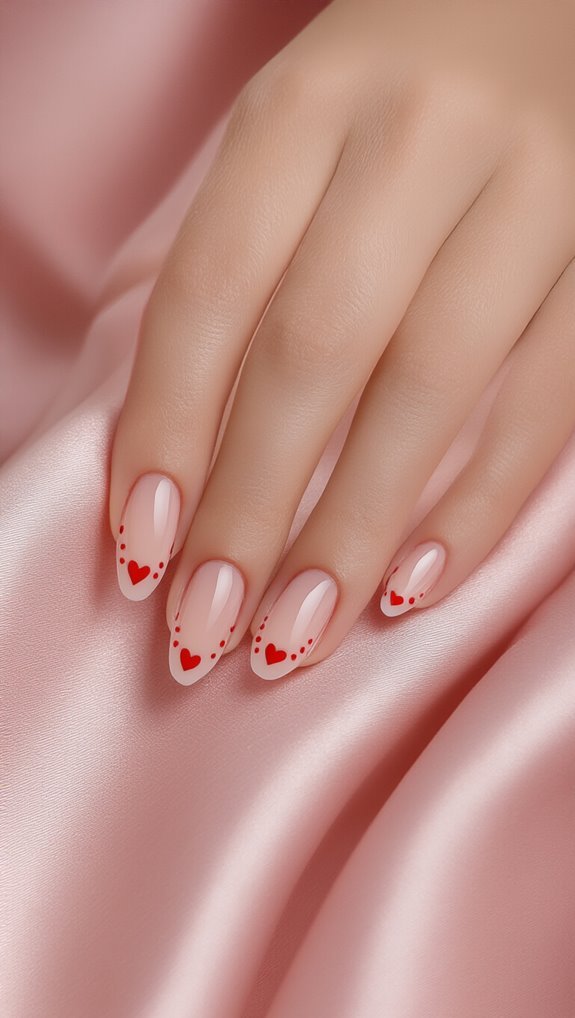
You’ll transform classic French tips into a Valentine’s masterpiece with just a few tweaks and basic supplies. Start by gathering your white or pink polish, a thin brush or toothpick, and red accent polish for the heart details you’ll add to each tip.
The technique combines traditional French manicure steps with romantic touches through unexpected color pairings like blush and burgundy or classic red and white combinations.
Essential Tools Needed
Before diving into this chic nail design, gather these must-have supplies to ensure your minimalist Valentine’s French tips turn out perfectly. You’ll need quality base and top coats, plus red or pink polish for the twist element. Don’t forget white polish for classic French tips.
Your nail hygiene matters, so include:
- Nail file and buffer for smooth edges
- Cuticle oil to nourish nail beds
- Striping tape for precise lines
Keep your tool storage organized with a dedicated container that protects brushes from damage. You’ll also want acetone, cotton pads, and a cleanup brush for mistakes. Consider matching accessories like heart-shaped nail stickers or tiny rhinestones to complement your design. With these essentials ready, you’re set to create stunning Valentine’s nails that’ll impress everyone.
Step By Step
Now that your supplies are ready, let’s create these elegant Valentine’s French tips with a romantic twist. Start by applying a clear base coat to protect your nails. Once dry, you’ll paint classic white tips using thin, steady strokes. Here’s where Valentine’s symbols transform the traditional look—add tiny red hearts or pink dots along the smile line using a dotting tool.
For extra romance, incorporate seasonal motifs by drawing delicate arrows or mini roses on accent nails. You can also replace white tips with soft pink or red for a bolder statement. Seal your design with a glossy top coat, ensuring you cap the nail edges to prevent chipping. This minimalist approach keeps your manicure sophisticated while celebrating the holiday perfectly.
Creative Color Combinations
Often, the most striking Valentine’s manicures come from unexpected color pairings that still maintain a minimalist aesthetic.
You’ll discover that stepping beyond traditional red and pink opens exciting possibilities for your French tips.
Try these sophisticated combinations:
- Pastel contrasts – Pair soft lavender tips with peachy-nude bases for a dreamy, romantic look
- Jewel tones – Create depth with emerald green tips over burgundy bases for luxe Valentine’s vibes
- Monochromatic magic – Layer different shades of mauve from light to dark for subtle dimension
You’re not limited to conventional choices. Mix warm corals with cool grays, or combine dusty rose with champagne gold.
These unexpected pairings’ll make your Valentine’s nails stand out while keeping the design clean and wearable for beginners.
Adding Glitter and Sparkle for Extra Romance
Nothing says Valentine’s Day quite like a touch of sparkle on your nails, and you’ll find that adding glitter is one of the easiest ways to elevate your romantic manicure.
You can create stunning glitter gradients by concentrating sparkle at the tips and fading it toward the cuticle. Simply dab a makeup sponge with glitter polish and press it onto your nail tips, working downward with lighter touches.
For full coverage, you’ll want to apply thin layers of glitter polish rather than one thick coat. This prevents clumping and ensures even distribution. Don’t forget to cap the free edge of your nails with each layer to prevent chipping.
Once you’ve achieved your desired sparkle level, seal everything with a quality sparkle sealant or thick topcoat. This smooths the texture and locks in every glittery particle. Apply two coats of sealant for maximum durability and shine that’ll last through Valentine’s Day and beyond.
Tips for Making Your Valentine’s Nail Art Last Longer
- Seal the free edge by swiping horizontally across your nail tips
- Reapply topcoat every two to three days for continuous protection
- Use quick-dry drops to prevent smudging during initial application
Don’t forget about routine maintenance between manicures. You’re protecting your investment when you wear gloves while cleaning and avoid using your nails as tools.
Keep a small bottle of topcoat handy for touch-ups when minor chips appear. These simple steps ensure your romantic nail art stays pristine throughout Valentine’s celebrations and beyond.
Frequently Asked Questions
Can I Do Valentine’s Nail Art if I Bite My Nails?
Yes, you can! You’ll find plenty of short nail designs perfect for Valentine’s Day that work beautifully on bitten nails. Try simple hearts, dots, or tiny cupid arrows that don’t need much nail length.
While you’re exploring nail biting alternatives like press-ons or nail wraps, you can still create adorable Valentine’s art. Focus on accent nails or use striping tape for clean lines that’ll make your shorter nails look polished and festive.
How Much Does Professional Valentine’s Nail Art Typically Cost at Salons?
You’ll typically pay $30-$80 for professional Valentine’s nail art, though the average price varies significantly across salon tiers.
Basic salons charge around $25-$40 for simple heart designs or red-pink patterns. Mid-range establishments run $45-$65, offering more intricate details like cupids or love letters.
High-end salon tiers can exceed $100 for elaborate 3D decorations, hand-painted scenes, or luxury gel applications with crystals. Don’t forget to factor in tips when budgeting.
Is Valentine’s Nail Art Appropriate for Work or Professional Settings?
You can absolutely wear Valentine’s nail art to work if you keep it professional. Choose office appropriate designs with neutral tones like soft pinks or nudes instead of bold reds. Add subtle accents like tiny hearts on one accent nail or delicate rose gold details.
Keep your short nails well-groomed and opt for minimalist designs that won’t distract during meetings. You’ll celebrate the holiday while maintaining your professional image.
Can Men Wear Valentine’s Themed Nail Art Designs?
Yes, you can absolutely wear Valentine’s themed nail art regardless of gender. You’ll find many gender neutral designs that work beautifully for everyone.
Try incorporating subtle accents like single hearts, minimalist line art, or geometric patterns in reds, pinks, or even blacks. You don’t need elaborate designs – simple dots, stripes, or negative space art create stylish looks. Choose colors and patterns that match your personal style and comfort level.
How Far in Advance Should I Do My Nails Before Valentine’s Day?
You’ll want to do your Valentine’s nail art about two days before the holiday for the best results. This timing gives you a buffer for any mistakes and allows for touch ups later if needed.
If you’re planning a salon booking, schedule it 2-3 days ahead since appointments fill up quickly.
Start your nail prep early by moisturizing your cuticles daily and removing old polish at least a day before applying your new design.
Conclusion
You’ve learned everything you need to create stunning Valentine’s nail art at home. Whether you’re painting polka dots, drawing hearts with toothpicks, or adding romantic glitter, these simple techniques will help you achieve professional-looking results. Don’t worry if your first attempt isn’t perfect – practice makes progress. Now grab your favorite polishes, put on some music, and enjoy creating your own festive Valentine’s manicure. Your nails will be date-night ready in no time!