You’ll create stunning Christmas nail art with just basic polish and simple tools. Start with candy cane stripes using red and white polish on diagonal angles, or paint festive green triangles for Christmas trees topped with gold stars. Add snowflakes by drawing intersecting lines with V-shaped branches, or try Santa hats with red triangles and white trim. For extra sparkle, blend metallic ombré or add glitter gradients. These beginner-friendly designs will transform your nails into miniature winter wonderlands perfect for the holidays.
Key Takeaways
- Start with clean, filed nails and apply base coat before creating candy cane stripes, snowflakes, or Christmas trees using thin brushes.
- Paint Santa hats by creating red triangles at nail tips, then add white trim bands and pompom dots for festive detail.
- Create holly designs with green elongated ovals and three red berry dots, or draw reindeer faces with brown ovals and red noses.
- Apply metallic ombré by blending gold and silver polish while wet, or build glitter gradients from cuticle to tip using makeup sponges.
- Seal all designs with quick-dry or glossy topcoat, focusing on edge sealing to prevent chipping and maintain crisp holiday nail art.
Essential Tools and Materials for Christmas Nail Art
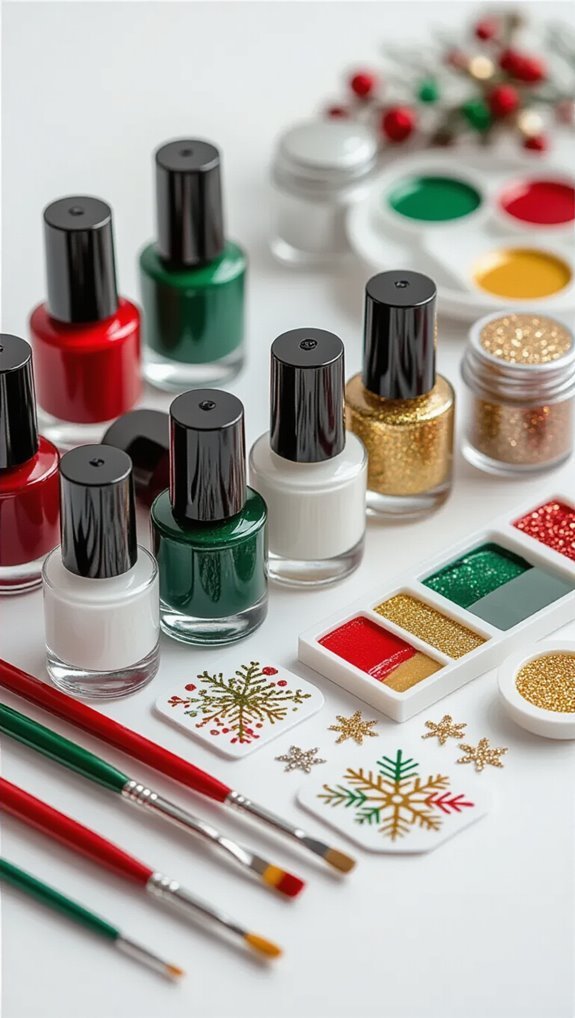
Before you dive into creating festive Christmas nail designs, you’ll need to gather the right tools and materials to bring your holiday vision to life.
Start with quality base and top coats to protect your nails and extend your design’s longevity. You’ll want various nail polish colors—especially reds, greens, whites, and golds for traditional Christmas themes.
For detailed work, invest in thin nail art brushes and dotting tools. These help you create precise lines, snowflakes, and holly patterns. Don’t forget tweezers for glitter placement and applying small embellishments like rhinestones or pearls.
Stock up on holiday decals featuring Santa, reindeer, or snowmen for quick, professional-looking designs. Fine glitter, chunky glitter, and metallic foils add sparkle to any creation.
You’ll also need nail polish remover, cotton swabs for cleanup, and a small dish for mixing custom colors.
With these essentials ready, you’re set to create stunning Christmas nail art.
Classic Candy Cane Stripe Design
You’ll need red and white polish as your essential colors, though some prefer adding a thin green accent line for extra festive flair.
Master the stripe painting technique by starting with a white base coat, then using striping tape or a thin brush to create diagonal red stripes at consistent intervals.
Seal your candy cane design with a quick-dry topcoat applied in thin, even strokes to prevent smudging and ensure your stripes stay crisp for days.
Essential Polish Colors
Three essential polish colors form the foundation of the classic candy cane stripe design: crisp white, vibrant red, and a clear base coat. You’ll achieve the best results with high-quality polishes that offer full coverage in two coats. Understanding basic color theory helps you select the perfect red shade—choose cooler reds for fair skin tones and warmer reds for deeper complexions.
For modern festive nailcare, you can experiment with winter matte finishes or incorporate shimmery textures into your design. Add a matte topcoat over traditional polish for a sophisticated twist, or select red and white polishes with built-in shimmer particles. Don’t forget you’ll need a quality topcoat to seal your design and ensure it lasts throughout the holiday season.
Stripe Painting Technique
Start with a steady hand and proper brush positioning when creating perfect candy cane stripes on your nails. You’ll need quality striping brushes for clean lines and professional results. Apply your base coat first, then paint alternating red and white diagonal banding across each nail.
| Step | Action |
|---|---|
| Base Layer | Apply white polish completely |
| First Stripe | Paint red diagonal from corner |
| Final Touch | Seal with clear topcoat |
Keep your striping brushes at a 45-degree angle for consistent diagonal banding. Don’t overload the brush—you want just enough polish to create smooth, unbroken lines. Work quickly before the polish dries, but don’t rush your strokes. Practice on paper first if you’re nervous about freehand painting.
Final Topcoat Tips
Once your candy cane stripes have dried completely, apply a high-quality topcoat to protect your festive design and extend its wear time. You’ll want to seal every edge properly to prevent chipping during holiday activities.
Consider these topcoat options for different finishes:
- Quick dry formulas – They’ll set your design in under 60 seconds, perfect when you’re rushing to parties
- Matte sealant varieties – These create a sophisticated velvet finish that transforms glossy stripes into elegant frost-like patterns
- Traditional glossy topcoats – They’ll enhance color vibrancy and add mirror-like shine
Focus on edge sealing by running the brush along your nail tips. This creates a protective barrier where chips typically start.
For optimal reapplication timing, add a fresh topcoat layer every three days to maintain your candy cane design’s crisp appearance throughout the season.
Elegant Snowflake Pattern Tutorial
You’ll create stunning snowflake patterns that capture winter’s delicate beauty on your nails. First, you’ll gather specific tools including a thin nail art brush, white polish, and top coat for this intricate design. Then you’ll prep your nails with a base coat before following simple steps to paint crystalline snowflakes that’ll make your manicure sparkle throughout the holiday season.
Tools and Materials Needed
Before creating your elegant snowflake nail art, gather these essential supplies to ensure professional-looking results. You’ll need quality tools that’ll make the intricate snowflake details stand out beautifully on your nails.
Here’s what you’ll require:
- Base essentials – White and silver nail polish, clear topcoat, and a thin detail brush for precise snowflake branches
- Design tools – Dotting tools in various sizes, holiday decals for accent snowflakes, and festive sponges to create gradient backgrounds
- Prep supplies – Nail file, buffer, cuticle pusher, and acetone for cleanup
Don’t forget nail tape for creating geometric snowflake patterns. You’ll also want toothpicks for ultra-fine details and a small dish for mixing custom shades.
Having everything ready prevents interruptions and ensures your snowflakes turn out crisp and symmetrical.
Base Coat Preparation
After gathering your supplies, start by removing any old polish with acetone and pushing back your cuticles for a clean canvas. Proper cuticle care ensures your design looks professional and lasts longer. Gently push them back using an orange stick—don’t cut unless absolutely necessary.
Next, buff your nail surface lightly to create slight texture for better adhesion. File your nails into your preferred shape, whether that’s square, oval, or almond. Focus on nail hydration by applying cuticle oil and massaging it in for 30 seconds per finger. This prevents cracking and peeling later.
Wipe each nail with rubbing alcohol to remove oils and residue. Now you’re ready to apply a thin base coat, starting from the center and working toward the edges. Let it dry completely before proceeding.
Snowflake Design Steps
Once your base coat has dried, transform your nails into a winter wonderland with this elegant snowflake pattern that’s easier to create than you’d think. You’ll need a thin nail art brush and white polish to achieve perfect snowflake symmetry on each nail.
Here’s how to create stunning snowflakes:
- Draw the foundation – Paint three intersecting lines through your nail’s center, creating a six-pointed star base
- Add branches – Dot small V-shapes along each line, working from the center outward for balanced proportions
- Create faux stitch texture – Use a dotting tool to add tiny dots between the branches, mimicking delicate stitched details
Finish with a quick-dry topcoat to seal your design. You’ve now mastered an impressive snowflake pattern that’ll make your nails the star of any holiday gathering.
Festive Christmas Tree Nail Art
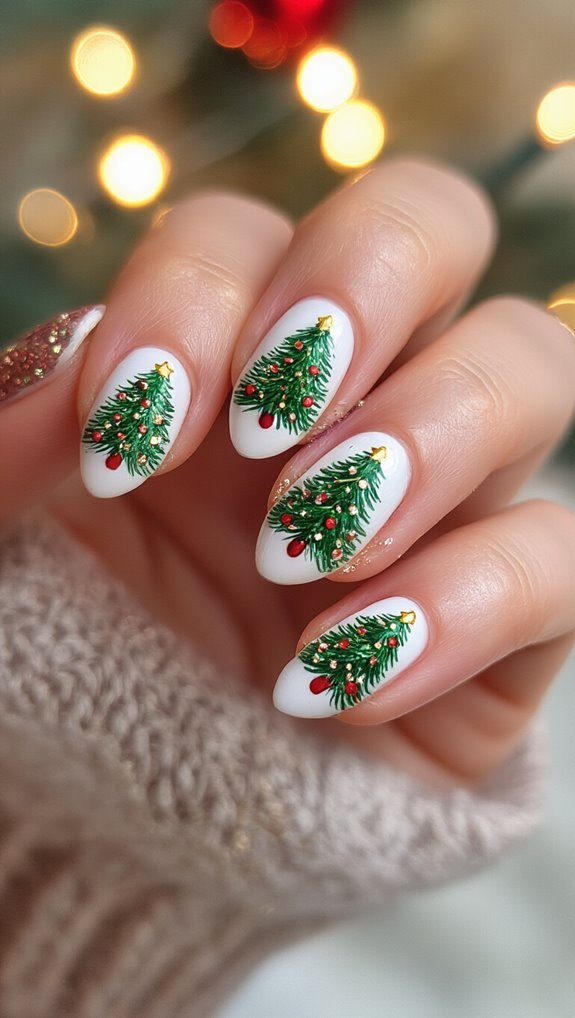
Nothing lights up your holiday manicure quite like festive Christmas tree nail art. You’ll transform plain nails into miniature winter wonderlands with just a few simple techniques.
Start with a white or nude base coat on all nails. Once dry, you’ll create your holiday greenery using a thin brush dipped in forest green polish. Paint a small triangle on each nail, starting from the cuticle area and tapering to a point near the tip. Don’t worry about perfect edges—real trees aren’t symmetrical.
Add dimension by dotting darker green polish along the tree’s edges with a toothpick. You’ll bring your trees to life with rustic ornaments next. Dab tiny dots of red, gold, and silver polish randomly across each tree using a dotting tool or bobby pin. Crown each tree with a small gold star using metallic polish. Seal everything with a glossy top coat, and you’re ready to spread holiday cheer.
Simple Santa Hat Design for Beginners
You’ll need just a few basic supplies to create an adorable Santa hat on your nails: red and white polish, a thin detail brush, and a dotting tool for the fuzzy trim.
Start by painting a triangular red shape at the tip of your nail, then add a white band at the base and a small white dot at the point.
This beginner-friendly design takes less than five minutes per nail and doesn’t require any advanced techniques or steady hands.
Required Tools and Colors
Before you begin creating your festive Santa hat nails, you’ll need to gather a few essential supplies that will make the design process smooth and enjoyable.
You don’t need professional-grade equipment to achieve stunning results.
Here’s what you’ll need:
- Base colors: Red polish for the hat, white for the trim and pom-pom, and nude or clear base coat
- Tools: Thin nail art brush or toothpick for detail work, dotting tool for the pom-pom
- Finishing products: Top coat (glossy or matte finishes work beautifully), non toxic removers for cleanup
You’ll also want cotton swabs and acetone for fixing mistakes.
Choose polishes with good opacity to minimize coats needed.
Quick-dry formulas save time between layers.
Keep paper towels nearby for wiping excess polish from your brush.
Creating the Hat Shape
After applying your base coat and letting it dry completely, start forming the Santa hat by painting a red triangle that begins at your nail’s tip and tapers down toward the middle. Keep the triangle’s edges slightly curved rather than perfectly straight for a more natural appearance. You’ll want the hat to cover about two-thirds of your nail, leaving room for the white trim below.
Once the red polish dries, add a white curved line at the triangle’s base to create the hat’s fluffy brim. For the pompom at the tip, dab white polish using a dotting tool to build a ribbed pompom texture. Apply multiple tiny dots close together, creating dimension that mimics felt textures found on real Santa hats.
Glittery Gold and Silver Holiday Nails
Metallic magic transforms ordinary manicures into festive masterpieces when you incorporate glittery gold and silver polishes into your Christmas nail art. You’ll create stunning metallic ombré effects by blending these shades seamlessly from cuticle to tip. Start with a silver base coat, then apply gold polish halfway up the nail while it’s still wet, gently blending where they meet.
For perfect glitter gradients, follow these steps:
- Apply sparse glitter near your cuticle using a makeup sponge
- Build intensity by adding more glitter toward the nail tip
- Seal everything with a high-shine top coat for durability
You can’t go wrong alternating gold and silver on different fingers or combining both on accent nails. Add tiny rhinestones at the base for extra sparkle. These versatile metallics complement any outfit while maintaining that holiday spirit. They’re sophisticated enough for office parties yet glamorous for New Year’s Eve celebrations.
Adorable Reindeer Face Tutorial
Once you’ve mastered metallic designs, you’ll love creating these charming reindeer faces that bring instant holiday cheer to your fingertips.
Start with a nude or light brown base coat on all nails. For the reindeer face, paint a brown oval on your ring finger’s upper half. Add two small black dots for eyes and a red circle for Rudolph’s signature nose.
Create antler variations using a thin brush dipped in dark brown polish. Draw two main branches extending upward from the face, then add smaller offshoots for complexity. You can make simple Y-shaped antlers or elaborate branching patterns depending on your skill level.
The reindeer symbolism represents guidance and magic during the holiday season, making this design perfect for Christmas parties. Complete the look by adding white dots around the other nails for snowflakes. Seal everything with a glossy topcoat to ensure your festive reindeer faces last through all your holiday celebrations.
Holly Leaves and Berries Design
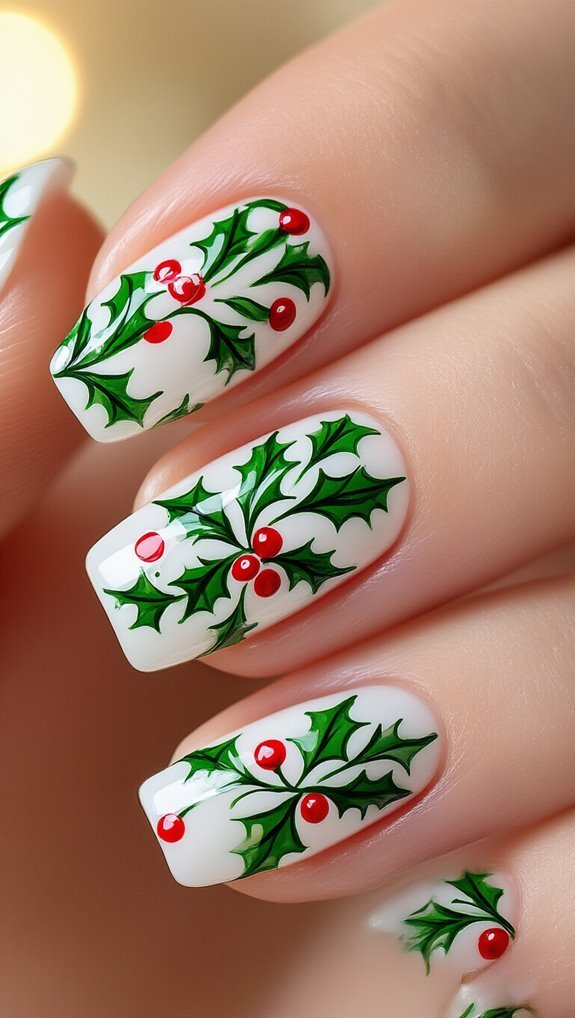
Holly leaves bring classic Christmas elegance to your nail art with their distinctive pointed edges and vibrant green color. You’ll capture the traditional holly symbolism of peace and goodwill through this timeless design that’s surprisingly easy to create.
Start with a neutral or deep red base coat. Use a thin brush dipped in forest green polish to paint two elongated oval shapes meeting at an angle, forming your holly leaf base. Add jagged edges along each side with quick, confident strokes.
Here’s how to perfect your berry placement:
- Position three red dots where the leaves connect using a dotting tool
- Create dimension by adding tiny white highlights on each berry
- Balance your design by placing berries asymmetrically for natural appeal
Seal everything with a glossy topcoat to make the colors pop. This design works beautifully as an accent nail or across all fingers for festive impact.
Minimalist Christmas Lights Pattern
You’ll often find that minimalist nail art creates the most elegant holiday looks, and a delicate Christmas lights pattern proves this perfectly. This design transforms your nails into a festive display without overwhelming complexity.
Start with a nude or pale pink base coat that’s completely dry. Using a thin nail art brush, draw a curved black line across each nail to represent the wire. Don’t worry about making it perfectly straight – a gentle wave looks more realistic.
For the neon stringlights effect, dot tiny bulbs along the wire using bright polish colors. Create negative space bulbs by painting small teardrop shapes, leaving the center unfilled. This technique adds dimension while maintaining the minimalist aesthetic. Alternate between filled and negative space bulbs for visual interest.
Apply colors like electric blue, hot pink, emerald green, and golden yellow. Space them irregularly for authenticity. Seal everything with a glossy top coat to make those lights truly shine.
Tips for Making Your Christmas Nail Art Last Longer
Maintaining your festive nail art through holiday parties and gift-wrapping marathons requires strategic preparation and the right techniques. You’ll need to protect your investment with smart choices that ensure your designs stay vibrant throughout the season.
Here’s how to achieve long lasting Christmas nails:
- Start with gel extensions – They’re more durable than regular polish and provide a stronger base for intricate designs
- Apply quality top coat – Reapply every 2-3 days, focusing on the tips where chipping typically begins
- Practice daily maintenance – Wear gloves during cleaning, avoid using nails as tools, and keep hands moisturized
Don’t forget about oiling cuticles twice daily with jojoba or vitamin E oil. This prevents peeling and keeps the skin around your nails healthy, which directly impacts how well your polish adheres.
You should also file away any snags immediately to prevent catches that’ll ruin your design. These simple steps will keep your Christmas nail art looking fresh from the first carol to New Year’s Eve.
Frequently Asked Questions
Can I Create Christmas Nail Art on Natural Nails or Only Acrylics?
You can absolutely create Christmas nail art on natural nails! You don’t need acrylics at all. Start with a breathable basecoat to protect your natural nails and help designs last longer.
Even short lengths work beautifully for festive designs. If you’re worried about freehand painting, try adhesive decals for quick, professional-looking results.
Natural nails actually hold polish well and give you flexibility to change designs throughout the holiday season.
How Far in Advance Should I Do Christmas Nails Before a Party?
You’ll want to do your Christmas nail art 3–5 days before your party for the best results.
This timing ensures your design looks fresh and vibrant when it matters most.
If you’re doing them yourself, this window gives you enough time to fix any mistakes without rushing.
On the day of your event, you can do quick touchups like adding a clear topcoat or fixing any small chips that might’ve appeared.
What’s the Average Cost of Getting Christmas Nail Art Done Professionally?
You’ll typically pay $40-80 for professional Christmas nail art, though average pricing varies by location and design complexity.
Simple designs like snowflakes or candy canes cost less, while intricate 3D elements or hand-painted scenes run higher.
Many salons offer seasonal discounts in early December to attract holiday clients.
You’re looking at an extra $15-30 above regular manicure prices for festive art, with gel lasting longer than regular polish.
Can Children Safely Wear Christmas Nail Art Designs?
Yes, you can safely create Christmas nail art for children when you choose the right products.
You’ll want to use non-toxic, water-based polishes specifically formulated for kids. Temporary stickers offer an even safer option that’s easy to apply and remove.
Consider toy-inspired designs like snowmen, reindeer, or candy canes that appeal to young ones. Always ensure proper ventilation and supervise application. Remove designs promptly if any irritation occurs.
How Do I Remove Glitter and Special Effects From Christmas Nail Art?
You’ll need patience to remove stubborn glitter and special effects from your festive manicure.
Start with an acetone soakdown by saturating cotton pads with acetone, placing them on each nail, and wrapping fingertips in foil for 10-15 minutes.
This dissolves the polish effectively.
For gentler removal, try an oil based remover that breaks down adhesives while moisturizing your nails.
Always buff away remaining glitter particles and follow with cuticle oil.
Conclusion
You’ve now mastered eight festive Christmas nail art designs that’ll make your holidays extra special. Whether you’re rocking candy cane stripes at work or showing off intricate snowflakes at parties, you’ll spread holiday cheer wherever you go. Don’t forget to seal your designs with quality top coat and follow those lasting-power tips. With practice, you’ll create these looks faster each time. So grab your polish, get creative, and let your nails celebrate the season in style!