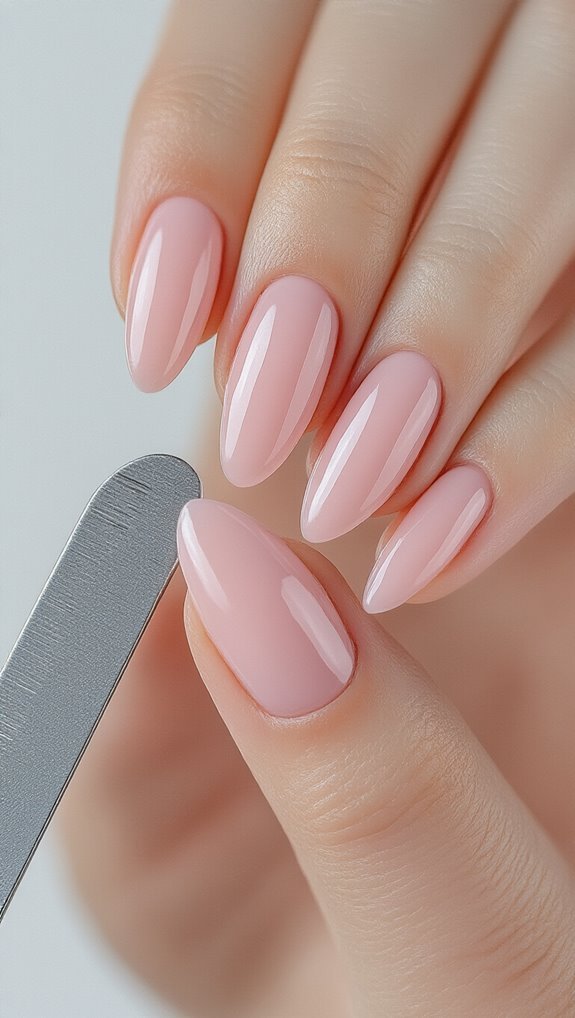
You’ll transform your natural nails into elegant almond shapes by filing at 45-degree angles from the sides toward the center, counting 8-10 strokes per side for symmetry. Start with a 180-grit file, trim nails straight across leaving 3-4mm length, then create gentle slopes and round the tip with small circular motions. Apply base coat in thin strokes, choose nude tones or jewel colors, and add simple dots or stripes for your first design. Master these fundamentals and you’ll discover advanced techniques for chrome finishes and gradient effects.
Key Takeaways
- Start by trimming nails straight across leaving 3-4mm past fingertip, then file from sides toward center at 45-degree angles.
- Create symmetrical almond slopes by counting 8-10 file strokes per side, then round the tip with gentle circular motions.
- Apply base coat in thin strokes, capping the free edge, followed by chosen polish color and protective top coat.
- Use thin nail art brushes and dotting tools with nail guides or striping tape for precise designs on the almond shape.
- Maintain daily with cuticle oil application twice and weekly top coat refresh to preserve nail art and almond shape integrity.
Essential Tools and Supplies for Creating Almond Nails
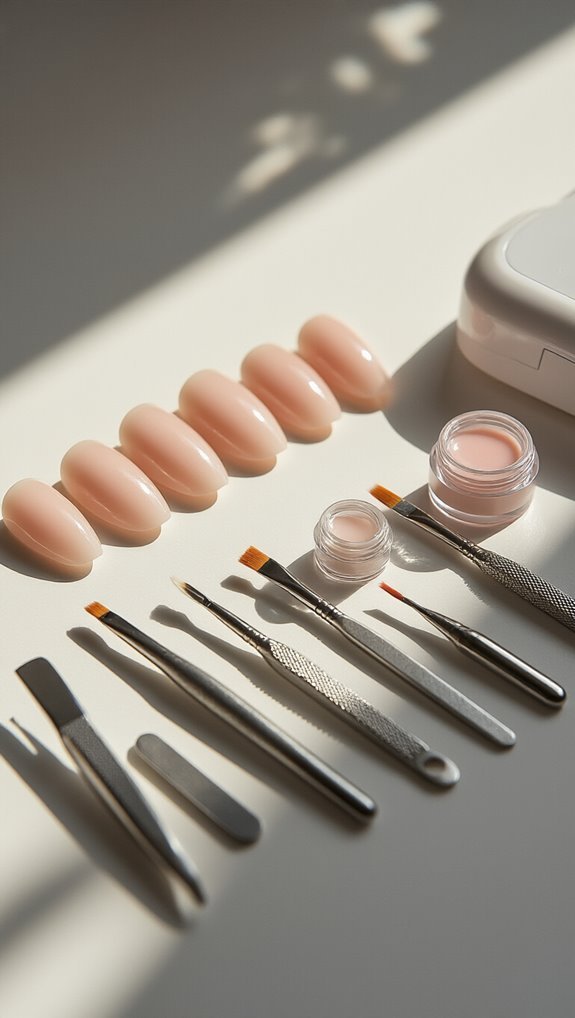
Whether you’re shaping natural nails or applying extensions, you’ll need the right tools to achieve the perfect almond shape. Start with a quality nail file—preferably 180/240 grit—for precise shaping without damage.
You’ll also need nail clippers for initial length reduction and a buffering block to smooth ridges and create a flawless surface.
Don’t overlook prep tools. A cuticle pusher helps create clean nail beds, while cuticle nippers remove excess skin.
You’ll want rubbing alcohol or nail dehydrator to eliminate oils before polish application.
For the actual art, gather your chosen polish colors, a base coat, and top coat. Thin nail art brushes enable detailed designs, while dotting tools create perfect circles and patterns.
Consider purchasing nail guides or striping tape for geometric designs.
Keep acetone, cotton pads, and cleanup brushes nearby for mistakes.
If you’re working with extensions, add nail glue and forms or tips to your kit.
Preparing Your Natural Nails for the Almond Shape
Now that you’ve gathered your tools, proper nail preparation sets the foundation for a stunning almond shape. Start by removing any existing polish with acetone-free remover to prevent excessive drying. Soak your fingertips in warm water for five minutes to soften the skin and cuticles.
Push back your cuticles gently using a cuticle pusher, working from the center outward. Apply cuticle oil for essential cuticle nourishment, massaging it into the nail bed and surrounding skin. This step prevents hangnails and promotes healthy nail growth.
Next, trim your nails straight across, leaving enough length to create the almond shape. You’ll need at least 3-4 millimeters extending past your fingertip. Use the proper buffering technique by moving the buffer in one direction across the nail surface, avoiding back-and-forth motions that can cause splitting. This smooths ridges and creates an even surface for shaping.
Finish by washing your hands thoroughly to remove debris before moving to the shaping phase.
Step-by-Step Filing Technique for Perfect Almond Tips
Once your nails are prepped and ready, you’ll begin shaping them into elegant almond tips using strategic filing techniques. The key is working methodically from the sides toward the center, creating that signature tapered look.
Follow these essential steps for flawless results:
- File at 45-degree cutting angles from each sidewall toward the tip’s center, maintaining consistent pressure
- Create symmetrical slopes by counting your file strokes on each side—typically 8-10 strokes per side works well
- Round the tip gently with small circular motions, avoiding sharp points that’ll snag and break
- Check your progress frequently by flipping your hand palm-down to spot any asymmetry
Common Mistakes to Avoid When Shaping Almond Nails
Even though you’ve mastered the basic filing technique, you’ll still encounter pitfalls that can ruin your almond nail shape if you’re not careful. The most damaging error you’ll make is filing too aggressively at the sides, creating weak points that’ll snap under pressure. You’re also likely to over-file the tip, transforming your elegant almond into a sharp stiletto.
Watch your file thickness—using a coarse grit on natural nails will cause splits and peeling. You’ll need a 180-grit or higher for shaping. Don’t saw back and forth; this creates heat and weakens the nail structure. File in one direction only.
Pushing too hard near the nail bed causes cuticle irritation and bleeding. Keep your movements gentle around this sensitive area.
You’ll often see beginners creating lopsided shapes by focusing on their dominant hand’s angle. Check symmetry constantly by comparing nails side by side. Finally, don’t skip the buffer—rough edges will catch and tear.
Choosing the Right Nail Length for Your Lifestyle
Getting the perfect almond shape means nothing if the length doesn’t work with your daily routine. You’ll need to consider your hands-on activities before committing to a specific nail length.
Here’s how different lengths match various lifestyles:
- Short almond (¼ inch past fingertip): Perfect if you’re typing constantly, handling childcare needs, or working in healthcare
- Medium almond (½ inch extension): Ideal for office jobs with moderate computer use and manageable work commute activities
- Long almond (¾ inch or more): Best for creative professionals, beauty industry workers, or those with minimal manual tasks
- Active-length almond (flush with fingertip): Optimal for athletes, musicians, or frequent drivers
Don’t choose length based on trends alone. If you’re constantly breaking nails during your work commute or struggling with diaper changes, it’s time to go shorter. Match your nail length to your reality, not your Instagram feed. You can always grow them out once your schedule allows.
Base Coat Application and Nail Strengthening Tips
Whether you’re working with natural nails or extensions, applying base coat correctly sets the foundation for long-lasting almond nail art. You’ll want to start with clean, dry nails and apply thin, even strokes from cuticle to tip. Don’t forget to cap the free edge—it’ll prevent chipping and peeling.
Your cuticle health directly impacts base coat adhesion. Push back cuticles gently and maintain a consistent oiling routine using jojoba or vitamin E oil twice daily. This keeps the nail bed moisturized and promotes stronger growth.
| Strengthening Method | Application Frequency | Results Timeline |
|---|---|---|
| Ridge-filling base | Every manicure | Immediate smoothing |
| Protein treatment | Weekly | 2-3 weeks |
| Biotin supplements | Daily | 6-8 weeks |
For weak nails, layer a strengthening base coat beneath your regular base. You’re building protection while creating the perfect canvas. Remember to let each layer dry completely—rushing this step compromises your entire manicure’s longevity.
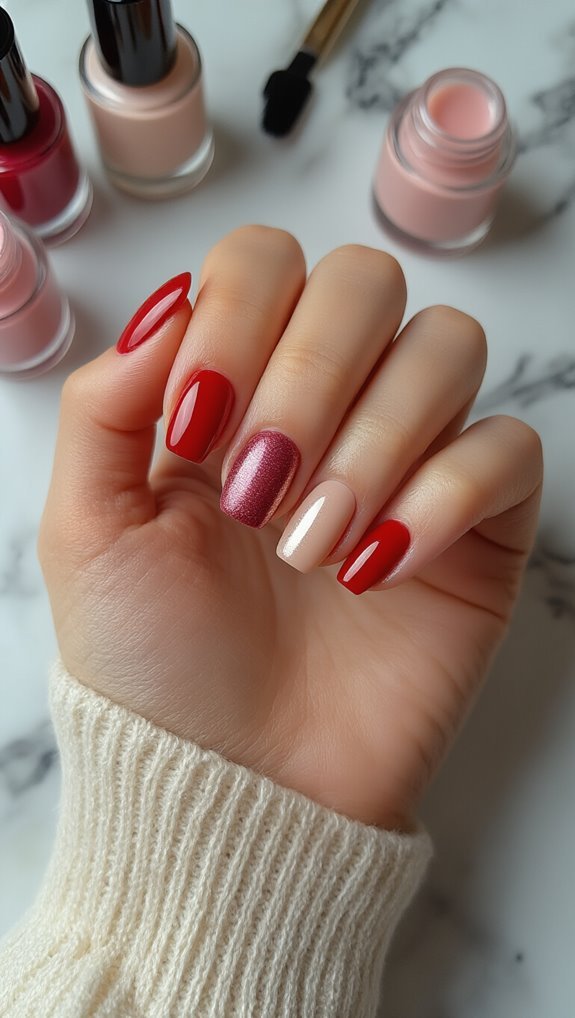
Popular Polish Colors and Finishes for Almond Nails
You’ve prepped your nails perfectly, and now it’s time to choose colors and finishes that complement your almond shape.
Nude and natural tones create an elegant, elongated look that enhances your nail’s tapered silhouette, while bold jewel colors make a striking statement against the feminine curve.
Chrome and metallic finishes add dimension and catch light beautifully on almond nails’ smooth surface.
Nude and Natural Tones
Most nail enthusiasts gravitate toward nude and natural tones for almond-shaped nails because these shades enhance the nail’s elegant silhouette without overwhelming it.
You’ll find these colors complement every skin tone while maintaining a sophisticated appearance that works for any occasion.
Here are the most flattering nude shades for almond nails:
- Soft taupe – Creates depth without looking harsh against your skin
- Muted peach – Adds warmth and makes hands appear more youthful
- Creamy beige – Elongates fingers and pairs perfectly with the almond shape
- Dusty rose – Offers subtle color while staying neutral
These versatile polishes serve as excellent bases for nail art or stand beautifully alone.
You can’t go wrong choosing natural tones that match your undertones—cool, warm, or neutral.
Bold Jewel Colors
While natural tones offer understated elegance, bold jewel colors transform almond nails into striking statement pieces that command attention. You’ll find that deep emerald greens, rich sapphire blues, and vibrant ruby reds complement the elongated almond shape perfectly. These intense hues create stunning gemstone gradients when you blend two or three shades together.
| Jewel Tone | Best Finish | Accent Options |
|---|---|---|
| Emerald | Matte shimmer | Gold foil tips |
| Sapphire | High gloss | Silver striping |
| Ruby | Satin | Black outline |
| Amethyst | Chrome | White dots |
Apply thin coats to prevent pooling at the nail’s tapered tip. You can enhance jewel tones by adding a matte shimmer topcoat that catches light without overwhelming the color’s richness. These bold shades work best on medium to long almond lengths.
Chrome and Metallic Finishes
Chrome and metallic finishes consistently rank among the top choices for almond nails, offering a futuristic edge that amplifies the shape’s natural elegance. You’ll achieve the most striking results by applying these finishes over a dark base coat, which intensifies their reflective properties.
Transform your almond nails with these metallic techniques:
- Rose gold chrome – Creates warmth against all skin tones
- Mirror gradients – Blend chrome from tip to base for dimension
- Silver foil accents – Add texture to accent nails only
- Holographic overlays – Layer over metallics for rainbow shifts
Apply chrome powder with a silicone tool using gentle circular motions. You’ll need to seal with a no-wipe top coat immediately to prevent oxidation. The elongated almond shape catches light beautifully, making metallics appear even more luminous.
Simple Nail Art Designs Perfect for Beginners
Starting out with almond nail art doesn’t have to feel overwhelming when you focus on mastering a few basic designs first. You’ll find that almond-shaped nails provide the perfect canvas for experimenting with negative space techniques and minimalist gems. These beginner-friendly styles require minimal tools while delivering maximum impact.
| Design Type | Tools Needed | Difficulty |
|---|---|---|
| Dot Pattern | Dotting tool, polish | Easy |
| Simple Stripes | Tape, brush | Easy |
| Half-Moon | Stickers, base coat | Medium |
| Accent Nail | Gems, top coat | Easy |
| French Tip | Guide strips, polish | Medium |
Begin with single accent nails featuring three minimalist gems at the base. Try negative space designs by painting only the tips or creating geometric cutouts with tape. You can’t go wrong with classic dots using a bobby pin or toothpick. These foundational techniques build your confidence and steady hand control before tackling complex patterns.
Maintenance and Touch-Up Schedule for Long-Lasting Results
Once you’ve mastered beginner-friendly designs, you’ll need to protect your investment with proper maintenance.
Your daily care routine, weekly touch-ups, and knowing when to remove your nail art will determine whether your almond nails stay pristine for days or weeks.
Let’s establish a practical schedule that’ll keep your manicure looking fresh without constant trips to the salon.
Daily Care Routine
You’ll typically need to dedicate just 5-10 minutes each day to maintain your almond nail art’s pristine appearance. This small investment protects your manicure and extends its lifespan significantly.
Your essential daily care steps:
- Apply cuticle oil twice – Morning application hydrates, while evening treatment repairs
- Perform a 30-second cuticle massage – Boost circulation and promote healthy nail growth
- Use overnight serum – Let potent ingredients work while you sleep for maximum strengthening
- Wear gloves for wet tasks – Shield your art from water damage and harsh chemicals
Don’t skip moisturizing your hands after each water exposure. You’re preventing chips and maintaining flexibility when you stay consistent.
Quick inspections during your routine help you catch minor issues before they become major problems requiring professional fixes.
Weekly Touch Up Tips
Beyond daily maintenance, setting aside 20-30 minutes weekly for touch-ups ensures your almond nail art stays flawless between salon visits. You’ll prevent minor chips from becoming major problems while keeping your manicure looking professionally done.
Start with a buffer refresh to smooth any rough edges that’ve developed. Apply cuticle oil generously, massaging it into the nail bed and surrounding skin. Check for lifting at the tips and repair immediately with nail glue.
| Task | Time Required |
|---|---|
| Buffer refresh edges | 5 minutes |
| Cuticle oil treatment | 8 minutes |
| Top coat reapplication | 7 minutes |
| Minor chip repair | 10 minutes |
Don’t forget to clean under your nails and remove any polish buildup around the edges. This weekly routine extends your manicure’s life by at least another week.
When to Remove
While your almond nail art might still look decent after three weeks, knowing when to remove it prevents damage to your natural nails and maintains their health.
You’ll protect your nail beds and avoid painful breaks by recognizing these signs:
- Visible growth gaps – When you see more than 3mm of space at your cuticle line
- Lifting edges – If polish starts peeling at the tips or sides
- Chipping patterns – Multiple chips affect your nail’s structural integrity
- Color fading – Significant discoloration indicates weakened polish bonds
Plan your salon timing around the two-week mark for gel polish and three weeks for acrylics.
Consider seasonal removal before major holidays when appointments book quickly.
You’ll maintain healthier nails by removing polish before it forces itself off.
Troubleshooting Guide for Broken or Uneven Almond Nails
When your almond nails break or develop uneven edges, don’t panic—these common issues have straightforward fixes that’ll restore your manicure’s elegant shape.
For split tips, file in one direction using a 180-grit file, starting from the outer edge toward the center. Apply nail glue to deep cracks, let it dry, then reshape the tip into its original almond curve.
To fix shape symmetry problems, compare both hands side by side under good lighting. You’ll spot uneven lengths and inconsistent curves more easily. File the longer nails to match your shortest one, maintaining the almond’s signature tapered sides. If one nail’s too wide, file the sides at a steeper angle to create balance.
For severe breaks below the free edge, cut all nails to match the damaged one’s length. It’s better to have shorter, uniform almonds than mismatched lengths. Apply strengthening base coat daily while they grow back.
Frequently Asked Questions
Can I Transition From Square or Round Nails to Almond Shape Immediately?
You shouldn’t transition immediately to almond shape from square or round nails. Instead, you’ll need gradual filing over several weeks to avoid weakening your nails.
Start with proper cuticle care and focus on strength building between filing sessions. You’ll achieve the best results by slowly tapering the sides while maintaining consistent shape maintenance.
This patient approach prevents breakage and ensures your nails stay healthy throughout the transformation process.
How Much Do Professional Almond Nail Services Typically Cost?
You’ll typically pay $30-80 for professional almond nail services, though pricing tiers vary significantly.
Basic shaping and polish costs less, while gel or acrylic extensions with art can reach $100+.
Regional variation plays a huge role – you’re looking at higher prices in major cities versus suburban areas.
Upscale salons charge premium rates, while neighborhood shops offer budget-friendly options.
Don’t forget to factor in tips and maintenance appointments every 2-3 weeks.
Are Almond Nails Suitable for People Who Type Frequently?
You’ll find almond nails work well for frequent typing if you keep them at a moderate length.
The tapered shape offers better keyboard compatibility than square or coffin styles since the narrower tips fit between keys more easily.
For optimal typing comfort, you’d want to maintain them slightly shorter than typical salon length.
Many office workers prefer almond shapes because they’re less likely to catch on keys while maintaining an elegant appearance.
Will Almond-Shaped Nails Make My Fingers Look Longer or Shorter?
Almond-shaped nails will make your fingers look longer and more slender.
The elongated silhouette creates an optical illusion that extends your finger length, while the tapered elegance draws the eye upward toward your fingertips.
You’ll notice this flattering effect works especially well if you’ve got shorter or wider fingers, as the gentle curves and pointed tip naturally slim and lengthen your hands’ appearance.
They’re universally flattering for most hand shapes.
Can Children or Teenagers Safely Wear Almond-Shaped Nails?
You’ll want to consider age guidelines before letting children wear almond-shaped nails.
They’re generally not child friendly for kids under 13 since the pointed tips can scratch or poke.
If you’re allowing teens to try them, ensure parental supervision during application and keep the length moderate.
Follow safety tips like filing edges smooth, avoiding extremely sharp points, and checking that nails don’t interfere with daily activities or sports participation.
Conclusion
You’ve now mastered the basics of creating stunning almond nails at home. With the right tools, proper filing technique, and regular maintenance, you’ll keep your nails looking salon-perfect. Don’t get discouraged if your first attempts aren’t flawless—you’ll improve with practice. Start with simple designs and gradually work toward more complex art. Remember to file gently, choose flattering lengths, and fix breaks immediately. Your elegant almond nails will soon become your signature style.