You’ll create amazing nail art using simple household items like toothpicks for polka dots, scotch tape for perfect stripes, and cotton swabs for cute flowers. Start with child-safe, water-based polish and a clear base coat, then apply thin layers to prevent smudging. Try easy designs like rainbow gradients with makeup sponges or adorable animal faces with basic dots and lines. Quick-dry drops and ice water tricks keep your art smudge-free while proper prep ensures your designs last longer.
Key Takeaways
- Start with water-based, child-safe polishes without formaldehyde or toluene, plus basic tools like dotting tools, tape, and cotton swabs.
- Prepare nails by washing hands, trimming nails safely, gently pushing back cuticles, and applying a clear base coat first.
- Create simple polka dots using toothpicks dipped in polish, working from pinky to thumb to avoid smudging wet designs.
- Make easy stripes by applying tape to dry base color, painting over it, then peeling tape while polish is slightly wet.
- Try beginner-friendly animal faces using pastel base colors, adding dot eyes and triangle noses with toothpicks or markers.
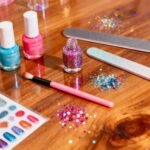
Essential Nail Art Supplies and Tools for Beginners
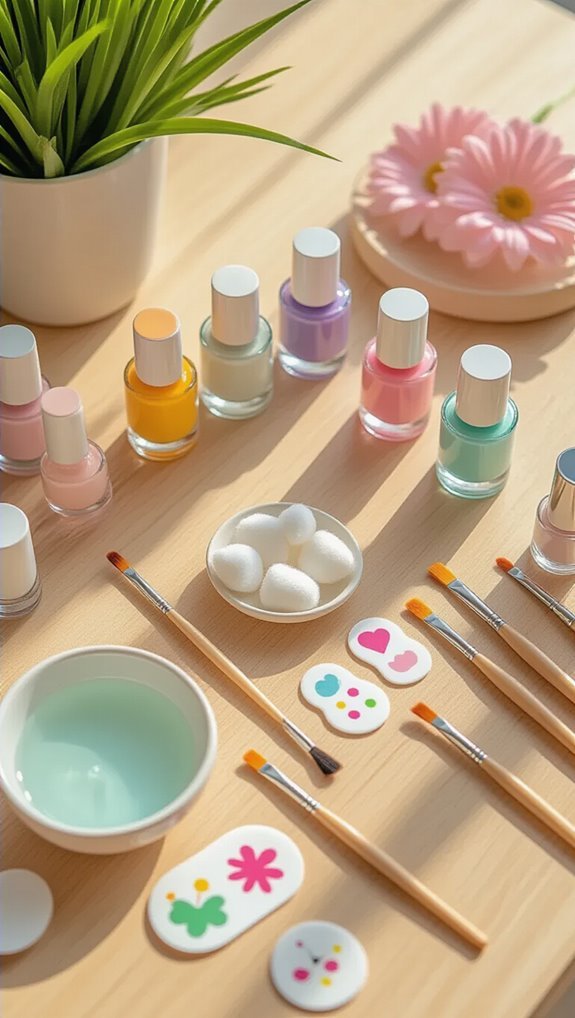
Starting with the right supplies makes nail art both easier and safer for young artists. You’ll need water-based, child safe polishes that don’t contain harsh chemicals like formaldehyde or toluene. These polishes peel off easily without requiring acetone removers.
Your basic toolkit should include dotting tools or bobby pins for creating circles, striping tape for clean lines, and small sponges for gradient effects. Cotton swabs help fix mistakes quickly. A clear base coat protects nails, while a top coat seals your designs.
Keep nail stickers and gems on hand for instant decoration when you’re short on time. Small paintbrushes work well for detailed designs, though toothpicks make excellent budget-friendly alternatives.
Store everything in a designated container to prevent spills. Always work on a protected surface using paper towels or a plastic mat. With parental supervision during your first projects, you’ll learn proper techniques while staying safe. Good ventilation remains important even with non-toxic products.
Preparing Your Nails for Art and Design
Now that you’ve gathered your supplies, you’ll need to prepare your nails properly before creating any designs. Start by washing your hands thoroughly with soap and warm water to maintain good nail hygiene. This removes dirt, oils, and bacteria that could interfere with your nail art.
Next, trim your nails to a comfortable length using child-safe nail clippers. File the edges gently with an emery board, moving in one direction to prevent splitting. Don’t file back and forth, as this weakens your nails.
For basic cuticle care, apply a drop of cuticle oil or hand lotion around each nail. Push back your cuticles gently with an orange stick or your towel after bathing. Never cut your cuticles—they protect your nails from germs.
Finally, wipe each nail with polish remover on a cotton ball to remove any remaining oils. This creates a clean surface that helps your base coat stick better.
Basic Polka Dot Design Using a Toothpick
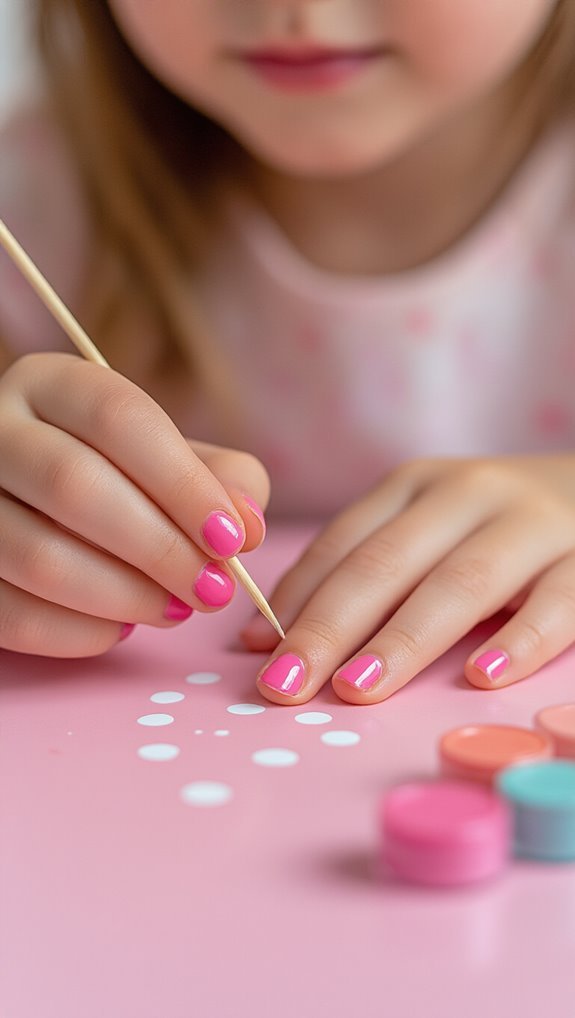
You’ll transform plain nails into adorable polka dot masterpieces with just a toothpick and a few bottles of polish.
First, you’ll gather your materials and learn the simple technique for making perfectly round dots every time.
Then you’ll experiment with exciting color combinations that’ll make your friends say “wow!”
Materials You Need
Before you begin creating your polka dot masterpiece, you’ll need to gather a few simple supplies that are probably already in your home.
You’ll want two or three bottles of child friendly nail polish in contrasting colors – one for your base coat and others for the dots.
Choose washable options like water-based polishes that won’t stain surfaces if you accidentally spill.
Grab a few toothpicks for dotting, paper towels for cleanup, and a small cup of water for rinsing.
You’ll also need nail polish remover and cotton balls for fixing mistakes.
Set up your workspace with newspaper or a plastic placemat for protection.
Keep everything in a small box for storage organization between nail art sessions.
This way, you’re always ready to create.
Creating Perfect Dots
With your supplies ready, the fun of making polka dots begins with applying your base coat color. Let it dry completely before starting your dots. Pour a small amount of your dot color onto paper. Dip your toothpick’s tip into the polish and gently press it onto your nail. You’ll create perfectly round dots every time.
Consider color theory when choosing combinations. Pink dots on white look sweet, while yellow dots on blue create bold contrast. Keep dot spacing consistent by imagining invisible grid lines on your nail. Place dots about one dot-width apart for the best look.
Work from your pinky to your thumb to avoid smudging. If you make a mistake, don’t worry. Use a cotton swab dipped in remover to fix it before the polish dries.
Fun Color Combinations
Sometimes the most eye-catching nail art comes from unexpected color pairings that make your polka dots pop. You’ll love experimenting with neon combos like hot pink dots on lime green bases or electric blue dots over bright orange polish. These bold choices instantly grab attention and show off your creative side.
For a softer look, try pastel pairings that create dreamy effects. Light purple dots on baby blue nails or mint green dots over pale yellow bases give you that sweet, candy-inspired style. You can’t go wrong mixing soft pink with lavender or combining peach with light turquoise.
Don’t forget classic combinations that always work: white dots on any dark color, gold dots on burgundy, or silver dots on navy blue. Mix and match until you find your favorite combination.
Creating Perfect Stripes With Scotch Tape
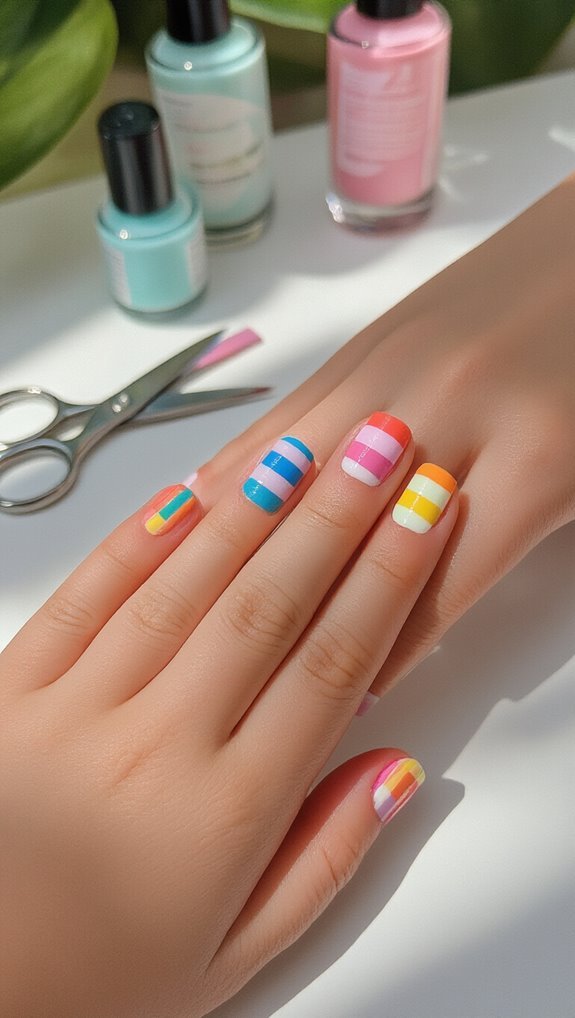
Among all the nail art tricks you’ll learn, using scotch tape to create stripes is one of the easiest and most fun techniques. You’ll need regular scotch tape, scissors, and at least two nail polish colors to master these striped tutorials.
Start by painting your nails with a base color and let them dry completely. This step’s crucial—wet polish will peel off with the tape. Cut small strips of tape and place them on your nails in any pattern you’d like. Press down the edges firmly to prevent polish from seeping underneath.
Apply your second color over the tape, using quick, confident strokes. Don’t wait—peel off the tape while the polish is still slightly wet for the cleanest lines. You’ll see perfect stripes appear like magic!
These tape techniques work for diagonal stripes, chevron patterns, or geometric designs. Practice on paper first if you’re nervous about trying it directly on your nails.
Simple Flower Patterns With Cotton Swabs
Now you’ll create adorable flower patterns using cotton swabs as your painting tool. You’ll need cotton swabs, nail polish in your favorite flower colors, and a toothpick for adding tiny details like centers or leaves.
The cotton swab’s rounded tip makes perfect petal shapes when you gently dab it onto your nail in a circular pattern.
Materials You Need
Before you start creating adorable flower nail art with cotton swabs, you’ll need to gather a few basic supplies that you probably already have at home. Choose child friendly polishes in bright colors that’ll make your flowers pop. You’ll want at least three shades for variety.
| Essential Items | Optional Extras |
|---|---|
| Cotton swabs | Glitter topcoat |
| Paper towels | Nail stickers |
| Small dish for dots | Toothpicks |
Pour a small amount of polish onto a paper plate for easy dipping. Keep nail polish remover nearby for quick fixes. Set up your workspace with newspaper or plastic covering to protect surfaces. Remember, you’ll need parental supervision when handling nail polish and remover. Having everything organized before starting makes the process smoother and more fun.
Creating Petal Shapes
With your supplies ready, you’ll start making beautiful flower petals using the cotton swab technique. Dip your cotton swab into nail polish and gently press it onto your nail at an angle. This creates a teardrop shape that becomes your first petal. Rotate your nail slightly and repeat four more times around an imaginary center point.
For watercolor petals, use diluted polish or mix two colors while they’re still wet. This creates a soft, dreamy effect that’s perfect for spring designs. You can also try ombre petals by using two shades of the same color. Start with the darker shade at the petal’s base and blend toward the lighter shade at the tip. Add a small dot of contrasting polish in the center to complete your flower.
Rainbow Gradient Nails Made Easy
Creating rainbow gradient nails often becomes the highlight of any nail art session, and you’ll find this technique surprisingly simple to master.
You’ll need a makeup sponge, white base polish, and your favorite rainbow colors.
Start by painting your nails white and letting them dry completely.
Here’s what makes gradient nails special:
- They blend multiple colors seamlessly
- You can create pastel ombre effects with lighter shades
- The sponging technique works for watercolor swirls too
- Each nail becomes a tiny canvas for color transitions
Apply strips of polish directly onto your sponge in rainbow order.
Dab the sponge gently onto your nail, rolling slightly to blend colors.
You’ll see the gradient form instantly.
Repeat the dabbing until you achieve your desired intensity.
Don’t worry about polish on your skin—you’ll clean that up with a cotton swab dipped in remover.
Seal everything with a clear topcoat for shine and durability.
Glitter and Sparkle Application Techniques
Glitter transforms ordinary nail art into something magical, and you’ll discover countless ways to add sparkle to your designs.
Start with a clear base coat, then apply your chosen nail polish color. While it’s still wet, sprinkle loose glitter directly onto the nail or use a small brush to place it precisely where you want sparkle accents.
For glitter layering, apply thin coats rather than one thick layer. Dip a foam eyeshadow applicator into loose glitter and gently press it onto tacky polish. You’ll get better coverage this way. Mix fine and chunky glitters for dimension, starting with the finest particles first.
Create gradient effects by concentrating glitter at the tips and fading toward the cuticle. Use a toothpick to arrange individual glitter pieces into shapes like hearts or stars.
Always seal your design with two coats of clear topcoat to prevent glitter from catching and peeling off.
Fun Animal Face Designs for Each Finger
Now you’re ready to transform your nails into a mini zoo with adorable animal faces!
You’ll start by creating cute cat faces with tiny whiskers and triangle ears on your thumbs and index fingers.
Then you can add puppy paw prints with small dots and pad shapes on your remaining fingers for a playful mix of furry friends.
Cute Cat Faces
Who doesn’t love adorable cat faces peeking out from their fingertips? You’ll create the cutest feline friends with just a few simple steps. Start with a light base coat in pink or white, then add pastel ears at the top corners of each nail using a small brush or toothpick.
Here’s what you’ll need to complete your design:
- Black nail polish or marker for kawaii whiskers
- Pink polish for tiny triangle noses
- White and black for sparkly eyes
- Clear top coat to seal everything
Draw two dots for eyes, then add a small upside-down triangle for the nose. Create three kawaii whiskers on each side by making gentle curved lines. You can customize each cat’s expression by changing the eye shapes or adding little mouths.
Puppy Paw Prints
After mastering those adorable cat faces, you’re ready to create playful puppy paw prints that’ll make your nails look absolutely precious.
Start with a light brown or tan base coat on each nail. Once it’s completely dry, you’ll add the paw print design.
Use puppy paw decals for the easiest application – simply peel and stick them onto your painted nails.
If you prefer painting freehand, grab paw print stencils to guide your brush.
Dip a small dotting tool in black polish to create one large pad and four tiny toe pads above it.
Space them evenly across your nail.
Add different colored backgrounds on each finger for variety.
Seal everything with a clear topcoat to protect your puppy-themed masterpiece.
You’ll love showing off these cute designs to friends.
Quick-Dry Tips and Smudge Prevention Tricks
When you’ve spent time creating beautiful nail art, the last thing you want is smudged polish ruining your hard work. You’ll need smart strategies to protect your masterpiece while it dries completely.
Here are proven methods to speed up drying time:
- Use fast sprays – Apply quick-dry drops or sprays 60 seconds after painting
- Try the ice water trick – Dip fingertips in cold water for 30 seconds
- Apply thin coats – Multiple thin layers dry faster than one thick layer
- Use fingertip shields – Protect wet nails with silicone guards while doing activities
Don’t touch anything for at least five minutes after painting.
If you’re impatient, blow cool air from a fan instead of using your breath, which adds moisture and slows drying.
Test if polish is dry by gently tapping two nails together.
If they stick, wait longer.
Setting a timer helps you resist the urge to check too soon.
Safe Removal Methods and Nail Care After Art
Taking off nail art requires gentle techniques to avoid damaging your nails and surrounding skin. Start by soaking cotton balls in gentle acetone free polish remover. Place one on each nail and wrap your fingertips with aluminum foil for five minutes. This softens the polish without harsh scrubbing. Gently push off the loosened polish with an orange stick, working from your cuticle to the tip.
After removal, you’ll notice your nails might look dry or slightly stained. Wash your hands thoroughly with soap and warm water. Apply cuticle moisturizing oil around each nail bed, massaging it in circular motions. This restores hydration that removal products strip away. Buff your nails lightly to smooth any rough spots, then apply a strengthening base coat to protect them. Give your nails a two-day break between art sessions to prevent weakness and peeling.
Frequently Asked Questions
How Long Should Nail Art Last on a 9-Year-Old’s Nails?
You’ll find the average weartime for nail art on a 9-year-old’s nails is typically 3-5 days.
Your child’s active lifestyle means designs won’t last as long as adults’.
You’ll notice seasonal variations affect durability – summer swimming and outdoor play shorten wear, while winter’s indoor activities help designs last longer.
If you’re using quality kid-safe polish and proper base coat, you might stretch it to a full week.
Can Nail Art Be Done on Short or Bitten Nails?
Yes, you can definitely create nail art on short nails and even bitten nails!
You’ll find that nail stickers work perfectly on shorter surfaces since they don’t require much space. Try using polish alternatives like water-based formulas that are gentler on damaged nails.
Focus on simple designs like dots or single accent nails.
You can also apply strengthening base coats to help bitten nails grow while still enjoying creative designs.
What if My Child Is Allergic to Regular Nail Polish?
If your child’s allergic to regular nail polish, you’ll find great hypoallergenic polishes specifically made for sensitive skin.
Water-based formulas don’t contain harsh chemicals that trigger reactions.
You can also try natural alternatives like henna designs or washable markers for temporary nail art.
Look for brands labeled “5-free” or “7-free” that skip common allergens.
Always test new products on one nail first and wait 24 hours before doing all nails.
How Much Should I Budget for Starter Nail Art Supplies?
You’ll typically need $20-40 for a basic starter kit. Your budget range depends on quality preferences, but here’s an essential supply checklist: 3-5 kid-safe polishes ($10-15), dotting tools ($3-5), striping tape ($2-3), small stickers ($3-5), and a top coat ($3-5).
You can find affordable sets at drugstores or online. Start small and add supplies as your child’s interest grows. Don’t forget nail polish remover and cotton pads too.
Is Nail Art Appropriate for School or Special Occasions Only?
You can wear nail art for both school and special occasions! Simple designs work perfectly for casual everyday wear at school – think single accent nails, polka dots, or subtle glitter.
Save elaborate designs for themed events like birthday parties, holidays, or weekends. Check your school’s dress code first, as some have specific rules about nail polish.
Start with neutral colors and small designs for school, then experiment freely during special occasions.
Conclusion
You’ve learned all the basics to create amazing nail art at home! With your new skills in polka dots, stripes, flowers, and animal faces, you’re ready to experiment and develop your own unique designs. Remember to always let each layer dry completely and protect your work with a clear topcoat. Don’t worry if your first attempts aren’t perfect – you’ll get better with practice. Now grab your supplies and start creating your masterpiece!