You’ll create stunning leafy nail art with just a few basic supplies: thin detail brushes, dotting tools, and green polishes ranging from sage to emerald. Start with simple fern fronds by painting curved stems and adding diagonal strokes, or try beginner-friendly palm leaves with quick feathery strokes. Mix monstera and eucalyptus patterns across different nails for variety, add gold accents for elegance, and seal everything with topcoat. Master these techniques to transform plain nails into botanical masterpieces.
Key Takeaways
- Start with simple palm leaves using thin curved strokes from cuticle to tip, adding quick feathery strokes outward for natural-looking fronds.
- Use three green shades (light, medium, dark) to create realistic depth and dimension in your leaf designs.
- Practice fern fronds by drawing a curved stem line, then adding small diagonal strokes on both sides.
- Fix mistakes easily by cleaning bleeding edges with acetone-dipped brush and redrawing outlines.
- Begin with lighter green backgrounds and add darker green details for maximum contrast and easier technique mastery.
Essential Tools and Supplies for Leafy Nail Art
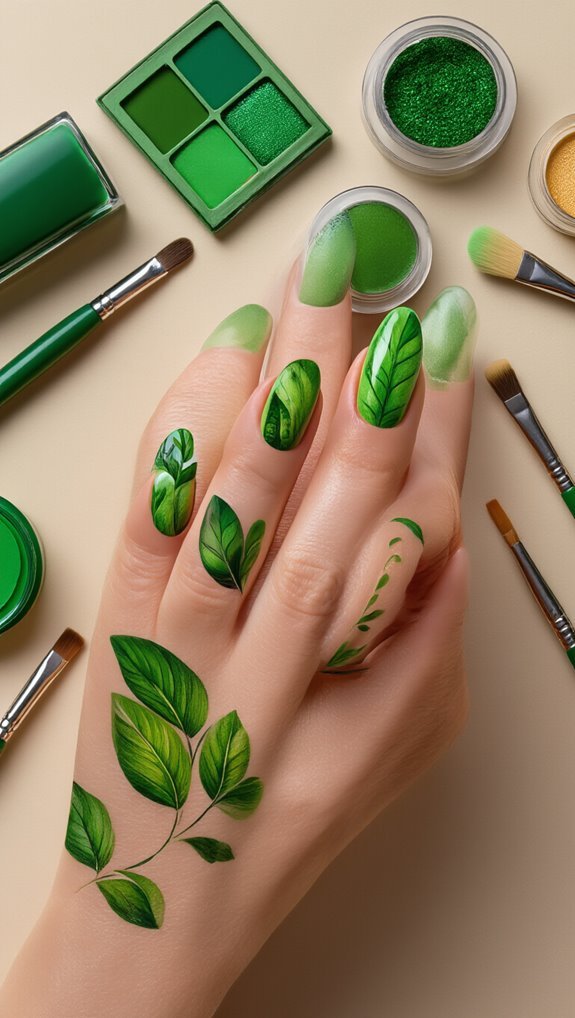
What’s the secret to creating stunning leafy nail art that looks professionally done? You’ll need the right tools to achieve those delicate botanical details. Start with fine-tipped brushes in various sizes—a liner brush for stems, a detail brush for veins, and a flat brush for broader leaf shapes. You’ll also require quality green polishes in multiple shades, from deep forest to bright lime.
Don’t forget dotting tools for creating texture and a thin striping brush for precise lines. Consider investing in sustainable tools like bamboo-handled brushes and glass mixing palettes instead of disposable options. They’re eco-friendly and last longer.
For your workspace, implement smart storage solutions to keep everything organized. Use magnetic strips for metal tools, compartmentalized boxes for polishes, and brush holders to protect delicate bristles. A well-organized station means you’ll spend less time searching and more time creating. Keep acetone, cotton swabs, and cleanup brushes within reach for quick corrections.
Best Green Polish Shades for Botanical Designs
Now that you’ve assembled your tools, selecting the perfect green polish shades will bring your botanical designs to life. You’ll want to build a collection that mimics nature’s diverse palette. Start with deep forest greens for creating dramatic leaf bases and shadows. These rich hues provide excellent contrast against lighter skin tones and nude base coats.
Add vibrant lime and kelly greens to capture fresh spring foliage. They’re ideal for accent leaves and highlighting details. Don’t overlook olive tones—they’re essential for achieving realistic, mature leaf effects and work beautifully for autumn-inspired designs.
Sage accents offer sophistication to your botanical arsenal. This muted green creates subtle depth when layered beneath brighter shades or stands alone for minimalist leaf art. Consider mint and seafoam greens for tropical themes. Mix metallic emerald polishes into your collection for special occasions. You’ll find that having five to seven green variations gives you enough flexibility to create dimensional, professional-looking leafy designs.
Simple Fern Frond Pattern Tutorial
You’ll create elegant fern fronds on your nails with just a few basic tools and simple brushstrokes.
This tutorial breaks down the pattern into easy steps that even beginners can master, starting with the main stem and adding delicate leaflets.
You can customize your design with various green shades or add metallic accents for extra dimension.
Tools You’ll Need
Before you begin creating your fern frond nail art, you’ll want to gather a few essential tools that’ll make the design process smooth and enjoyable.
You’ll need a base coat, sustainable polish in two shades of green (one light, one dark), and a clear topcoat for sealing your design.
A thin detail brush or striping brush is crucial for painting delicate frond lines that define these minimalist motifs.
Don’t forget a dotting tool or toothpick for creating tiny leaf details along each frond stem.
You’ll also need nail polish remover and cotton swabs for quick cleanup around your cuticles.
Keep a small dish of water nearby to thin your polish if needed, ensuring smooth application when drawing fine botanical lines.
Step By Step Guide
After gathering your tools, start by applying a thin base coat to clean, dry nails and let it dry completely.
Next, you’ll paint two coats of your chosen green shade, considering color psychology—lighter greens evoke freshness while deeper tones suggest sophistication.
Once dry, dip your thin brush into darker green polish. Starting from the base of your nail, draw a curved stem line reaching toward the tip. Add small diagonal strokes on both sides of the stem, creating the fern’s delicate fronds. Work quickly but steadily—you don’t need perfection.
This botanical design aligns with current seasonal trends, especially for spring and summer collections. Seal your artwork with a glossy topcoat, capping the free edge to prevent chipping.
You’ve now mastered an elegant fern pattern.
Color Combination Ideas
Now that your fern technique is ready, selecting the right color combinations will transform this simple pattern into striking nail art.
You’ll find that pairing deep forest green with soft mint gradients creates an ethereal, dimensional effect that mimics real foliage.
Try applying mint as your base, then layer darker greens for the fronds to achieve natural depth.
For autumn-inspired looks, incorporate olive accents alongside burnt orange or gold backgrounds.
These warm tones make your fern patterns pop while maintaining botanical authenticity.
You can also experiment with monochromatic schemes using three green shades from light to dark.
Don’t overlook unexpected pairings like emerald fronds on nude bases or sage patterns against black polish.
These contrasts ensure your leafy designs stand out whether you’re attending casual gatherings or formal events.
Creating Tropical Monstera Leaves on Your Nails
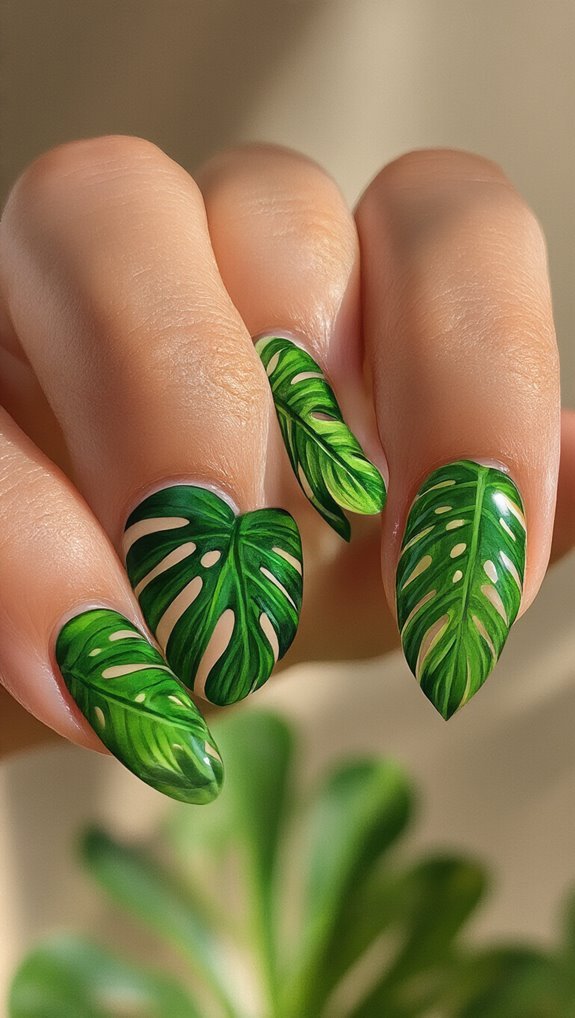
You’ll need a thin nail art brush, dotting tool, and steady hand to transform your nails into miniature monstera masterpieces.
Start by painting the distinctive split-leaf shape with dark green polish, then add lighter green highlights to create depth and those iconic fenestrations.
Mix sage, emerald, and mint greens for a realistic tropical effect that’ll make your manicure pop.
Essential Tools Needed
Before diving into the creative process of painting monstera leaves, you’ll need to gather the right tools for this tropical nail art design.
You’ll want a thin detail brush for creating delicate leaf veins and a flat brush for filling in larger areas. Choose sustainable polishes in various shades of green – from deep emerald to bright lime – to achieve realistic plant inspired textures.
Don’t forget a dotting tool for adding dewdrops and a clean-up brush with acetone for precise edges.
You’ll also need a quality base coat and top coat to protect your design.
A small piece of makeup sponge helps create gradient effects between different green tones.
Keep a toothpick handy for fixing minor mistakes and creating fine details in the leaf splits.
Step-by-Step Painting Technique
Start with a clean, dry base coat and apply your chosen background color—a soft sage or cream works beautifully.
You’ll create stunning monstera leaves using simple brush strokes and layering textures for depth.
- Paint the base leaf shape – Use dark green polish to draw elongated ovals, leaving negative space between each leaf
- Add split details – Drag a thin brush from the leaf’s edge toward the center, creating characteristic monstera cuts
- Highlight with lighter green – Apply subtle strokes along one side of each leaf for dimension
Don’t overwork the design—monstera’s beauty lies in its organic imperfections.
The negative space you’ve preserved makes each leaf pop against your base color.
Seal everything with a glossy top coat to enhance the tropical vibrancy.
Color Combination Ideas
The right color palette transforms your monstera nail art from simple leaves into a statement piece that captures the essence of tropical foliage. You’ll create depth by layering emerald and forest green over a sage base, allowing each shade to peek through the signature monstera holes.
Try ombre gradients that transition from dark hunter green at the tips to mint near your cuticles. This technique mimics how natural light filters through real leaves.
For bold looks, incorporate neon contrasts by adding lime or chartreuse highlights along the leaf veins against deep green backgrounds.
Don’t forget complementary colors. Pair your green monstera with coral, pink, or gold accents on adjacent nails. You can also experiment with teal-to-green transitions or add white negative space between leaves for a modern, airy feel.
Easy Palm Leaf Design for Beginners
You’ll often find that palm leaf designs look incredibly complex, but they’re actually one of the most forgiving nail art patterns for beginners to master. The key lies in understanding that palm fronds naturally have an organic, imperfect flow that works in your favor.
Start with these simple steps to create stunning tropical silhouettes:
- Base stroke: Draw a thin curved line from your cuticle to the nail tip using a fine brush
- Add fronds: Paint quick, feathery strokes angling outward from both sides of your center line
- Create depth: Leave negative space between some fronds for a more realistic, airy appearance
You don’t need perfect symmetry—uneven strokes actually enhance the natural look. For best results, use a darker green polish against a lighter base or nude background. The contrast makes your palm leaves pop while hiding minor mistakes.
Practice on paper first if you’re nervous, but remember that real palm leaves aren’t uniform either.
Delicate Eucalyptus Branch Nail Art Technique
After mastering palm leaves, eucalyptus branches offer another botanical design that’s surprisingly achievable with the right technique. You’ll need a thin liner brush, sage green polish, and a darker forest green for depth.
Start by painting thin, curved stems diagonally across your nail. Don’t make them perfectly straight—natural branches have gentle bends. Add pairs of miniature eucalyptus leaves along each stem using small, teardrop-shaped strokes. Work from the base upward, making leaves progressively smaller toward the tips.
Layer your colors for dimension. Apply lighter green leaves first, then add darker ones sporadically for contrast. You can create depth by slightly overlapping some leaves while spacing others apart.
Beyond aesthetics, eucalyptus symbolism represents healing and protection, making this design meaningful as well as beautiful. For extra detail, dot tiny white highlights on select leaves to mimic natural light reflection. Seal everything with a glossy topcoat to enhance the botanical effect.
Adding Gold Accents to Your Leafy Designs
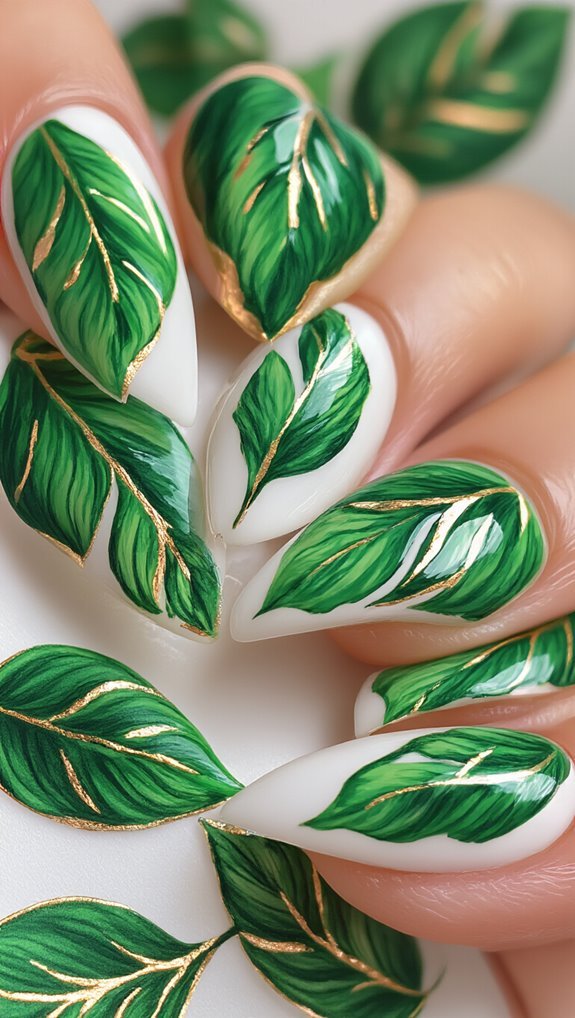
You’ll transform your leafy nail designs from simple to stunning by incorporating metallic touches that catch the light. Master three essential gold techniques: applying delicate gold leaf fragments for dimensional texture, painting thin metallic lines to define leaf veins, and creating shimmer borders that frame your botanical art.
These luxe additions won’t just complement your green base—they’ll make your manicure look professionally crafted.
Gold Leaf Application Techniques
Transform your green nail art with the luxurious touch of gold leaf, creating stunning botanical designs that catch light with every movement. You’ll master professional application methods by understanding proper adhesive selection and transfer techniques.
Apply these gold leaf steps:
- Prep with adhesive – Brush special nail adhesive where you want gold accents, letting it become tacky for 30 seconds
- Transfer delicately – Press gold leaf sheets gently using tweezers or a silicone tool, avoiding direct finger contact
- Seal perfectly – Remove excess with a soft brush, then apply topcoat carefully around edges
Choose water-based adhesives for beginners or quick-dry formulas for advanced control. You’ll achieve crisp lines by cutting leaf sheets before application. Practice placement on paper first to perfect your botanical vision.
Metallic Vein Details
Gold leaf creates beautiful backgrounds, but metallic vein details bring your leafy designs to life with precise, delicate linework that mimics nature’s intricate patterns. You’ll achieve stunning vein texture using thin brushes and metallic polishes.
| Tool | Best For |
|---|---|
| Liner brush | Fine central veins |
| Dotting tool | Branching patterns |
| Striping tape | Straight guidelines |
| Detail brush | Metallic gradient effects |
Start with your leaf’s center vein, then add smaller branches extending outward. You’re creating depth by varying pressure—press harder at the base, lighter toward tips. Mix gold with copper polish for a natural metallic gradient that transitions beautifully. Don’t overwork the design; leaves aren’t perfect. Apply your metallic details when the base color’s tacky but not wet. This technique ensures crisp lines that won’t bleed or smudge.
Shimmer Border Methods
While metallic veins add interior detail, shimmer borders frame your leafy designs with eye-catching golden edges that define and elevate each element. You’ll create professional-looking accents that transform simple leaves into luxurious nail art.
Apply these shimmer border techniques:
- Glitter gradients: Brush fine gold glitter from leaf edges inward, creating a fade effect that mimics natural light reflection
- Iridescent foil strips: Press thin foil pieces along leaf perimeters for instant metallic definition
- Dual-tone edging: Layer copper shimmer over gold bases for dimensional, sunset-inspired borders
Start with a tacky base coat around your leaf outlines. You’re building thin layers, so don’t overload your brush. Seal everything with quick-dry topcoat to prevent chipping.
These borders catch light beautifully, making your green designs pop against any skin tone.
Mixing Different Leaf Patterns on One Hand
Beyond the simplicity of single-leaf designs, you’ll discover endless creative possibilities when combining different leaf patterns across your nails. Start by selecting three to four complementary leaf styles—perhaps ferns, monstera, and eucalyptus shapes. You’ll create visual interest through asymmetrical spacing, placing larger leaves on your thumb and middle finger while reserving delicate patterns for smaller nails.
Mix realistic botanical prints with abstract interpretations for dynamic contrast. Paint detailed veins on one nail, then switch to minimalist outlines on the next. You can achieve depth using layered silhouettes, overlapping translucent leaves in varying shades of green. Try combining matte and glossy finishes within the same manicure, or alternate between negative space designs and fully covered nails.
Don’t overthink the arrangement—nature isn’t perfect. Place tropical leaves next to temperate varieties, or pair geometric interpretations with organic shapes. This eclectic approach ensures each nail contributes to a cohesive yet diverse botanical story.
Quick Fixes for Common Leafy Nail Art Mistakes
Even when you’re careful with your leafy nail art, mistakes happen—but they’re easier to fix than you’d think. Smudged veins and uneven edges don’t mean starting over. You’ll save your design with simple color correction techniques and strategic touch-ups.
Fix these three common errors without removing your polish:
- Bleeding leaf edges – Dip a thin brush in acetone for precise edge cleanup, then redraw the outline with a steady hand
- Muddy vein details – Apply white polish underneath green shades to brighten and sharpen blurred lines
- Asymmetrical leaf shapes – Add tiny dots or extend edges with matching polish to balance proportions
When polish pools at your cuticles, wrap an orange stick with cotton soaked in remover. This creates a precision tool that won’t disturb surrounding art. For color correction on dark spots, layer a nude base before reapplying green shades. These fixes transform amateur mistakes into professional-looking leafy designs.
Sealing and Maintaining Your Botanical Nail Art
Your botanical nail art typically needs proper sealing within minutes of completion to prevent smudging and chipping. Apply a quality nail topcoat in thin, even strokes from base to tip, ensuring you cap the free edge. This creates a protective barrier that’ll extend your design’s lifespan by up to two weeks.
Wait three minutes between coats if you’re applying multiple layers. You’ll want to reapply topcoat every three days to maintain shine and prevent yellowing of green pigments. Quick-dry formulas work best for intricate leafy details since they won’t cause bleeding or smearing.
Store your finished nails away from direct sunlight and excessive humidity storage areas like bathrooms. High moisture levels can lift edges and cause premature peeling. Keep cuticle oil handy for daily application around your nail beds – this prevents brittleness while preserving your botanical artwork’s vibrancy. Touch up any minor chips immediately with matching polish and fresh topcoat.
Frequently Asked Questions
Can I Create Leafy Designs on Natural Nails or Only Extensions?
You can absolutely create leafy designs on natural nails! Your own nails work perfectly as a canvas for green nail art. Whether you’re painting freehand leaves, using mini decals, or stamping botanical patterns, natural nails provide an ideal surface.
You don’t need extensions to achieve beautiful leafy looks. Just prep your nails properly with a base coat, and you’ll find that intricate leaf designs adhere wonderfully to your natural nail bed.
How Long Does Leafy Nail Art Typically Last Before Chipping?
Your leafy nail art‘s chip longevity typically ranges from 5-10 days with regular polish and up to 2-3 weeks with gel.
You’ll notice topcoat importance plays a huge role here – applying a quality topcoat every 2-3 days significantly extends wear time.
You’re looking at better durability when you seal the design edges properly and avoid harsh chemicals.
Quick-dry formulas tend to chip faster than traditional polishes despite their convenience.
Is Leafy Nail Art Appropriate for Professional Workplace Settings?
You’ll find leafy nail art can be office friendly when you choose subtle botanicals over bold designs. Opt for muted greens instead of bright, eye-catching shades that might distract in professional settings.
Minimalist leaves on one or two accent nails work better than full coverage designs. Keep patterns small and refined, avoiding glitter or excessive embellishments.
Your workplace’s dress code ultimately determines what’s acceptable, so consider your company culture first.
What’s the Average Cost for Salon Leafy Nail Art Services?
You’ll typically pay $35-65 for professional leafy nail art at salons, though salon pricing varies by location and complexity.
Basic leaf designs start around $35, while intricate botanical patterns can reach $80.
You’re likely to find seasonal discounts during spring promotions when floral and leafy designs peak in popularity. Many salons offer 15-20% off nature-inspired nail art in March and April.
Don’t forget to ask about package deals that include maintenance.
Can I Do Leafy Designs Without Artistic Drawing Skills?
Yes, you can definitely create beautiful leafy designs without drawing skills!
You’ll find that sticker techniques make it incredibly simple – just peel and apply pre-made leaf decals onto your base color.
Foil accents add stunning metallic veining effects when you press them onto tacky polish.
You can also use stamping plates with leaf patterns or try the dry brush method where you’ll dab green polish in random strokes for abstract leaves.
Conclusion
You’ve now mastered the basics of creating stunning green leafy nail art that’ll turn heads wherever you go. Whether you’re rocking simple fern fronds or intricate monstera patterns, these botanical designs bring nature’s beauty right to your fingertips. Don’t forget to seal your artwork properly and touch up any chips to keep your nails looking fresh. With practice, you’ll develop your own unique style and create increasingly complex designs that showcase your creativity.