You’ll transform your nails into miniature masterpieces with these seven spa-worthy designs that don’t require salon visits. Try botanical hand-painted florals with dimensional petals, minimalist geometric line art using negative space, or chrome mirror finishes with jewel-tone accents. Japanese cherry blossoms offer delicate seasonal beauty, while luxe marble effects with gold foiling create sophisticated elegance. Celestial patterns bring cosmic shimmer, and watercolor ombré gradients blend sunset hues seamlessly. These techniques unlock professional results at home.
Key Takeaways
- Botanical garden florals feature hand-painted roses, peonies, and lavender using thin acrylic layers for dimensional petals on nude or pastel bases.
- Chrome mirror finishes create ultra-reflective nails using specialized powder over gel polish, accented with matte blacks or gold foiling.
- Minimalist geometric line art uses triangle accents, parallel stripes, and negative space for sophisticated, understated nail designs.
- Luxe marble effects combine swirled white, gray, and nude polishes with strategic gold foiling along veining lines for elegant texture.
- Japanese cherry blossom designs utilize delicate sakura petals in soft pink shades with seasonal variations like butterfly or snow-dusted branch accents.
Botanical Garden Hand-Painted Florals
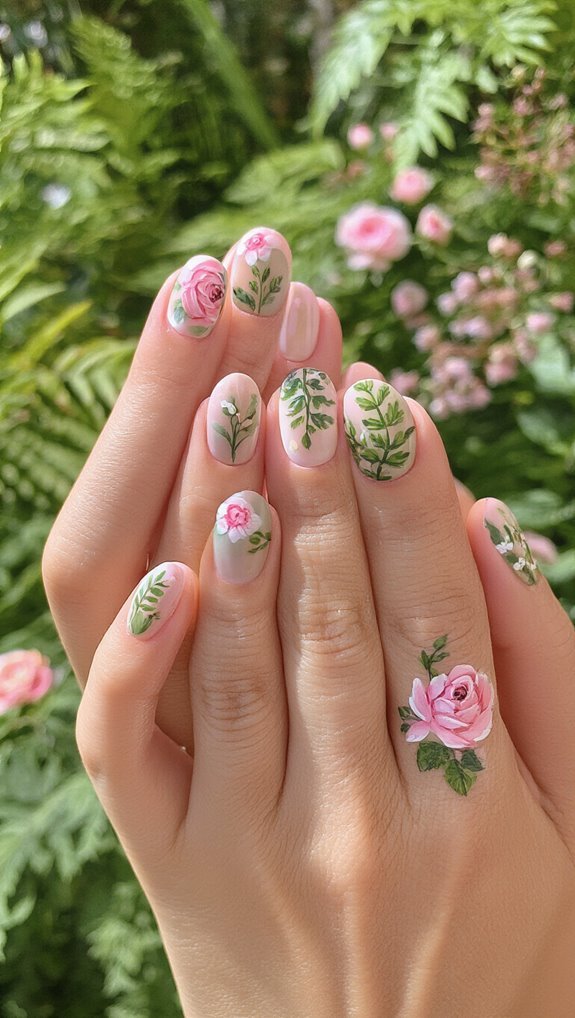
The delicate beauty of botanical garden florals transforms your nails into miniature canvases showcasing nature’s artistry. You’ll discover endless inspiration from hand tied bouquets and wildflower clusters that skilled nail technicians recreate with precise brushstrokes. These designs feature roses, peonies, lavender sprigs, and baby’s breath painted across nude or pastel bases.
Your nail artist begins by applying a base coat, then carefully layers thin acrylic paints to build dimensional petals and leaves. They’ll use liner brushes for stems and details, while dotting tools create perfect flower centers. You can choose full-nail coverage or accent designs featuring single blooms on ring fingers.
Request matte topcoats for vintage appeal or glossy finishes for modern elegance. These botanical designs last two to three weeks with proper care. You’ll love how each nail becomes a unique piece of wearable art that complements both casual and formal attire.
Minimalist Geometric Line Art
Clean lines and sharp angles offer a sophisticated alternative to ornate floral designs, perfect for those who prefer understated elegance. You’ll find minimalist geometric nail art transforms your fingertips into modern canvases where simplicity meets impact.
Master these essential geometric techniques:
- Triangle accents – Create pointed shapes at nail tips or cuticle lines
- Parallel stripes – Apply thin tape for perfectly straight divisions
- Diagonal splits – Divide nails into contrasting color blocks
- Dot grids – Use dotting tools for precise circular patterns
You’ll love how negative space becomes part of the design, letting your natural nail peek through strategic gaps. This technique creates visual breathing room while maintaining artistic interest. Monochrome accents in black, white, or metallics enhance the minimalist aesthetic without overwhelming the overall look.
You can request single accent nails featuring geometric patterns or commit to full sets. Either approach delivers that clean, editorial finish that’s both timeless and trendy.
Chrome Mirror Finish With Accent Details
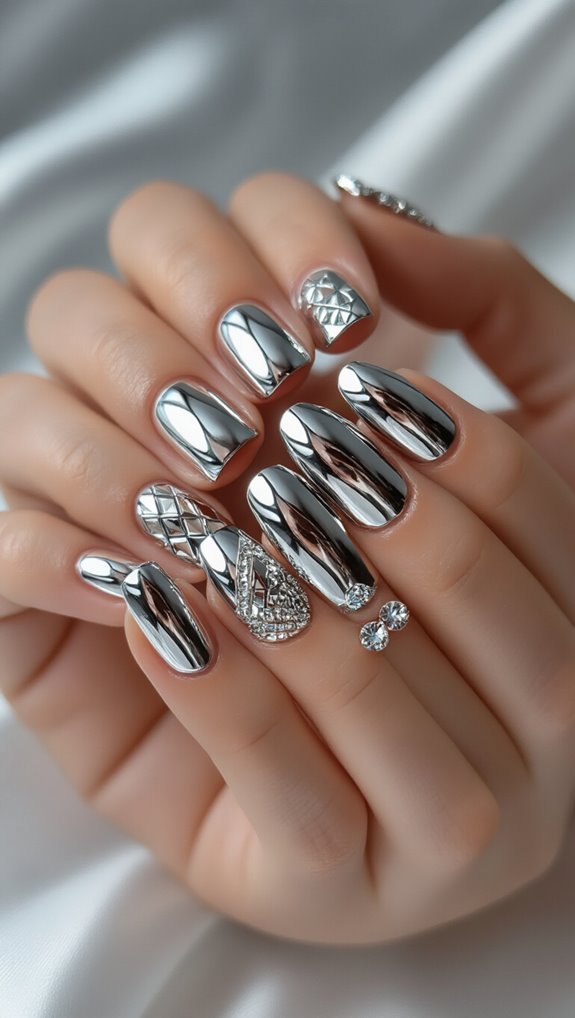
You’ll achieve the perfect chrome mirror finish by applying a specialized powder over gel polish using a silicone applicator in gentle, circular motions until the surface becomes completely reflective.
Your color combinations should feature the chrome as the base with strategic accent details in contrasting matte blacks, deep jewel tones, or delicate gold foiling along the cuticle line or tips.
These techniques transform standard manicures into luxurious, eye-catching statements that reflect light beautifully while maintaining the sophisticated spa aesthetic.
Application Techniques
While chrome mirror finishes create stunning reflective surfaces on their own, adding accent details elevates these designs to professional spa-quality levels.
You’ll achieve flawless results by mastering proper stamping techniques and maintaining precise liner control throughout the application process.
Start with these essential steps for perfect chrome application:
- Apply a no-wipe gel top coat as your base
- Cure for 30 seconds under LED light
- Rub chrome powder using silicone-tipped applicators
- Seal with another thin top coat layer
For accent details, you’ll need steady hands when creating geometric lines or delicate swirls.
Practice your liner control on practice wheels before working on clients.
Position your hand against a stable surface while drawing to prevent shaking.
Layer thin coats rather than attempting thick applications that’ll bubble or wrinkle.
Color Combinations
Several chrome powder shades pair beautifully with contrasting accent colors to create depth and visual interest in your nail designs. You’ll find silver chrome stunning with deep burgundy or navy accents, while rose gold chrome looks exceptional with blush pink or coral details. Gold chrome complements emerald green and sapphire blue magnificently.
Try incorporating ombre transitions between your chrome base and accent shades. You can blend chrome silver into matte black for a dramatic gradient or fade rose gold into nude pink for subtle elegance. These complementary mixes enhance the mirror effect’s impact.
Don’t overlook unconventional pairings like holographic chrome with neon accents or copper chrome with teal. You’ll achieve professional results by selecting colors that either harmonize softly or contrast boldly against your chrome foundation.
Japanese-Inspired Cherry Blossom Designs
You’ll master authentic cherry blossom nail art by learning precise sakura petal techniques that create delicate, layered blooms using thin brushes and dotting tools.
Your color palette selection should balance traditional soft pinks and whites with modern interpretations featuring coral, lavender, or metallic accents.
You can adapt these designs seasonally by incorporating falling petals for spring, full branches for summer, or subtle gold touches for autumn celebrations.
Sakura Petal Techniques
Transform your nails into a delicate spring canvas with sakura petal techniques that capture the ethereal beauty of Japanese cherry blossoms. You’ll master these artistic methods with practice and patience.
Start with sakura stampings for precise, uniform petals across your nail bed. Apply a soft pink base, then use specialized stamps to create consistent bloom patterns. For a more organic look, try petal stippling—dab a fine brush in white and pink polish to build dimensional flowers.
Essential tools you’ll need:
- Detail brushes (sizes 00-2)
- Dotting tools for flower centers
- Quality stamping plates with cherry blossom designs
- Sheer pink and white polishes
Layer your petals from light to dark shades, creating depth. Add tiny gold accents to mimic pollen, and seal everything with a glossy topcoat for that spa-worthy finish.
Color Palette Selection
The perfect cherry blossom nail design begins with choosing authentic Japanese-inspired colors that honor the delicate beauty of sakura season. You’ll want to start with soft pink bases ranging from barely-there blush to dusty rose. These shades capture the ephemeral nature of actual cherry blossoms.
While traditional designs favor muted neutrals like warm beiges, dove grays, and cream whites for branches and accents, don’t shy away from modern interpretations. You can incorporate subtle neon contrasts—think electric coral tips or fluorescent pink stamping—to give your sakura nails a contemporary edge.
Balance is key when mixing palettes. Pair one bold accent nail featuring neon elements with four fingers showcasing classic pastels. This approach keeps your design sophisticated while adding personality that’ll make your manicure stand out at the spa.
Seasonal Design Variations
As seasons change throughout the year, you can adapt your cherry blossom nail art to reflect different moods and occasions while maintaining that signature Japanese aesthetic. You’ll discover endless possibilities by incorporating seasonal elements into your designs.
Transform your cherry blossoms with these variations:
- Spring motifs – Add butterfly accents and fresh green leaves
- Summer shimmer – Include gold leaf and iridescent petals
- Autumn fusion – Blend falling sakura with maple leaves
- Winter textures – Create snow-dusted branches with matte topcoat
You’re not limited to pink blooms year-round. Try white blossoms against navy for winter elegance or coral petals for summer vibrancy.
Mix metallic stamping with hand-painted details to achieve depth. Don’t forget to adjust your base colors—soft pastels work beautifully in spring while deeper burgundies complement fall designs perfectly.
Luxe Marble Effect With Gold Foiling
When you’re looking to elevate your spa manicure with something truly sophisticated, the marble effect with gold foiling delivers an artistic masterpiece on your fingertips. This technique combines natural marble veining patterns with luxurious metallic texture, creating depth and dimension that catches light beautifully.
You’ll achieve the marble look by swirling white, gray, and nude polishes together while they’re still wet. Use a fine brush to create delicate veins running through the design. Once dry, apply gold foil strategically along the veining lines for maximum impact.
| Application Step | Time Required |
|---|---|
| Base coat & marble swirls | 15 minutes |
| Vein detailing | 10 minutes |
| Gold foil application | 20 minutes |
The metallic texture adds glamour without overwhelming the subtle marble base. You can customize the intensity by adjusting how much foiling you incorporate. This design works exceptionally well on accent nails or as a full set for special occasions.
Celestial Stars and Moon Patterns
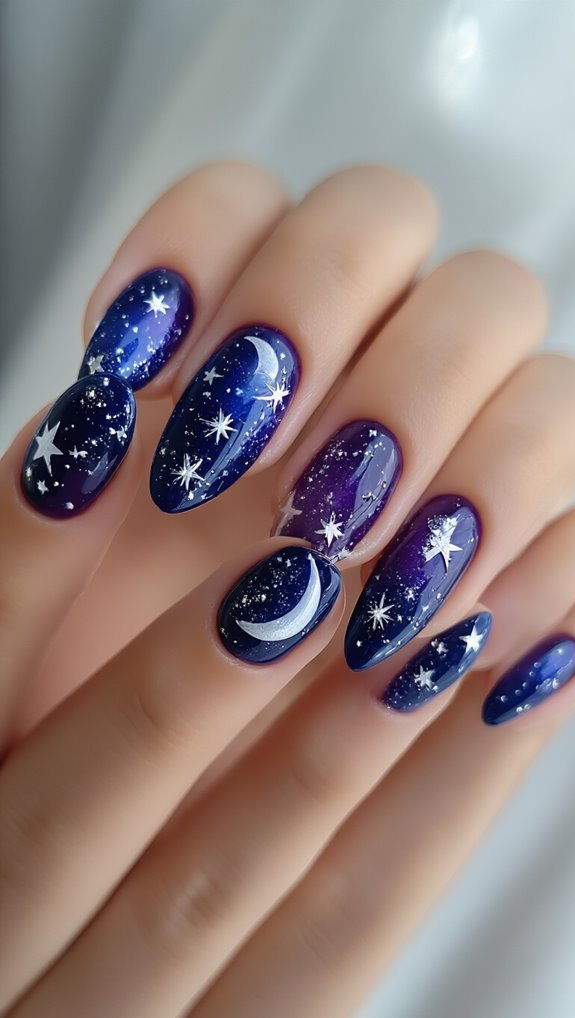
Beyond earthly elegance lies another dimension of nail artistry that captures the mystery of the night sky. You’ll transform your nails into miniature cosmic canvases with celestial stars and moon patterns that sparkle with otherworldly charm. This design trend brings astronomical beauty to your fingertips through delicate lunar silhouettes and twinkling stellar details.
You can achieve this ethereal look using:
- Navy or black base polish for the night sky backdrop
- Fine-tipped brushes for precise star placement
- Metallic silver or gold for galactic shimmer accents
- Matte topcoat to create depth between elements
Start by painting crescent moons on accent nails, then dot tiny stars across remaining fingers. You’ll want to vary star sizes for realistic constellation effects. Layer holographic polish over select areas to intensify the galactic shimmer.
This versatile design works beautifully for both subtle daytime wear and dramatic evening events, making it a perfect year-round choice.
Watercolor Ombré Gradients
From dreamy celestial designs to artistic fluidity, watercolor ombré gradients offer a softer approach to nail art that mimics the gentle blending of watercolor paintings. You’ll love how this technique creates ethereal transitions between colors that look like they’re melting into each other.
Start your watercolor journey by selecting complementary shades that’ll blend seamlessly. You’re working with soft gradients here, so choose colors that naturally flow together—think sunset hues or ocean tones. The key to achieving that watercolor effect lies in pigment layering. You’ll apply thin, translucent coats rather than thick, opaque ones.
Dab your polish onto a makeup sponge and gently press it onto your nails, building intensity gradually. Don’t rush the process; let each layer dry before adding the next. You can blend multiple colors horizontally or vertically, creating unique patterns every time. Seal your masterpiece with a glossy topcoat that’ll enhance the depth and luminosity of your gradient design.
Frequently Asked Questions
How Long Do These Nail Art Spa Designs Typically Last?
Your nail art spa designs typically last 1-3 weeks, depending on several durability factors like the quality of products used, application technique, and your daily activities.
You’ll extend their lifespan with proper maintenance tips: wear gloves during housework, apply cuticle oil daily, and avoid using your nails as tools.
Touch-ups after a week can refresh the design, while gel-based art generally outlasts regular polish by an extra week.
What Is the Average Cost for These Specialty Nail Art Services?
You’ll typically spend $35-$150 for specialty nail art services, depending on design complexity and salon location.
Basic patterns start at lower pricing tiers, while intricate hand-painted designs or 3D embellishments command premium rates.
You can save money by watching for seasonal discounts during slower months or holiday promotions.
Many salons offer package deals that include nail art with manicures, bringing down the overall cost per service.
Can These Designs Be Done on Natural or Artificial Nails?
You can get these nail art designs on both natural nails and artificial tips. Your nail technician will work with whatever base you prefer.
Natural nails offer a healthier canvas and require less maintenance, while artificial tips provide extra length and durability for intricate designs.
You’ll find that gel overlays on natural nails or acrylics work equally well. Most spa designs adapt perfectly to either option you choose.
How Much Time Should I Schedule for These Nail Art Appointments?
You’ll want to schedule 90 minutes to 2 hours for intricate nail art appointments, depending on the design’s complexity.
Simple patterns might take just an hour, while detailed artwork with multiple colors and embellishments needs more time.
Always add 15-20 minutes of buffer time to your appointment length for drying, touch-ups, and unexpected adjustments.
Don’t rush the process – you’re investing in wearable art that requires patience and precision.
Do I Need to Book Appointments in Advance for Complex Designs?
Yes, you’ll definitely need to book complex designs in advance. Popular nail artists often have packed schedules, so appointment timing becomes crucial for intricate work.
You should call at least a week ahead for elaborate designs, as artist availability varies significantly. During busy seasons like holidays or prom, you’re looking at two to three weeks’ notice.
Don’t assume walk-ins will work – complex art requires dedicated time slots that artists specifically reserve.
Conclusion
You’ve discovered seven stunning nail art designs that’ll transform your next spa visit into a creative adventure. Whether you’re drawn to delicate cherry blossoms, bold geometric lines, or dreamy celestial patterns, there’s a style that’ll perfectly match your personality. Don’t settle for plain polish when these artistic options await. Book your appointment, pick your favorite design, and let skilled technicians turn your nails into miniature masterpieces. You’ll leave feeling pampered, polished, and absolutely gorgeous.