You’ll transform your nails into mirror-like masterpieces with DIY chrome nail art in five simple steps. Start by gathering chrome powder, gel polish, and a UV lamp, then prep your nails by filing and cleansing them thoroughly. Apply two coats of dark gel polish and cure completely. Next, buff the chrome powder onto the tacky-free surface using circular motions until you achieve that signature metallic shine. The final step ensures your stunning chrome finish lasts for weeks.
Key Takeaways
- Prep nails by filing, buffing, pushing back cuticles, and cleansing with 70% isopropyl alcohol to remove oils.
- Apply two thin coats of dark gel polish base, curing each coat under LED lamp for proper adhesion.
- Remove tacky residue with alcohol, then buff chrome powder onto nails using firm circular motions with silicone applicator.
- Seal chrome finish with thin gel top coat, capping free edges and curing for 60 seconds under UV/LED light.
- Gather essential supplies including gel polish, chrome powder, UV/LED lamp, applicator tools, and no-wipe top coat before starting.
Gather Your Chrome Nail Art Supplies and Tools

Before you begin creating stunning chrome nails at home, you’ll need to assemble the right supplies and tools for professional-looking results. Start with a quality base coat, black or dark-colored gel polish, and a no-wipe top coat. You’ll require chrome powder in your preferred shade, along with a silicone or eyeshadow applicator for smooth application.
Your nail lamp is essential for curing gel products properly. Choose a UV or LED lamp with at least 36 watts of power to ensure complete curing. Don’t forget nail prep essentials: files, buffers, cuticle pushers, and 70% isopropyl alcohol for cleansing.
For mineral safety, work in a well-ventilated area and consider wearing a dust mask when handling chrome powders. These fine particles can become airborne during application.
Keep a small brush handy for cleanup and lint-free wipes for removing excess powder. Store your chrome powders in sealed containers away from moisture to maintain their reflective quality.
Prep and Prime Your Nails for Chrome Application
With your supplies ready, you’ll now need to prepare your natural nails to create the perfect canvas for chrome powder adhesion. Start by removing old polish completely and filing your nails into your desired shape. Push back cuticles gently, then trim any excess skin. Your cuticle care routine directly impacts how smoothly the chrome applies near the nail bed.
| Step | Action |
|---|---|
| 1 | Remove old polish |
| 2 | File and shape nails |
| 3 | Push back cuticles |
| 4 | Buff nail surface |
| 5 | Clean with alcohol |
After shaping, buff your nail surface lightly to remove ridges and create texture for better primer adhesion. Don’t over-buff—you’re just smoothing imperfections. Cleanse each nail with rubbing alcohol to remove oils and debris.
Skip your usual hydration routine until after completing the chrome application. Oils and moisturizers prevent proper bonding. Apply a thin base coat, cure it, then add your gel color polish foundation.
Apply Your Base Color and Cure Completely
Select a gel polish color that’ll serve as your chrome’s foundation—black creates the most mirror-like finish, while lighter shades produce softer, pearl-like effects.
Apply your chosen gel polish in thin, even strokes, starting from the cuticle line and sweeping toward the free edge. You’ll want two coats for full opacity.
After the first coat, perform an undercut cleanup by running a small brush dipped in acetone along the skin’s edge to remove any polish that’s touched your skin. This prevents lifting and ensures professional-looking results. Cure for 30 seconds under your LED lamp.
Apply your second coat using the same technique, maintaining cuticle hydration throughout the process—dry cuticles can cause uneven application. Cap the free edge by swiping horizontally across the nail tip to seal the polish. Cure for the full recommended time, typically 60 seconds, ensuring complete polymerization.
Your base must be perfectly cured before chrome application.
Buff on the Chrome Powder for Mirror Shine
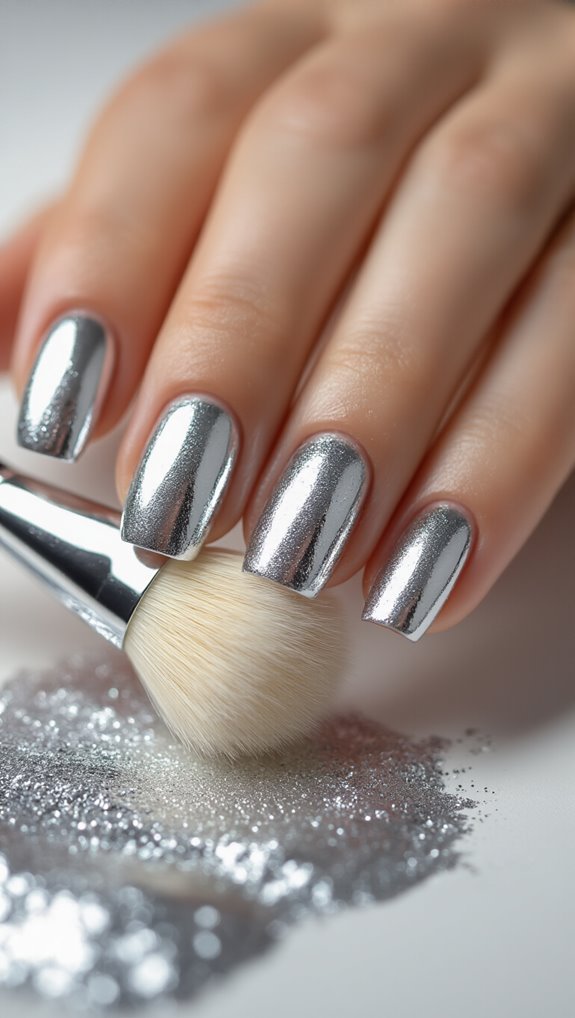
Remove the tacky residue from your cured gel polish using isopropyl alcohol and a lint-free wipe—this step’s crucial for achieving maximum chrome adhesion.
Once your nail’s completely dry, you’re ready to apply the chrome powder.
Dip your silicone tool or eyeshadow applicator into the chrome powder, tapping off excess.
The powder density matters—too much creates clumping, while too little won’t achieve that mirror finish.
Start with a small amount; you can always add more.
Press the powder onto your nail using firm, circular buff techniques.
Work from the cuticle to the tip, ensuring complete coverage.
You’ll notice the chrome effect appearing instantly as you buff.
Apply more pressure for intense shine, but don’t overwork one area—this can lift the base color.
Continue buffing until you’ve achieved your desired mirror effect.
Use a soft brush to remove any excess powder around your cuticles and skin.
The transformation should be dramatic and reflective.
Seal and Protect Your Chrome Nail Art
After you’ve achieved that perfect mirror finish, you’ll need to lock in the chrome powder with a high-quality top coat to prevent chipping and maintain the reflective effect. Apply a thin, even layer across the entire nail surface, ensuring you cap the free edge for maximum durability.
The right nail sealant makes all the difference in your chrome manicure’s longevity. Consider these essential tips:
- Wait 30 seconds before applying the top coat to let the chrome powder settle
- Use gel formulas specifically designed for chrome finishes to preserve the mirror effect
- Cure for 60 seconds under UV/LED light for complete hardening
Don’t rush this crucial step. A properly sealed chrome nail won’t dull or peel prematurely.
If you’re using regular polish instead of gel, apply two thin coats of quick-dry top coat, allowing each layer to dry completely. Your chrome art will stay pristine for up to two weeks with proper sealing.
Frequently Asked Questions
How Long Does Chrome Nail Art Typically Last Before Needing Touch-Ups?
You’ll typically enjoy your chrome nail art for 1-2 weeks before needing touch-ups, though durability factors like your daily activities and nail growth rate affect longevity.
If you’re rough on your hands, expect shorter wear time.
Following proper maintenance tips extends the life – you’ll want to wear gloves during cleaning, apply cuticle oil daily, and avoid using your nails as tools.
A quality top coat reapplication every few days helps too.
Can Chrome Powder Be Applied Over Regular Nail Polish Instead of Gel?
You can’t successfully apply chrome powder over regular polish because it won’t adhere properly. Chrome powder needs a tacky gel polish base that’s been cured under UV/LED light to stick.
While regular polish might seem like a quick apply option, it’ll leave you with patchy, uneven results that’ll chip immediately. You’ll waste your chrome powder trying this shortcut. Stick with gel polish for that mirror-like finish you’re after.
Is Chrome Nail Art Safe for Pregnant Women to Wear?
You’ll find chrome powder itself is generally considered safe during pregnancy since it’s typically made from fine metallic pigments.
However, you should consider the pregnancy safety of the base products you’re using underneath. Gel polishes and their UV curing process raise more chemical exposure concerns than the chrome powder. If you’re worried, opt for regular polish bases or pregnancy-safe gel formulas, and ensure you’re working in a well-ventilated area.
How Much Does Professional Chrome Nail Art Cost at Salons?
You’ll typically pay $40-80 for professional chrome nail art at salons, though salon pricing varies significantly.
In major cities, you’re looking at $60-100, while smaller towns charge $30-50.
Regional variations depend on local competition and overhead costs.
High-end salons often charge $100+ for intricate designs.
The price usually includes base coat, chrome powder application, and top coat.
Some salons charge extra for nail art on each finger beyond basic full-set chrome.
Can You Remove Chrome Nails at Home Without Damaging Natural Nails?
Yes, you can safely remove chrome nails at home with gentle removal techniques. You’ll need to file off the chrome powder’s top coat first, then soak cotton pads in acetone and place them on each nail for 10-15 minutes. For extra care, try oil soaking your cuticles beforehand to protect them. Don’t force or peel the polish off – let the acetone dissolve it completely to avoid damaging your natural nails.
Conclusion
You’ve mastered the art of chrome nails! With these five simple steps, you can create salon-worthy mirror nails at home whenever you want. Remember, practice makes perfect, so don’t worry if your first attempt isn’t flawless. The key to stunning chrome nails is proper prep, smooth base application, and gentle buffing technique. Now that you know the process, experiment with different base colors to discover unique chrome effects. Your nails will be the envy of everyone!