You’ll need quality black, white, and gray polishes plus thin detail brushes to recreate Hollow Knight’s atmospheric nail art. Start by buffing and priming your nails, then mix deep charcoals with pale blues for Hallownest’s signature palette. Paint the Knight’s horned silhouette using fine black strokes on white bases, add soul vessel circles with metallic borders, and create mask shard fragments with angular white shapes. Master these foundational techniques before tackling advanced glow effects and character portraits.
Key Takeaways
- Prep nails by buffing smooth, pushing cuticles, and applying base coat for a clean canvas.
- Mix deep charcoals, ethereal whites, and pale blues to create Hollow Knight’s signature color palette.
- Paint character details like Knight’s horns and mask using fine brushes and black polish on white base.
- Add glow effects with phosphorescent powder and UV-reactive polish for spells like Vengeful Spirit.
- Seal each layer with quick-dry topcoat and finish with matte or glossy coating for atmospheric contrast.
Essential Tools and Materials for Hollow Knight Nail Art

Before you can bring the haunting beauty of Hallownest to your fingertips, you’ll need to gather the right supplies for creating detailed Hollow Knight nail art.
Start with a quality base coat and black, white, and gray polishes for the Knight’s iconic color scheme. You’ll want thin detail brushes in various sizes for painting intricate masks and horns, plus a dotting tool for creating eyes and small accents.
Don’t forget nail art essentials like a silk topcoat to protect your design and add durability. For authentic game aesthetics, consider a matte finish that mimics the Knight’s shadowy appearance. Keep brush cleaner nearby to switch between colors without muddying your artwork. Prepare your workspace with cuticle oil to moisturize surrounding skin before starting, acetone for corrections, and a steady hand rest. Optional additions include striping tape for clean lines and nail stickers if you’re working with simpler designs.
Preparing Your Nails for Detailed Game-Inspired Designs
While intricate game designs demand precision, you’ll achieve the best results by starting with properly prepared nails. Begin with thorough surface buffing to create a smooth canvas that’ll help your Hollow Knight characters appear crisp and defined. Use a fine-grit buffer in gentle circular motions, removing ridges that could distort your artwork.
Cuticle hydration is crucial before pushing them back. Apply cuticle oil and let it absorb for two minutes, then gently push cuticles using an orange stick. This creates more nail space for your detailed designs.
| Prep Step | Tool Required | Time Needed |
|---|---|---|
| Filing | 180-grit file | 2 minutes |
| Buffing | 4-way buffer | 3 minutes |
| Cuticle care | Oil & pusher | 5 minutes |
| Cleansing | Rubbing alcohol | 1 minute |
| Base coat | Quality primer | 2 minutes |
Remove all oils with rubbing alcohol before applying your base coat. This ensures your Hollow Knight designs won’t chip or peel during wear.
Creating the Perfect Hallownest Color Palette
You’ll need to master Hallownest’s signature color scheme before painting any Hollow Knight designs on your nails.
Start with essential base colors like deep charcoal blacks, ethereal whites, and the distinctive pale blues that define the game’s atmospheric underground kingdom.
Mix these foundations with translucent grays and purples to create the shadow tones that’ll bring depth to your Knight, Hornet, or any bug character you’re recreating.
Essential Base Colors
Darkness defines Hallownest’s atmosphere, and capturing that mood starts with selecting the right base colors for your nail art. You’ll need deep charcoal for the kingdom’s shadowy depths and soft white for highlighting ethereal details like soul particles. Muted mauve works perfectly for infected areas or dream sequences.
| Color Type | Hex Code | Usage |
|---|---|---|
| Void Black | #0D0D0D | Background shadows |
| Steel Gray | #4A5568 | Stone structures |
| Pale Blue | #E0E7FF | Soul energy |
Apply your base coat first, then layer these colors strategically. Start with the darkest shade as your foundation. You can’t achieve Hallownest’s signature gloom without proper color depth. Mix colors sparingly—too much blending creates muddy results that won’t capture the game’s stark contrasts.
Mixing Shadow Tones
Building on those base colors, shadow tones bring depth and dimension to your Hallownest-inspired nails. You’ll create shadow gradients by mixing your base colors with drops of black or deep purple polish. Start with a 3:1 ratio—three parts base to one part darkening shade.
For muted contrasts that capture the game’s atmospheric feel, blend gray into bright colors rather than using them pure. Mix orange with charcoal for rust effects on beetle designs. Combine teal with black for deep cavern backgrounds. These subdued tones prevent your art from looking cartoonish.
Test each mixture on paper before applying. You’re aiming for colors that whisper rather than shout. Remember, Hollow Knight’s world feels ancient and weathered—your shadow tones should reflect that worn, mysterious quality throughout your design.
Painting the Knight’s Iconic Horned Silhouette
Once you’ve prepared your base coat, you’re ready to create the Knight’s distinctive horned silhouette—the centerpiece of your Hollow Knight nail design. Start by loading a fine detail brush with black polish. Position it at the center of your nail, then paint two curved horns extending upward and slightly outward. Keep the strokes smooth and deliberate.
For the head, create a rounded shape beneath the horns, maintaining that minimalist silhouette that makes the Knight instantly recognizable. Don’t worry about perfect symmetry—slight variations add character. If you’re working on shorter nails, adjust the proportions accordingly while preserving the essential horn shape.
Consider adding metallic accents to enhance the design. A thin line of silver or gunmetal polish along the horn edges creates depth without overwhelming the simplicity. You can also dot tiny metallic highlights where the horns meet the head, suggesting the Knight’s mask-like features while maintaining the clean, iconic look.
Adding Soul Vessel and Mask Shard Details
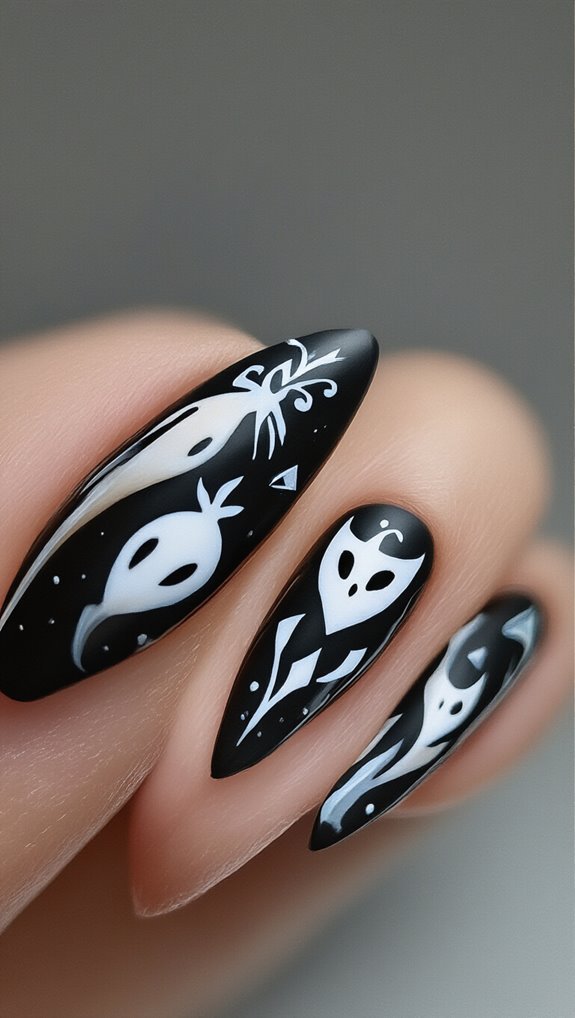
While the Knight’s silhouette forms your design’s foundation, incorporating Soul Vessels and Mask Shards transforms basic nail art into authentic Hollow Knight tribute pieces. You’ll capture the game’s soul mechanics by painting tiny white circles with metallic silver borders on your thumb and index finger. These represent the vessels that store magical energy throughout your journey.
For mask symbolism, create angular white fragments using a detail brush. Position three shards diagonally across your middle finger, mimicking the broken masks you’d collect in-game. Add subtle gray shadows beneath each piece for depth.
| Element | Color | Placement |
|---|---|---|
| Soul Vessel | White/Silver | Thumb, Index |
| Mask Shard | Pure White | Middle Finger |
| Shadow Detail | Light Gray | Under Shards |
| Accent Lines | Black | Vessel Edges |
| Highlight | Pearl White | Shard Tips |
Seal these intricate details with a quick-dry top coat. You’re preserving the delicate brushwork while ensuring your tribute to Hallownest’s mystical elements lasts through daily wear.
Designing Forgotten Crossroads Background Effects
Recreating the Forgotten Crossroads’ atmospheric depths requires layering translucent washes of dusty purple and muted blue-gray across your ring finger and pinky.
You’ll build dimension through strategic color placement that mimics the area’s abandoned tunnels.
Dab lighter tones near your cuticles, gradually deepening shades toward the tips.
Apply weathered foliage effects using a thin liner brush dipped in olive-brown polish.
Create delicate vine patterns crawling along the nail edges.
Add tiny dots of sage green to suggest moss growth on ancient structures.
- Blend colors while polish remains tacky for seamless transitions
- Use toothpicks to scratch texture into semi-dry base layers
- Apply luminescent mist with diluted white polish and sponging technique
- Create depth shadows using deep purple in nail corners
- Add tiny specks of silver glitter for dust particle effects
Seal these atmospheric details with quick-dry topcoat, ensuring you don’t smudge the delicate layering work you’ve accomplished.
Incorporating Character Portraits From Dirtmouth to the City of Tears
You’ll capture the Knight’s mysterious presence by painting their iconic mask with crisp white polish and deep black accents for the eye holes.
Hornet’s dynamic silhouette requires thin needle techniques to create her flowing cloak and sharp horns against a burgundy base.
Quirrel’s distinctive shell patterns work best when you layer pearl and blue shades in curved strokes that mirror his rounded form.
Knight’s Mask Details
When adding the Knight’s mask details to your nail art, you’re essentially creating a miniature portrait that captures the essence of Hollow Knight’s silent protagonist. The mask symbolism represents the vessel’s hollow nature, so you’ll need precision with your detailing brush.
Start with a white base, then outline the iconic horns using thin black strokes. Your texture techniques should create depth through shading beneath the eye sockets.
Essential details to include:
- Twin curved horns extending upward
- Deep black eye holes for that signature vacant stare
- Subtle gray shadowing along the mask’s edges
- Clean symmetrical lines defining the face shape
- Tiny highlight dots for dimensional effect
Apply a matte topcoat to certain areas while keeping others glossy. This contrast mimics the game’s atmospheric lighting perfectly.
Hornet Needle Techniques
While the Knight’s mask embodies silence and emptiness, Hornet’s needle-sharp design demands dynamic brushwork that captures her fierce elegance across your nail canvas. You’ll master her signature weapon through precise micro stitching patterns that mirror her thread attacks. Apply these piercing techniques with a steady needle grip to create razor-thin lines extending from her silhouette.
| Technique | Application |
|---|---|
| Base Layer | Silver metallic polish |
| Thread Lines | Ultra-fine striping brush |
| Needle Point | Dotting tool tip |
| Shadow Effect | Black gradient fade |
| Highlight | White accent dots |
Control your thread tension by maintaining consistent pressure while dragging the brush from Hornet’s form outward. You’re creating movement that reflects her acrobatic combat style. Each stroke should feel deliberate, capturing both her nobility and lethal precision in miniature form.
Quirrel Shell Patterns
As Quirrel’s journey unfolds from Dirtmouth’s humble entrance to the City of Tears‘ rain-soaked spires, his distinctive shell becomes your blueprint for capturing Hallownest’s wandering scholar.
You’ll master pattern layering techniques that transform his iconic headpiece into nail art worthy of the Archives.
Start with a pale blue base coat, then sketch Quirrel’s rounded squirrel shell outline using a detail brush.
Build depth through careful shading—darker blues create the shell’s segments while lighter tones highlight its curved surface.
- Apply thin coats to prevent smudging between layers
- Use striping tape for clean segment lines
- Blend navy and teal for authentic shell coloring
- Add white dots mimicking rain droplets from City of Tears
- Seal with glossy topcoat for shell-like shine
Using Stamping Techniques for Repeated Hollow Knight Motifs
Through the intricate world of nail stamping, you’ll discover how to recreate Hollow Knight‘s most iconic symbols with perfect precision every time.
Start by selecting stamping plates featuring game elements like Void particles, Soul orbs, or the King’s Brand symbol. Clean your stamper and scraper thoroughly before applying black or metallic polish to the engraved design.
Practice your motif placement on paper first to map out where each element will sit. You’ll want to position larger symbols like the Hollow Knight mask on accent nails while distributing smaller repeat patterns across remaining fingers.
Create depth using layered decals by stamping translucent designs over opaque bases. Try overlapping Void tendrils with geometric Hallownest architecture for authentic game aesthetics.
For cohesive repeat patterns, maintain consistent spacing between stamps. Roll the stamper firmly from one edge to achieve crisp transfers. Seal each layer with quick-dry topcoat before adding the next design element.
Applying Glow Effects for Dream Nail and Spell Elements
Building on your stamped designs, you can now bring Hollow Knight’s magical elements to life with luminous effects that capture the ethereal glow of Dream Nail strikes and spell casting.
Start by applying a white gel polish base where you’ll create the glow. This foundation ensures your effects pop against darker backgrounds.
For Dream Nail energy, blend translucent pink and white polishes to achieve ethereal rimlighting around your design edges.
Create spectral bloom effects by dabbing phosphorescent powder into wet topcoat, concentrating it at spell origins.
You’ll achieve authentic-looking Vengeful Spirit trails using thin brushes dipped in glow-in-the-dark polish.
Essential techniques for magical nail effects:
- Layer transparent aurora powder over white for Soul essence
- Use UV-reactive polish for Howling Wraiths patterns
- Apply holographic topcoat selectively for Shade Cloak shimmer
- Dot neon gel for Focus healing particles
- Gradient blend blues and purples for Abyss Shriek energy
Cure each layer thoroughly under LED light for lasting brilliance.
Sealing and Protecting Your Hollow Knight Nail Art
After perfecting your Hollow Knight design with glowing dream elements, you’ll need to lock in your artwork with proper sealing techniques.
Apply a high-quality top coat in thin, even strokes to prevent smudging and extend your nail art’s lifespan.
You’ll maximize protection by allowing adequate drying time between layers—resist the temptation to rush this crucial final step.
Top Coat Application
Once you’ve completed your intricate Hollow Knight designs, you’ll need to seal them with a quality top coat to prevent chipping and extend the life of your nail art.
Apply thin, even strokes from base to tip, capping the free edge for maximum durability. If you’ve used a peel off basecoat for easy removal, ensure the top coat doesn’t extend beyond the design area.
Consider these application tips:
- Wait 5 minutes between design completion and top coat application
- Use quick-dry formulas for intricate designs with multiple layers
- Choose a matte finish for authentic game-inspired aesthetics
- Apply two thin coats rather than one thick layer
- Cure under LED light if using gel products
Your Hollow Knight nail art will now withstand daily wear while maintaining its sharp details.
Drying Time Tips
Frequently, nail artists underestimate how crucial proper drying time is for preserving intricate Hollow Knight designs. You’ll need at least 45 minutes for ambient curing at room temperature, though this varies based on polish thickness and environmental factors. Keep your hands still during the initial 15-minute period to prevent smudging the delicate character details.
Humidity control significantly affects drying speed. If you’re working in humid conditions above 60%, add an extra 20 minutes to your wait time. You can accelerate the process by positioning a fan nearby or using a nail dryer on cool setting. Don’t rush—premature handling will blur your Knight’s features and ruin the sharp edges of your design. Test dryness by gently tapping nails together; they shouldn’t stick or leave impressions.
Frequently Asked Questions
How Long Does It Take to Complete a Full Hollow Knight Nail Set?
You’ll need about 2-3 hours to complete a full Hollow Knight nail set. The time estimate depends on your skill level and design complexity.
You’re looking at multiple drying interruptions between base coats, detailed character work, and topcoat applications. Each layer needs 5-10 minutes to dry properly.
If you’re adding intricate details like the Knight’s mask or Hornet’s needle, you’ll spend extra time ensuring precision between drying periods.
Can I Create Hollow Knight Nail Art Without Being Artistic?
Yes, you can absolutely create Hollow Knight nail art without artistic skills! You’ll find success using nail stencil templates that feature the Knight’s mask and other game symbols.
Stamping kits make it even easier – they’ll transfer intricate Hollow Knight designs directly onto your nails with minimal effort. You don’t need freehand drawing abilities when these tools do the detailed work for you.
Just follow the instructions and you’ll achieve professional-looking results.
Will Acetone Remove the Detailed Game Artwork When Removing Polish?
Yes, acetone will remove your detailed game artwork unless you’ve properly protected it. You’ll need to focus on artwork sealing before applying your final top coat. Use a water-based sealer specifically designed for nail art to create acetone resistance. Once sealed, apply two layers of quality top coat.
If you’re using nail wraps or stickers instead of hand-painted designs, they won’t survive acetone removal regardless of sealing methods.
How Much Does Professional Hollow Knight Nail Art Typically Cost?
You’ll typically pay $50-$150 for professional Hollow Knight nail art, depending on complexity and location.
Basic character designs start around $50, while intricate scenes with multiple characters reach $150+. Salon comparisons show specialty gaming nail artists charge 30-50% more than regular salons.
You’re paying for artistic expertise and time-intensive detail work.
Pricing ranges vary significantly between cities, with metropolitan areas commanding premium rates for this specialized video game artwork.
Which Hand Should I Start With When Attempting Detailed Designs?
Start with your non-dominant hand first when you’re creating detailed Hollow Knight designs. You’ll have better control and steadier movements when your dominant hand is doing the painting work.
It’s much harder to paint intricate details like the Knight’s mask or nail weapon when you’re using your non-dominant hand to hold the brush. Save your dominant hand for last since you’ll be less steady by then.
Conclusion
You’ve mastered the art of bringing Hallownest to your fingertips! Your nails now showcase the Knight’s journey through intricate designs and glowing effects. Don’t forget to let each layer dry completely and apply that final top coat for durability. Whether you’re sporting the Knight’s silhouette or Dream Nail shimmer, you’ll carry a piece of this beloved game wherever you go. Now show off your Hollow Knight nail art and inspire other fans to create their own masterpieces!