You’ll need fine-tipped brushes, dotting tools, gold polish, and foils to start your gold nail art journey. First, prep your nails by removing old polish, pushing back cuticles, and applying a base coat. Create simple dots with a dotting tool dipped in gold polish, or use striping tape for clean lines. For more drama, press gold foil onto tacky adhesive. Seal everything with topcoat to prevent chipping. Master these basics and you’ll discover endless golden possibilities.
Key Takeaways
- Start with clean, oil-free nails by removing old polish, pushing back cuticles, and wiping with rubbing alcohol before applying base coat.
- Apply a thin base coat and let it dry completely before adding any gold polish or decorative elements to ensure proper adhesion.
- Create simple gold dots using a dotting tool dipped in gold polish, spacing them evenly across the nail for an easy first design.
- Use striping tape over dry base color to create clean gold lines, removing tape while polish is wet for sharp edges.
- Seal your gold design with a quality top coat applied in thin strokes, reapplying every three days to maintain shine and prevent chipping.
Essential Tools and Supplies for Gold Nail Art

You’ll need several key tools and supplies to create stunning gold nail art at home. Start with a quality base coat and top coat to protect your natural nails and seal your design. You’ll want fine-tipped brushes for detailed work, dotting tools for precision, and a cleanup brush with acetone for mistakes.
Gold pigments are essential for achieving that rich metallic finish. Choose between loose powders, chrome powders, or pressed pigments depending on your desired effect. You’ll also need gold foils, striping tape, and metallic polishes in various shades from champagne to deep bronze.
Don’t forget proper foil storage to maintain your materials’ quality. Keep foils in a cool, dry container away from humidity. Store brushes upright and clean them thoroughly after each use.
You’ll need rubbing alcohol for sanitizing tools, lint-free wipes for cleanup, and a UV or LED lamp if you’re using gel products.
Preparing Your Nails for Gold Application
Before you apply any gold polish or embellishments, you’ll need to create the perfect canvas for your design.
Start by thoroughly cleaning your nail surface with rubbing alcohol or nail polish remover to eliminate oils and debris that could prevent proper adhesion.
Once your nails are completely dry, apply a thin, even base coat to protect your natural nails and help your gold nail art last longer.
Nail Surface Cleaning
Setting up a pristine canvas for your gold nail art starts with thorough surface cleaning. You’ll need to remove every trace of old polish using acetone or nail polish remover. Soak a cotton pad and press it against each nail for 10 seconds before wiping away residue.
Next, focus on cuticle care by gently pushing back the skin with an orange stick. Don’t cut them—you’re just creating a clean nail bed. Wash your hands with soap to eliminate surface oils that prevent polish adhesion.
Finally, swipe each nail with rubbing alcohol or nail dehydrator on a lint-free wipe. This strips away remaining moisture and oils, ensuring your gold application won’t chip or peel. Your nails are now perfectly prepped for stunning gold designs.
Base Coat Application
With your nails completely clean and dehydrated, the base coat becomes your foundation for flawless gold application. You’ll need to work quickly but precisely to ensure even coverage.
Start by rolling the bottle between your palms to mix the formula—never shake it, as this creates bubbles. Load your brush with enough product to cover one nail without redipping. Position your brush angle at 45 degrees, starting with a thin stripe down the center, then paint each side.
Keep the base coat thin near your cuticles for cuticle protection against staining and chipping. Don’t flood the sidewalls or skin. Cap the free edge by swiping horizontally across the tip. Let each hand dry for two minutes before proceeding. This protective barrier ensures your gold polish adheres properly and lasts longer.
Basic Gold Accent Dots and Studs Technique
Breaking into the world of gold nail art doesn’t require advanced skills when you start with dots and studs. You’ll create stunning designs with minimal effort using these beginner-friendly techniques.
For gold dotting, dip your dotting tool into gold polish and gently press it onto your nail’s surface. Create patterns by spacing dots evenly along the nail tips or clustering them in corners. Clean your tool between applications to maintain crisp, uniform circles. You can vary dot sizes by adjusting pressure or using different tool sizes.
Stud placement adds instant glamour to any manicure. Apply a small drop of nail glue or wet topcoat where you want each stud. Using tweezers, carefully position gold studs onto the adhesive. Press gently to secure them without smudging surrounding polish. Popular placements include the cuticle line, creating diagonal lines, or accenting a single nail. Seal everything with topcoat to prevent studs from catching or falling off.
Creating Simple Gold Stripes and Lines
Transform your nails into miniature works of art by mastering the technique of gold striping. You’ll need striping tape or a thin nail art brush dipped in gold polish.
For tape method, apply base color and let it dry completely. Place tape strips where you want geometric negative space, press edges firmly, then paint gold polish over the exposed areas. Remove tape while polish is still wet for crisp lines.
Using a brush requires steadier hands but offers more freedom. Load your brush with minimal polish and drag it across the nail in one smooth motion. Practice on paper first. Create minimalist chevrons by painting two angled lines that meet at a point. Start from the nail’s edge and work toward the center.
For best results, seal your design with quick-dry topcoat. This prevents smudging and extends your manicure’s lifespan.
Mastering Gold Foil Application
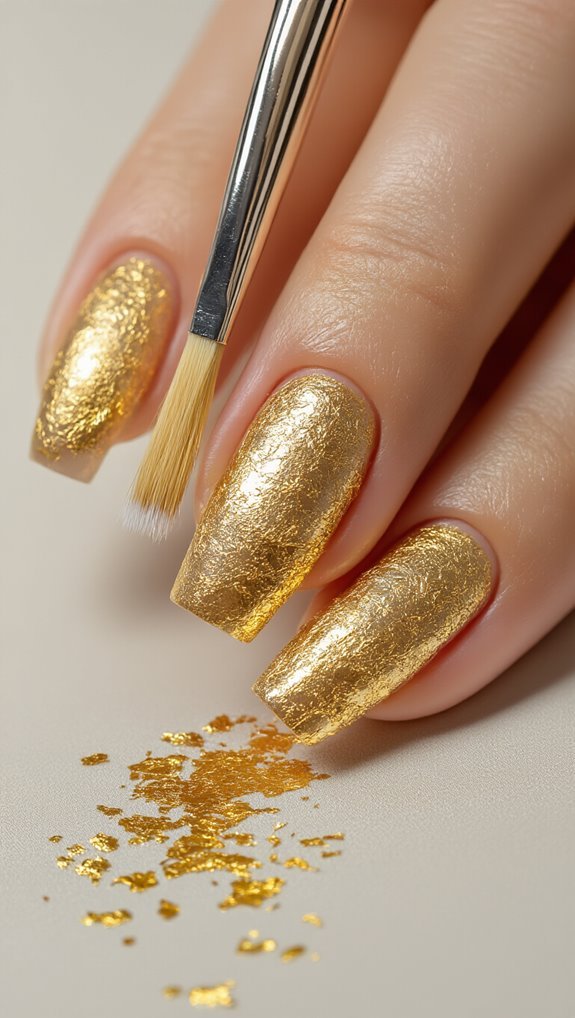
Gold foil takes your nail art to the next level by adding dimension and texture that painted designs can’t match. You’ll need tacky base polish, gold leafing sheets, and a soft brush to achieve professional results.
Start by applying your base color and letting it dry completely. Paint a thin layer of foil adhesive where you want the gold to stick. Wait until it becomes tacky—about 30-60 seconds. Press the gold leafing gently onto the adhesive using your fingertip or a silicone tool. Don’t rub; just press firmly for even foil transfer.
Peel away the backing sheet slowly to reveal your design. You’ll see the foil has adhered only where you applied adhesive. Brush away excess pieces with a clean, dry brush. Seal everything with a quality top coat to prevent the foil from lifting. For best results, cap the free edge of your nail when applying the final seal.
Gold Glitter Gradient Tutorial
You’ll need the right tools and techniques to create a stunning gold glitter gradient that transitions from intense sparkle to subtle shimmer.
Start by gathering your gold glitter polish, makeup sponges, clear top coat, and acetone for cleanup before applying your base coat in thin, even strokes.
The gradient effect comes from dabbing concentrated glitter at your nail tips and gradually blending it toward the cuticle area with less product as you work downward.
Essential Supplies Needed
Before you begin creating your glitter gradient, you’ll need to gather the right supplies to ensure professional-looking results. You’ll work with various gold pigments and metallic powders to achieve the perfect shimmer effect.
| Supply Type | Product | Purpose |
|---|---|---|
| Base | Clear base coat | Protects natural nail |
| Color | Gold polish | Creates foundation |
| Texture | Fine glitter | Adds sparkle dimension |
Start with quality gold pigments that blend smoothly. Choose metallic powders in varying particle sizes for depth. You’ll also need makeup sponges for dabbing, top coat for sealing, and acetone for cleanup. Don’t forget tweezers for placing larger glitter pieces and a small brush for precision work. Having these essentials ready prevents interruptions during application.
Base Coat Application
Apply your clear base coat in thin, even strokes from cuticle to tip, ensuring complete coverage across each nail’s surface.
You’ll need to let each layer dry for two minutes before proceeding.
This protective barrier prevents staining and promotes better adhesion for your gold polish.
Don’t skip this crucial step—it’s essential for cuticle health and maintaining your manicure’s longevity.
The base coat creates a smooth foundation while supporting moisture retention in your nail bed.
Work carefully around the edges without flooding the sidewalls.
If you’re using gel polish, cure under UV light for 30 seconds.
For regular polish, wait until it’s completely dry to touch.
A quality base coat strengthens brittle nails and helps your gold design last up to seven days longer.
Creating Gradient Effect
Now that your base coat has dried, the gradient effect offers one of the most stunning gold nail designs you can create at home. You’ll need a makeup sponge and two to three gold polish shades ranging from light to dark.
Apply the lightest gold at your nail base, then dab the medium shade onto the sponge’s edge. Press it gently onto your nail’s middle section, creating an ombre blending effect. Next, add the darkest gold to the sponge and focus on your nail tips for a seamless metallic transition.
Work quickly while the polish remains wet to achieve smooth gradation. Don’t worry about polish on your skin—you’ll clean that up later with a small brush dipped in acetone.
Easy Gold French Tip Designs
French tips consistently rank among the most timeless nail designs, and adding gold elevates this classic look with a touch of luxury that’s surprisingly simple to achieve. You’ll master gold frenchies faster than traditional white tips since metallic polish forgives minor imperfections.
Start by applying your base coat and nude polish. Once dry, place tip guides or tape across each nail. Apply gold polish in smooth strokes from one side to the other. Remove guides while polish is still wet for crisp lines.
| Variation | Difficulty | Time |
|---|---|---|
| Classic Straight | Beginner | 15 min |
| V-Shaped Tips | Intermediate | 20 min |
| Double Line | Beginner | 18 min |
| Diagonal Tips | Advanced | 25 min |
For celestial accents, add tiny stars or dots along the gold tip line using a dotting tool. Mix matte and glossy topcoats on alternating nails for dimension. These designs work beautifully on both short and long nails.
Combining Gold With Other Colors
You’ll discover that gold polish creates stunning contrasts when paired with the right colors. Black backgrounds make gold accents pop dramatically, while nude bases offer subtle elegance that’s perfect for everyday wear.
Try mixing gold with other metallics like silver or rose gold to achieve a modern, multidimensional look that catches light from every angle.
Gold and Black Combinations
Within the world of nail art, gold and black create one of the most striking color partnerships you can achieve. You’ll find this combination works perfectly for both elegant events and edgy everyday looks.
| Design Style | Gold Type | Best Occasion |
|---|---|---|
| French Tips | Matte gold | Business meetings |
| Geometric Patterns | Metallic foil | Evening events |
| Accent Nails | Gothic shimmer | Concerts/parties |
Start with a black base coat and let it dry completely. Apply your chosen gold polish using thin strokes for even coverage. For matte gold effects, you’ll need a mattifying topcoat after the gold layer dries. Gothic shimmer designs work best when you apply the gold in diagonal sweeps across the nail. Always seal your design with a quality topcoat to prevent chipping.
Nude Base Options
While black creates drama with gold accents, nude bases offer a subtler elegance that’s perfect for everyday wear and professional settings. You’ll find that sheer mauve complements cool skin tones beautifully, while warm beige enhances warmer complexions. These neutral foundations let gold details shine without overwhelming your overall look.
Start with two thin coats of your chosen nude polish, ensuring complete opacity. You can add gold leaf fragments along the cuticle line for a delicate touch, or paint thin gold stripes vertically for an elongating effect. Try dotting gold polish at the base of each nail for a reverse French manicure. The understated combination works especially well with fine gold glitter dusted across tips or a single gold accent nail featuring geometric designs.
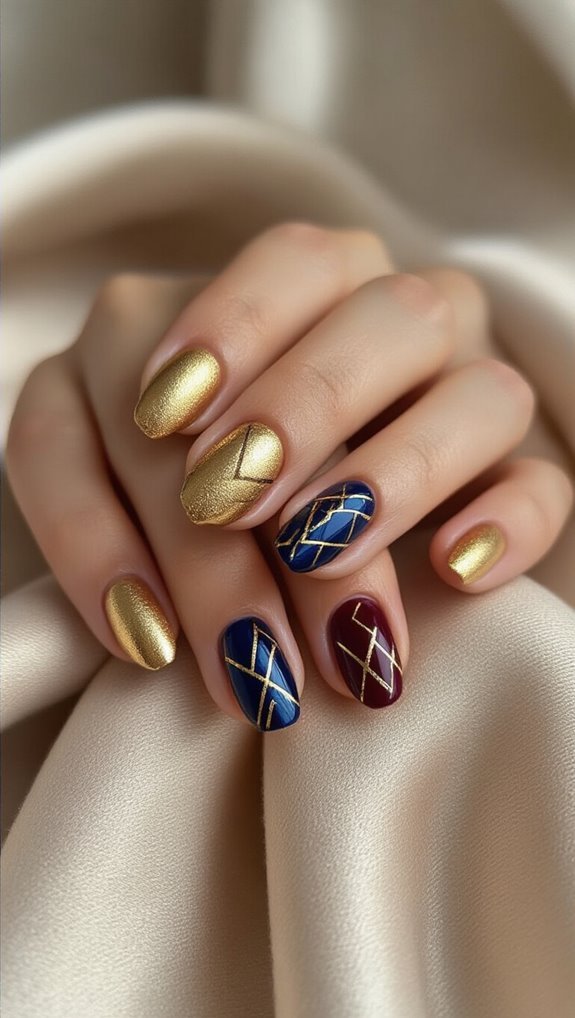
Metallic Color Pairings
Beyond classic nude bases, metallic color pairings elevate gold nail art to stunning new dimensions.
You’ll find that warm metallics like copper and bronze blend seamlessly with gold, creating sunset-inspired gradients that catch light beautifully. Try layering these shades for an ombré effect that transitions from deep bronze at the cuticle to bright gold at the tips.
Cool metallics offer striking contrast instead. Silver and gold combinations create modern, edgy designs when you alternate them in geometric patterns or stripes. Gunmetal gray paired with gold delivers sophistication that’s perfect for evening events.
You can also experiment with rose gold as a bridge between warm and cool tones, mixing it with either gold or silver for versatile looks that complement any outfit.
Fixing Common Gold Nail Art Mistakes
Even experienced nail artists occasionally struggle with gold polish mishaps, but you can salvage most mistakes without starting over.
When you’ve applied too much gold polish, don’t panic. Use a small brush dipped in acetone to carefully remove excess product from your cuticles and skin. For streaky application, add a thin second coat rather than trying to fix wet polish.
If your gold appears dull, you’ve likely skipped the base coat or applied polish to oily nails. Understanding nail art color psychology helps you recognize that gold’s warmth can clash with cool undertones, causing an unflattering appearance. Switch to a warmer gold shade if needed.
Glitter fallout requires environmental cleanup techniques. Place a paper towel under your workspace and use tape to lift stray particles from your skin.
When gold foil won’t stick, ensure you’re using proper adhesive and pressing firmly with a silicone tool. These simple fixes’ll transform your failed attempts into stunning manicures.
Sealing and Maintaining Your Gold Manicure
After perfecting your gold nail design, you’ll need proper sealing techniques to preserve its brilliance for weeks. Apply a quality top coat in thin, even strokes from base to tip. This creates a protective barrier against chips and maintains your manicure’s lustrous finish.
Follow these essential maintenance tips:
- Reapply top coat every three days to refresh shine
- Wear gloves during cleaning tasks to prevent chemical damage
- Use cuticle hydration drops daily to prevent peeling around edges
- Apply hand cream for overnight protection while wearing cotton gloves
- File away minor chips immediately before they spread
You’ll extend your gold manicure’s lifespan by avoiding hot water exposure during the first 24 hours. Quick-dry sprays can compromise the seal, so let your nails air dry naturally.
When you notice dulling after a week, buff the surface lightly and add another top coat layer. These practices ensure your gold nails stay photo-ready for up to three weeks.
Frequently Asked Questions
Can I Use Gold Nail Art if I Have Short Nails?
Yes, you can absolutely rock gold nail art on short nails! You’ll want to keep designs simple with minimalist accents that won’t overwhelm your nail beds.
Try a single gold stripe down the center, dots at the base, or paint just the tips. Short statement nails actually look more elegant with delicate gold details rather than busy patterns.
You’re creating a sophisticated look that enhances your natural nail shape beautifully.
How Much Does a Complete Gold Nail Art Kit Typically Cost?
You’ll find gold nail art kits in various budget ranges, from $15 for basic starter sets to $80 for comprehensive collections.
If you’re just beginning, you can grab a decent kit for $25-40 that includes gold foils, glitters, and essential tools.
Luxury sets featuring premium gold leaf, professional-grade brushes, and multiple gold shades can reach $100-150.
You don’t need the priciest option to create stunning gold designs.
Is Gold Nail Polish Safe for Pregnant Women to Use?
You’ll find most gold nail polishes are pregnancy safe when they’re free from harmful chemicals like formaldehyde and toluene.
Always practice ingredient checking before purchasing, looking for “3-free” or “5-free” labels that indicate maternity friendly formulas.
If you’re visiting a salon, ask about their salon protocol for expecting mothers – they should provide proper ventilation and offer non-toxic polish options.
Don’t hesitate to bring your own pregnancy-safe polish if you’re concerned.
Can I Create Gold Nail Art Over Gel or Acrylic Nails?
Yes, you can definitely create gold nail art over gel or acrylic nails.
You’ll find these surfaces actually provide an excellent base for intricate designs.
Apply a gel overlay first to ensure smooth adhesion, then add your gold polish or metallic foil for stunning effects.
The sturdy foundation of gel or acrylics won’t chip easily, so your gold designs will last longer than on natural nails.
How Long Does Gold Nail Art Usually Last Before Chipping?
You’ll typically enjoy 5-7 days of chip-free gold nail art on natural nails, though wear time expectations increase to 2-3 weeks over gel or acrylic bases.
Your maintenance tips should include applying thin polish layers, sealing edges carefully, and using quality top coat every 2-3 days.
You’ll extend longevity by wearing gloves during cleaning, avoiding hot water soaks, and touching up small chips immediately with matching gold polish.
Conclusion
You’ve now got all the basics to create stunning gold nail art at home. Start with simple dots and stripes, then work your way up to foil and French tips. Don’t worry if you make mistakes—they’re part of learning. Remember to always seal your design with a quality top coat for lasting shine. With practice, you’ll develop your own style and techniques. Your golden manicures will soon become your signature look.