You’ll transform basic Halloween nails into showstoppers with these trending designs. Create classic orange-black gradients using a makeup sponge for seamless blending, or try spooky spider web French tips with a thin brush. Paint tiny ghosts on accent nails, add blood drip effects with dark red polish, or design jack-o’-lantern faces with triangular features. Mix in creepy eyeballs, skeleton bones, candy corn color blocks, and midnight cemetery scenes. Master these techniques to achieve salon-worthy Halloween nail art at home.
Key Takeaways
- Create classic Halloween gradients by sponging orange and black polish together for a sophisticated ombré effect with depth.
- Paint candy corn stripes using white, orange, and yellow sections with striping tape for crisp color separation.
- Add spooky character accents like jack-o’-lantern faces, tiny ghosts, or creepy eyeballs using dotting tools and thin brushes.
- Draw spider web French tips by painting straight lines from center outward, then connecting with curved lines.
- Design midnight cemetery scenes with purple base, gray foggy tombstones, and black tree silhouettes against yellow moons.
Classic Orange and Black Gradient Nails
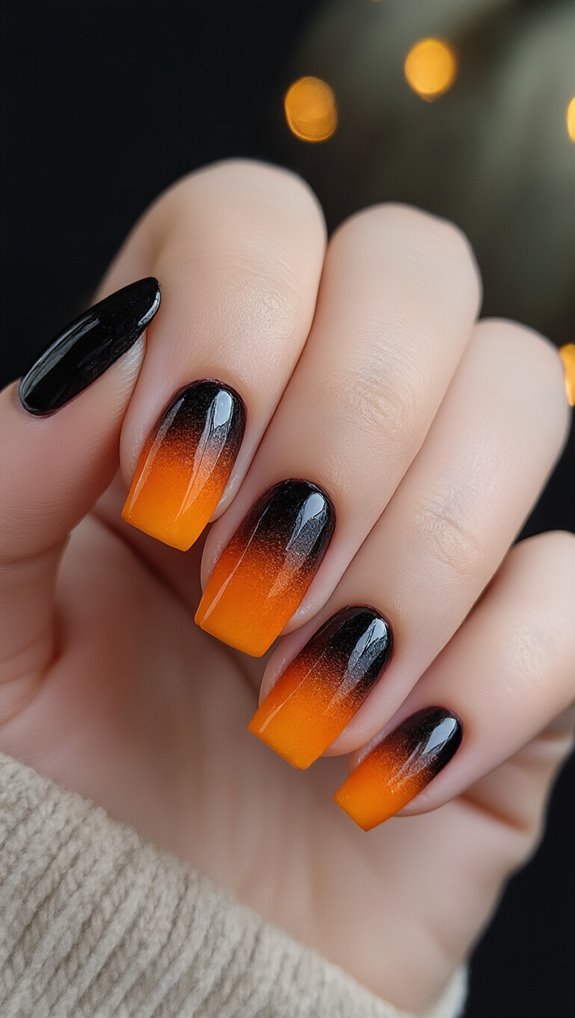
Transform your nails into a spooky masterpiece with the timeless orange and black gradient that screams Halloween. You’ll need orange and black polish, a makeup sponge, and base coat to achieve this festive look.
Start by applying your base coat and letting it dry completely. Dab both polishes onto the sponge, slightly overlapping the colors in the middle. Press the sponge onto your nail using a rolling motion, building up the gradient with multiple light layers. You can create a matte ombré effect by finishing with a matte topcoat, giving your nails a sophisticated, modern twist.
For extra drama, try a glitter gradient by adding sparkly polish to the tips or base of your nails. Apply the glitter more heavily at one end, gradually fading it out for a seamless transition. This technique adds depth and catches light beautifully, making your Halloween manicure stand out at any party.
Spooky Spider Web French Tips
You’ll transform traditional French tips into Halloween masterpieces by adding delicate spider webs across the nail’s surface.
Start with a white or nude base and black tips, then use a thin brush or dotting tool to create intricate web patterns connecting from the tip downward.
For extra drama, try silver metallic webs over deep purple tips or add tiny rhinestone “spiders” at the web’s center.
Web Design Techniques
While traditional French tips offer timeless elegance, spider web designs add the perfect Halloween twist to this classic manicure style.
You’ll create stunning webs using a thin nail art brush or toothpick dipped in white or silver polish. Start by drawing straight lines from your nail’s center outward, like responsive layouts branching across your tip. Connect these spokes with curved lines, working from the center out.
Your microinteractions guide the web’s placement—position it at the corner for subtle spookiness or center it for maximum impact.
Apply the web over black, orange, or deep purple tips for contrast. You can add tiny rhinestone “dewdrops” or a small spider charm for extra dimension. Seal everything with a glossy topcoat to protect your intricate handiwork.
Color Combination Ideas
Three color combinations can elevate your spider web French tips from basic to bewitching. You’ll create maximum impact by choosing contrasting shades that make your web design pop against the base color.
- Classic Gothic: Paint black webs over white or nude tips for timeless elegance that’ll match any Halloween outfit.
- Electric Night: Apply neon purples as your base with silver metallic webs for a modern twist that glows under party lights.
- Soft Spooky: Use muted pastels like lavender or mint green with delicate gray webs for an unexpectedly chic approach.
Don’t forget to seal your design with a glossy topcoat. You’re aiming for webs that look freshly spun, not dusty cobwebs.
The key’s selecting colors that complement your skin tone while maintaining that eerie Halloween vibe.
Tiny Ghost Accent Nails
Tiny ghost accent nails often become the perfect choice when you’re looking for Halloween nail art that’s both adorable and easy to create. You’ll need just a white polish, a dotting tool, and black polish for the eyes to bring these mini ghosts to life on your fingertips.
Start by painting one or two accent nails with your base color—black or orange works beautifully. Once dry, you’ll create your ghosts using white polish. Dip your dotting tool into white polish and make small oval shapes for the ghost bodies. Don’t worry about perfection; slightly wobbly shapes add character.
For polka ghosts, scatter multiple tiny spirits across the nail in a random pattern. You can vary their sizes by using different dotting tools. Add two tiny black dots for eyes using a toothpick or thin brush. Some ghosts can look sideways or upward for personality. Finish with a topcoat to seal your spooky design.
Blood Drip Effect Manicure
You’ll create a chilling blood drip effect manicure with just a few essential tools and the right technique.
Start by gathering your supplies and following the step-by-step process to achieve realistic drips that cascade down your nails.
Choose from classic red-on-black combinations or experiment with unexpected color pairings for a unique twist on this gory design.
Essential Tools Needed
Before you can create the perfect blood drip effect manicure, you’ll need to gather a few essential tools that will make the process smooth and professional-looking. Your toolkit should include nail dotters for creating precise drip patterns and dots of varying sizes. While magnetic polish isn’t necessary for this design, it’s worth having in your collection for other Halloween effects.
Here’s what you’ll absolutely need:
- Red and dark red nail polish – Choose high-pigment formulas that won’t streak
- Thin detail brush or toothpick – For drawing realistic drip lines down your nails
- Top coat – Seals your design and adds glossy dimension to the blood effect
Don’t forget acetone and cotton swabs for quick cleanup around your cuticles. With these tools ready, you’re set to create spine-chilling blood drips.
Step By Step
Once you’ve assembled your tools, start by applying a base coat to protect your natural nails and create a smooth canvas for your design.
Paint two coats of deep red or burgundy polish, letting each layer dry completely.
For the blood drip effect, load a thin brush with darker red polish and draw irregular drips from your nail tips downward. Vary the lengths and thickness for realism.
Add dimension by highlighting drips with glow in dark polish mixed with clear topcoat—this creates an eerie effect under blacklight.
For accent nails, use pumpkin stencils on your ring fingers before applying the base color. Peel off stencils while polish is tacky.
Seal everything with a quick-dry topcoat to prevent smudging and extend your manicure’s wear time.
Color Combination Ideas
Several striking color combinations can elevate your blood drip manicure beyond the traditional red-on-red scheme. You’ll create more visual interest by experimenting with unexpected color pairings that still capture Halloween’s spooky essence.
Try these dramatic combinations:
- Neon purple drips over black base – creates an electric, otherworldly effect that glows under party lights
- Metallic copper drips on matte pumpkin orange – delivers a sophisticated autumn vibe with dimensional contrast
- Teal ombre transitioning to deep green drips – mimics toxic waste or zombie blood for unique horror appeal
Don’t limit yourself to one drip color either. You can alternate between shades on different nails or layer multiple colors for a mixed-blood effect. The key is ensuring your base color provides enough contrast to make the drips pop dramatically.
Jack-o’-Lantern Face Designs
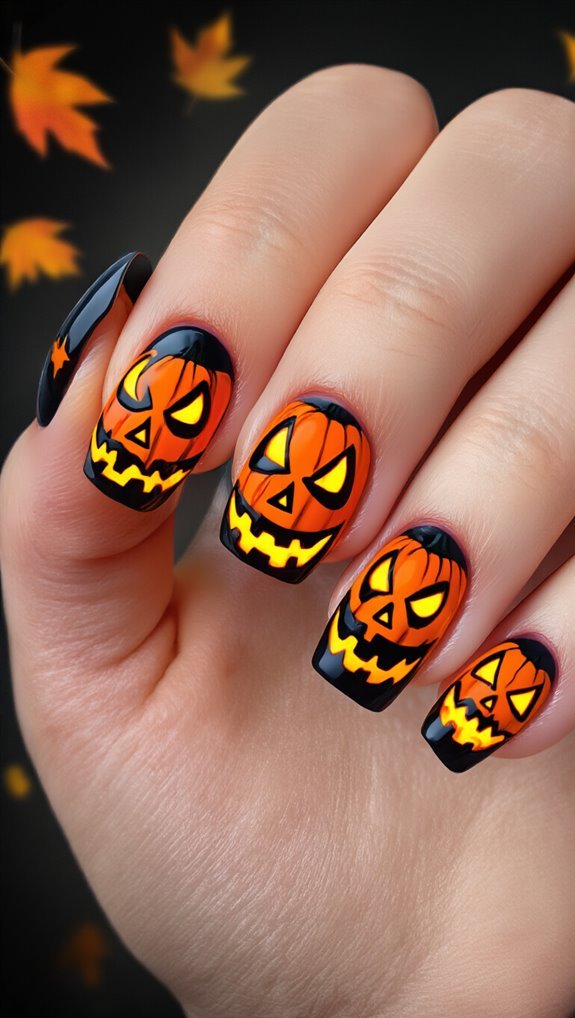
Transform your nails into miniature pumpkin patches with classic jack-o’-lantern face designs that capture Halloween’s playful spirit. You’ll need orange polish as your base and black polish for the facial features.
Start by painting each nail bright orange. Once dry, use a thin brush or toothpick to create triangular eyes near the tip. Add a carved smile beneath them—you can make it friendly with curved lines or spooky with jagged teeth. Don’t forget the tiny triangle nose between the eyes.
For variation, paint different expressions on each mini pumpkin nail. Try winking eyes, surprised circles, or crooked grins. You can add green stems at the cuticle area using a small dot of polish.
Seal your jack-o’-lantern designs with topcoat to prevent chipping. These festive faces work on short or long nails and pair perfectly with black accent nails featuring bats or spiders.
Witchy Moon and Stars Pattern
You’ll create a mystical witchy look by combining crescent moons, tiny stars, and constellation patterns across your nails using metallic polish or nail art pens.
Start with a dark base coat in deep purple or black, then add your celestial elements using gold or silver for maximum contrast.
Keep your moon shapes consistent in size while varying star placement to achieve a balanced yet whimsical night sky effect.
Essential Design Elements
When creating a witchy moon and stars pattern, you’ll need to master the placement and proportion of celestial elements to achieve that mystical aesthetic. Start with a dark base coat—deep purple, midnight blue, or black works perfectly. Position your crescent moon as the focal point, typically on the accent nail.
- Paint delicate stars in varying sizes around the moon using a thin brush or dotting tool
- Add vintage motifs like tiny constellation lines connecting select stars for authenticity
- Create haunted textures by sponging metallic polish over dried elements for an aged effect
You’ll want to balance empty space with decorated areas. Don’t overcrowd the design; let each element breathe. Seal everything with a glossy topcoat to enhance the celestial shimmer and protect your mystical masterpiece.
Application Technique Tips
Successfully executing this celestial design often depends on having steady hands and the right tools at your fingertips. You’ll want to start with a dark base coat—deep purple or black works perfectly. Apply thin, even layers rather than one thick coat to prevent bubbling.
For the moon, use minimal brush pressure to create a delicate crescent shape. If you’re struggling with freehand painting, try using nail stickers or stencils instead. When adding stars, dab your dotting tool gently to form different sizes.
Remember that drying time between layers is crucial. Wait at least two minutes before adding new elements to avoid smudging. You can speed things up with quick-dry drops, but don’t rush the process. Finish with a quality top coat to seal your mystical masterpiece.
Creepy Eyeball Nail Art
Creepy eyeball nail art brings out the spine-tingling essence of Halloween with its unsettling yet captivating design. You’ll create miniature watching eyes that’ll make everyone do a double-take when they spot your manicure.
Start with a white base to form the matte sclera, then add these essential details:
- Paint red squiggly lines from the iris edges to mimic bloodshot veins
- Create glowing pupils using neon green or yellow polish for an otherworldly effect
- Add a clear topcoat only to the iris area for realistic depth and shine
You can paint different eye colors across your nails or stick to one haunting shade. Try positioning the irises looking in various directions for maximum creepiness.
Don’t forget to seal everything except the matte sclera with topcoat – the contrast between glossy and matte textures makes the eyes appear more lifelike. This design works brilliantly on accent nails or across all ten fingers.
Skeleton Bone Details
While skeleton designs might seem complex, you’ll find that creating bone details on your nails is surprisingly achievable with the right techniques. Start with a black or deep purple base coat, then use a thin brush to paint white bones. You’ll create realistic bone texture by adding subtle gray shadows along the edges and joints.
| Bone Element | Application Tip |
|---|---|
| Finger Bones | Draw three connected segments |
| Miniature Skulls | Use dotting tool for eye sockets |
| Rib Cage | Paint curved parallel lines |
| Spine Details | Create stacked oval shapes |
For miniature skulls, position them strategically on accent nails. You can achieve depth by layering white polish in thin coats, building opacity gradually. Don’t worry about perfect symmetry—slight irregularities make bones look more authentic. Seal your design with a matte topcoat to enhance the chalky, skeletal appearance that’ll make your Halloween manicure truly spine-chilling.
Candy Corn Color Block Design
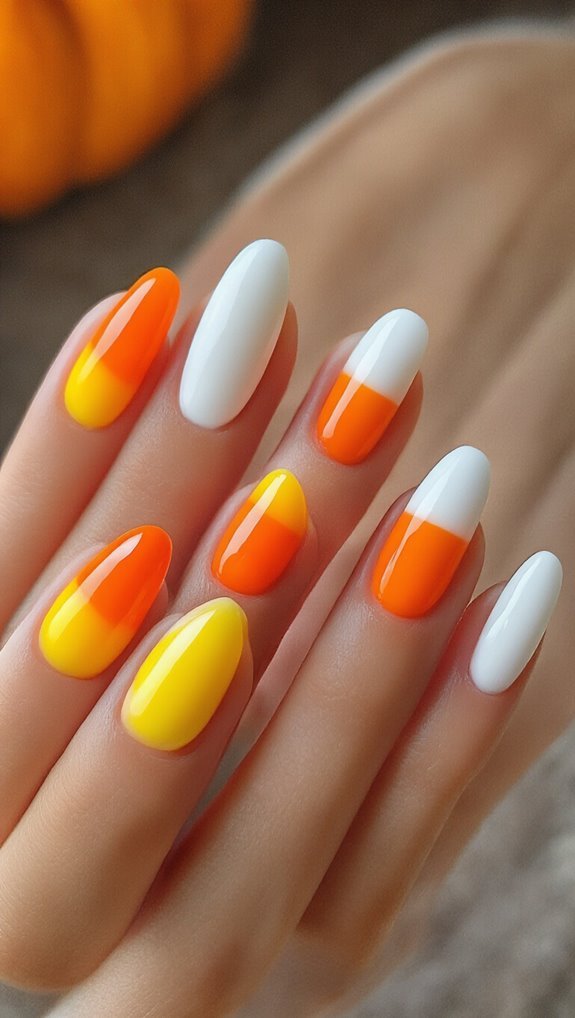
This candy-stripe technique transforms your nails into miniature versions of everyone’s favorite Halloween treat. You’ll create a striking candy corn design using three distinct color blocks that capture the essence of this iconic confection. The geometric ombré effect adds modern sophistication to a classic Halloween motif.
Start with clean, prepped nails and apply your base coat. Here’s how you’ll achieve the perfect candy corn look:
- Paint the bottom third of each nail with bright white polish, creating a clean horizontal line
- Apply vibrant orange to the middle section, slightly overlapping the white for seamless blending
- Finish with sunny yellow at the tips, ensuring crisp color separation
You can reverse the color order for variety or add glitter topcoat for extra sparkle. This design works beautifully on both short and long nails. For precision, use striping tape to create perfectly straight lines between colors. Seal everything with a glossy topcoat to make your candy corn manicure last through all your Halloween festivities.
Midnight Cemetery Scene Nails
For a more dramatic Halloween look that goes beyond playful candy themes, you’ll want to master the midnight cemetery scene design. This intricate nail art transforms your fingertips into miniature gothic landscapes that’ll captivate everyone at your Halloween gathering.
Start with a deep purple or navy base coat to create your night sky. While it’s still tacky, blend in wisps of gray polish using a small sponge to achieve foggy gravestones at the nail’s base. You’ll need a fine detail brush to paint black tombstone shapes emerging from the mist.
Add moonlit silhouettes by painting a pale yellow circle on your accent nail, then layer bare tree branches across it using black polish. Create depth by varying the opacity of your fog effect—thicker at the bottom, fading upward. Finish with tiny white dots for stars and seal everything with a matte top coat. This design works best on longer nails where you’ve got more canvas space.
Frequently Asked Questions
How Long Before Halloween Should I Get My Nails Done?
You’ll want to get your Halloween nails done about one to two weeks before the holiday. This timing ensures your manicure looks fresh for parties and trick-or-treating without chipping or growing out too much.
If you’re planning intricate nail art, book your appointment early since salons get busy. Don’t wait until the last minute – popular nail artists often book up completely as Halloween approaches, leaving you with limited options.
Can I Create Halloween Nail Art on Natural or Artificial Nails?
You can create Halloween nail art on both natural nails and artificial tips.
Your natural nails work perfectly for most designs if they’re healthy and have some length. If you prefer longer nails or need a stronger base for intricate art, artificial tips provide an excellent canvas. They’ll hold detailed designs better and won’t chip as easily.
Either option lets you rock spooky designs throughout the Halloween season.
What’s the Average Cost of Professional Halloween Nail Art?
You’ll typically pay $30-80 for professional Halloween nail art at most salons, though intricate designs can reach $100+. Salon pricing varies by location, complexity, and whether you’re adding art to a basic manicure or gel service.
If you’re watching your DIY budgeting, creating Halloween nails at home costs around $15-30 for supplies like polish, stickers, and tools that you can reuse for multiple designs throughout the spooky season.
How Do I Remove Glitter and Dark Halloween Nail Polish Completely?
You’ll need pure acetone for stubborn glitter and dark polish removal. Soak cotton pads in acetone, place them on each nail, and wrap with foil for 10-15 minutes.
For acetone alternatives, try non-acetone removers with longer soaking times. Don’t scrape aggressively – this causes peeling prevention issues. Instead, gently push off loosened polish with a cuticle pusher.
Follow up with cuticle oil to restore moisture and prevent nail damage.
Which Nail Shape Works Best for Detailed Halloween Designs?
You’ll find almond and square shapes work best for detailed Halloween designs. The almond precision gives you enough surface area for intricate artwork while maintaining an elegant curve that won’t snag.
Square nails offer maximum canvas space for complex patterns. While stiletto detailing can look dramatic, the narrow tips make painting tiny ghosts or spiderwebs challenging.
You’re better off choosing shapes that balance style with practical painting space for your spooky masterpieces.
Conclusion
You’ve got plenty of spooky options to transform your nails this Halloween season. Whether you’re going for subtle ghost accents or dramatic blood drips, there’s a design that’ll match your vibe. Don’t be afraid to mix techniques or combine different ideas on each nail for a truly unique look. Grab your favorite polishes, nail art tools, and get creative. Your Halloween manicure will be the perfect finishing touch to any costume you choose.