You’ll start your purple nail art journey by prepping clean nails with a base coat, then applying thin layers of lavender polish using confident center-to-edge strokes. Create simple designs like polka dots with a dotting tool and dark purple polish, or try gradient ombre by pressing a makeup sponge loaded with three purple shades onto each nail. Seal everything with a quick-dry top coat, capping the tips for two-week durability. Master these basics first, then explore advanced marble and floral techniques.
Key Takeaways
- Start by removing old polish, pushing back cuticles, filing nails, and applying a thin base coat before any purple polish application.
- Choose 2-3 purple shades from light lavender to deep plum for creating gradients, patterns, or simple solid color designs.
- Apply purple polish in thin, confident strokes from cuticle to tip, capping the nail edge to prevent chipping.
- Try beginner-friendly designs like polka dots using a dotting tool or simple gradients with a makeup sponge for blending colors.
- Seal your purple nail art with a quality top coat, capping the free edge for designs that last up to two weeks.
Essential Tools and Purple Polish Selection for Your First Design
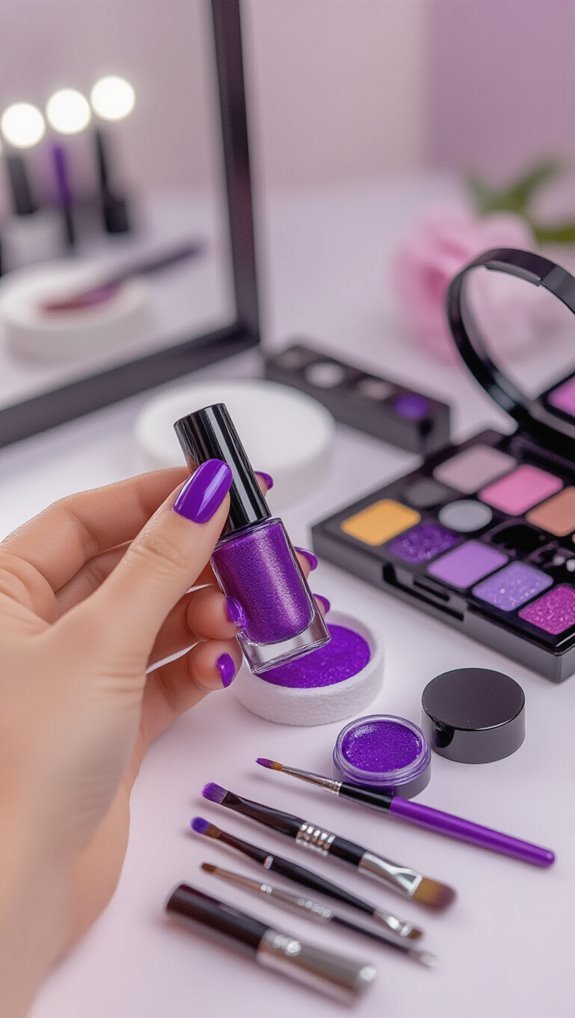
When you’re ready to create your first purple nail art design, you’ll need the right tools and polishes to ensure professional-looking results. Start with a quality base coat, two to three purple shades ranging from light lavender to deep plum, and a quick-dry top coat. Many brands now offer vegan polishes that deliver vibrant color without harmful chemicals.
You’ll also need dotting tools, thin brushes for detailed work, and cleanup brushes with acetone. Don’t forget nail art tape for crisp lines and a small sponge for gradient effects. Test your purple shades under different ambient lighting conditions since purples can appear drastically different in natural versus artificial light.
Warm lighting tends to bring out red undertones while cool lighting emphasizes blue notes. Keep cotton swabs and pure acetone nearby for quick corrections. With these essentials assembled, you’re equipped to begin creating stunning purple nail art designs.
Preparing Your Nails for Perfect Purple Application
Now that you’ve gathered your purple polishes and tools, you’ll need to prep your nails properly for a flawless finish.
Start by removing any old polish and washing your hands thoroughly, then push back your cuticles and shape your nails with a file.
Once your nails are clean and shaped, apply a thin layer of base coat to protect your natural nails and help the purple polish adhere better.
Nail Cleaning Basics
You’ll always achieve better polish results when you start with properly cleaned nails. Remove any existing polish with acetone-free remover, working from base to tip.
Next, soak your fingertips in warm water for three minutes to begin cuticle softening. This makes pushing back cuticles easier and less painful.
After soaking, use soap free cleansers specifically designed for nails. These products won’t leave residue that prevents polish adhesion. Gently scrub under each nail with a soft brush, removing dirt and oils. Push back softened cuticles with an orange stick or cuticle pusher—never cut them.
Dry your nails thoroughly with a lint-free towel. Finally, swipe each nail with rubbing alcohol or nail dehydrator to eliminate remaining oils. Your nails are now perfectly prepped for purple polish application.
Base Coat Application
Apply your base coat with confidence—it’s the foundation that makes purple polish truly pop. Start at your nail’s center, then sweep the brush toward each side edge. You’ll need thin, even strokes that cover the entire nail surface without pooling at the cuticles.
Choose a base coat that doubles as a nail strengthener if you’re dealing with brittle nails. This extra protection prevents chipping and extends your manicure’s life. Before applying, dab a small amount of cuticle oil around each nail and massage it in—this creates a barrier that makes cleanup easier later.
Let your base coat dry completely for two minutes. Don’t rush this step; proper drying time ensures your purple polish won’t streak or bubble when you apply it next.
Classic Purple Gradient Ombre Tutorial
You’ll need the right tools to create a stunning purple gradient ombre that transitions seamlessly from dark to light. Gather at least three purple polish shades, a makeup sponge, liquid latex or tape for cleanup, and a quick-dry top coat before you begin.
The key to mastering this look lies in your blending technique—you’ll dab and roll the sponge rather than dragging it across your nails.
Essential Supplies Needed
Before diving into the gradient technique, you’ll need to gather the right tools and products to ensure your purple ombre nails turn out flawlessly. Here’s what you’ll require:
- Three purple polish shades (light, medium, dark)
- Makeup sponges for blending
- Liquid latex or tape for cleanup
- Quick-dry topcoat
- Acetone-based polish remover
You’ll also want nail files, buffer blocks, and cuticle oil nearby. Store your polishes upright in a cool, dark drawer—proper storage tips prevent thickening and separation.
Create your own DIY remover by mixing acetone with glycerin to reduce drying effects. Keep paper towels handy for quick cleanup between color applications.
Don’t forget tweezers for precise sponge handling. With these essentials ready, you’re set to create stunning purple gradient nails that’ll last for days.
Gradient Blending Technique
Dab your makeup sponge with the lightest purple shade first, creating a foundation that’ll anchor your gradient effect.
Apply this base color from your nail’s tip to halfway down, using gentle pressing motions. Next, add your medium purple shade to the sponge’s middle section, overlapping slightly with the light shade. The key to successful ombre sponging lies in working while the polish remains wet.
Press the sponge onto your nail using a rolling motion, blending where colors meet. You’ll need to repeat this color layering process twice for opacity.
Add your darkest purple at the nail’s base, dabbing carefully to avoid harsh lines. Clean up excess polish around your cuticles with a small brush dipped in acetone. Seal everything with a quick-dry topcoat.
Simple Purple Polka Dot Pattern Step-By-Step
Breaking into the world of nail art doesn’t have to be intimidating, and polka dots offer the perfect starting point for beginners. You’ll create charming designs with minimal tools and effort.
Start with a light purple base coat and let it dry completely. Here’s what you’ll need:
- Dotting tool or bobby pin
- Dark purple polish for dots
- Light purple base polish
- Top coat
- Paper towel for cleanup
Dip your dotting tool into the dark purple polish and gently press onto your nail. You’re aiming for a bubble texture rather than flat circles.
Create dots in random patterns or organized rows—both look fantastic. For royal accents, add tiny gold dots between purple ones.
Don’t worry if they’re not perfect circles; slight variations add character. Work one nail at a time to prevent smudging.
Once you’ve finished all ten nails, seal everything with a glossy top coat. You’ve just mastered your first polka dot manicure!
Easy Purple and Silver Glitter Accent Nails
When you’re ready to add glamour to your purple manicure, silver glitter accent nails deliver maximum impact with minimal effort. You’ll need purple base polish, silver glitter topcoat, and optional embellishments like purple rhinestones or metallic studs.
Start by painting all nails with two coats of purple polish. Once dry, select your accent nails—typically the ring fingers work best. Apply the silver glitter polish to these chosen nails only. While the glitter’s still tacky, you can press purple rhinestones or metallic studs into place using tweezers.
| Step | Action |
|---|---|
| 1 | Apply purple base to all nails |
| 2 | Add silver glitter to accent nails |
| 3 | Place rhinestones with tweezers |
| 4 | Seal with clear topcoat |
This combination creates elegant contrast without overwhelming your look. The sparkle catches light beautifully, making your manicure perfect for special occasions or when you want extra shine. Finish with a quality topcoat to protect your design.
Minimalist Purple Geometric Shapes Using Tape
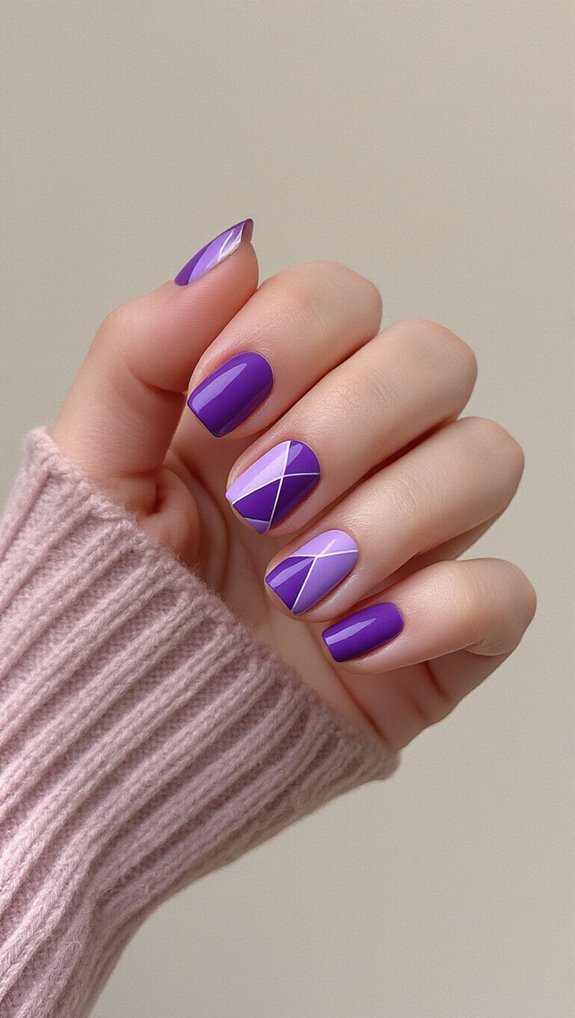
For a more understated approach to purple nail art, geometric shapes created with tape offer clean lines and modern sophistication. You’ll achieve professional-looking designs without needing steady hands or advanced skills.
Start with a nude or light purple base coat. Once it’s completely dry, apply thin strips of tape to create your desired matte geometry patterns. Here’s what works best:
- Diagonal stripes across the nail
- Triangle shapes at the tips
- Chevron patterns using angled tape
- Half-moon designs near the cuticle
- Crosshatch patterns for added dimension
Paint over the exposed areas with deep purple polish. Remove the tape while the polish is still slightly wet to prevent chipping. You’ll reveal crisp negative space that makes the design pop.
For extra impact, alternate between glossy and matte purple shades. This technique transforms simple shapes into eye-catching nail art that’s perfect for work or minimalist fashion lovers.
Lavender French Tip Manicure With a Modern Twist
You’ll need a thin striping brush, lavender polish, and steady hands to create this updated take on the classic French manicure.
Start with your regular base coat routine, ensuring each nail is completely dry and smooth before moving forward.
The key to perfect lavender tips lies in using quick, confident strokes rather than going back over wet polish multiple times.
Essential Tools Needed
Before creating your lavender French tip manicure with a modern twist, you’ll need to gather the right tools to ensure professional-looking results. Having quality supplies makes the difference between amateur and salon-worthy nails.
Here’s what you’ll need:
- Base and top coat – protects natural nails and seals your design
- Lavender polish with purple pigments – choose highly pigmented formulas for opacity
- Fine-tipped nail brushes – essential for precise tip application and detail work
- Nail guides or tape – creates clean, crisp French tip lines
- Acetone and cotton swabs – quickly fixes mistakes without starting over
Don’t forget a good LED lamp if you’re using gel polishes. Quality nail brushes are worth the investment since they’ll give you better control over the purple pigments when creating gradient effects or geometric patterns.
Base Coat Application
Start with clean, dry nails and apply a thin layer of base coat from the cuticle to the free edge, ensuring complete coverage without pooling at the sides.
You’ll want to cap the tips by swiping horizontally across each nail’s edge—this technique doubles as nail biting prevention since it creates a protective barrier.
Let the base coat dry for two minutes before proceeding.
If you’ve recently used cuticle oil, remove any residue with rubbing alcohol or nail polish remover first.
Oil prevents proper adhesion and can cause your manicure to chip prematurely.
Don’t skip this crucial step.
Base coat protects your natural nails from staining, especially important when you’re working with purple polishes.
It also creates a smooth canvas that helps your color adhere better and last longer.
Creating Lavender Tips
Now that your base coat has dried, it’s time to create the lavender tips that give this classic French manicure its contemporary update. You’ll need a steady hand and the right shade of soft lavender polish to achieve professional results.
Before painting, prepare your workspace with these essentials:
- Paper towel for quick cleanup
- Nail guide strips or tape
- Small brush for precision
- Acetone and cotton swabs
- Your chosen soft lavender shade
Apply the guide strips just below where you want the tips to end. Paint the soft lavender polish in smooth, even strokes from the guide to the nail’s edge. Don’t worry about minor imperfections—they’ll disappear with practice.
For a modern touch, consider adding a matte finish topcoat that transforms the glossy lavender into a sophisticated, velvety texture.
Purple Marble Effect Using the Water Technique
When you’re ready to create stunning purple marble nails, the water marbling technique offers one of the most mesmerizing effects you can achieve at home. Fill a small cup with room-temperature water and drop alternating shades of purple polish onto the surface. You’ll watch the colors spread into concentric circles.
Use a toothpick to drag through the polish, creating marble swirls and delicate patterns. Work quickly before the polish dries on the water’s surface. Apply tape around your nails to protect your skin, then dip your finger straight down into the design.
The key to perfect ombre veins is using complementary purple shades—try pairing deep plum with soft lilac. Remove excess polish from the water’s surface before lifting your finger out. Once dry, peel off the tape and clean up edges with acetone on a small brush. Seal your masterpiece with a glossy topcoat.
Quick Purple Flower Design With a Toothpick
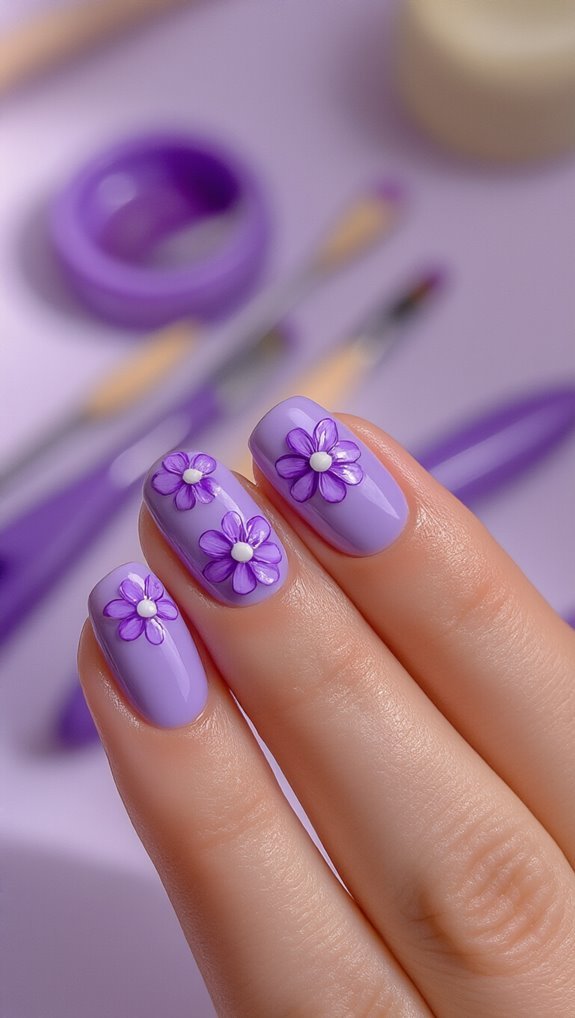
Whip up charming purple flowers on your nails in minutes using just a toothpick and two polish colors. You’ll create adorable toothpick florals that look professionally done without expensive tools.
Start with a light purple base coat that’s completely dry. Drop a small dot of dark purple polish where you want each flower’s center. Here’s your petal layering technique:
- Dip the toothpick’s tip in dark purple polish
- Pull five petals outward from the center dot
- Keep strokes short and controlled for uniform petals
- Add white dots to flower centers for dimension
- Create leaves with green polish using the same pulling method
You’re basically dragging polish from the center outward in quick motions. Don’t overthink it—imperfect petals look more natural. Place flowers randomly across your nails or create a French tip garden effect. Seal everything with a fast-drying topcoat to prevent smudging your handiwork.
Finishing Touches and Long-Lasting Top Coat Application
Your beautiful purple nail art won’t last without proper sealing and protection.
You’ll need to apply a quality top coat that covers every millimeter of your design, extending slightly past the nail edges to prevent chipping.
Choose between glossy or matte finish options based on your preference – matte creates a sophisticated, modern look that’s especially striking with purple shades.
Apply the top coat in thin, even strokes from base to tip.
Don’t forget to cap the free edge by swiping across the nail’s tip.
For enhanced durability, look for formulas with UV absorption properties that prevent color fading from sun exposure.
These longevity boosters will keep your purple art vibrant for up to two weeks.
Once dry, massage cuticle oil around each nail to hydrate the surrounding skin and add extra shine.
You’ve now sealed your artwork properly, ensuring it’ll withstand daily wear while maintaining its stunning appearance.
Frequently Asked Questions
How Do I Remove Purple Nail Polish Stains From My Skin?
You’ll remove purple nail polish stains from your skin using olive oil or baking soda.
Soak a cotton ball in olive oil and gently rub the stained areas until the polish lifts away.
Alternatively, make a paste with baking soda and water, then scrub the stains in circular motions.
Both methods work effectively without harsh chemicals.
Rinse with warm water afterward and moisturize your skin to prevent dryness.
Can I Mix Different Purple Polish Brands Together Safely?
You can safely mix different purple polish brands together, but there are some considerations.
Brand compatibility varies because each company uses unique polish chemistry formulations. You’ll get the best results mixing polishes with similar base ingredients – check if they’re both lacquer-based or gel-based.
Test your mixture on paper first since some combinations might streak, separate, or create unexpected textures.
Always work in a ventilated area when mixing.
How Long Should I Wait Between Purple Nail Art Sessions?
You’ll want to wait at least 1-2 weeks between purple nail art sessions to maintain healthy nails. These rest periods allow proper nail recovery from polish chemicals and filing.
Your session frequency depends on your nails’ condition – if they’re brittle or peeling, extend the break to 3 weeks. Polish longevity typically lasts 5-7 days with proper application, but don’t rush to reapply immediately after removal.
Will Purple Nail Polish Stain My Natural Nails Permanently?
No, purple nail polish won’t permanently stain your nails, but it can leave temporary discoloration.
You’ll notice darker shades are more likely to cause yellowing.
For staining prevention, always apply a quality base coat before your purple polish.
The polish formulation matters too – cheaper brands often contain more pigments that seep through.
If you do get staining, it’ll grow out naturally as your nails regenerate over several weeks.
What Purple Shades Work Best for Different Skin Tones?
For fair skin tones, you’ll find cool lavenders and soft lilacs create a beautiful contrast.
If you’ve got medium skin, try vibrant purples or deep plums that’ll really pop against your complexion.
Darker skin tones look stunning with rich eggplants and bold violet shades.
You can’t go wrong with metallic purples on any skin tone – they’re universally flattering and add extra dimension to your nail art.
Conclusion
You’ve now mastered eight stunning purple nail art designs that’ll transform your manicure game. From simple polka dots to elegant marble effects, you’re equipped with techniques that work for any skill level. Don’t forget to seal your artwork with a quality top coat for durability. Keep practicing these tutorials, and you’ll soon create custom purple designs with confidence. Your nails are your canvas—let your creativity shine through these beautiful purple masterpieces you’ve learned today.