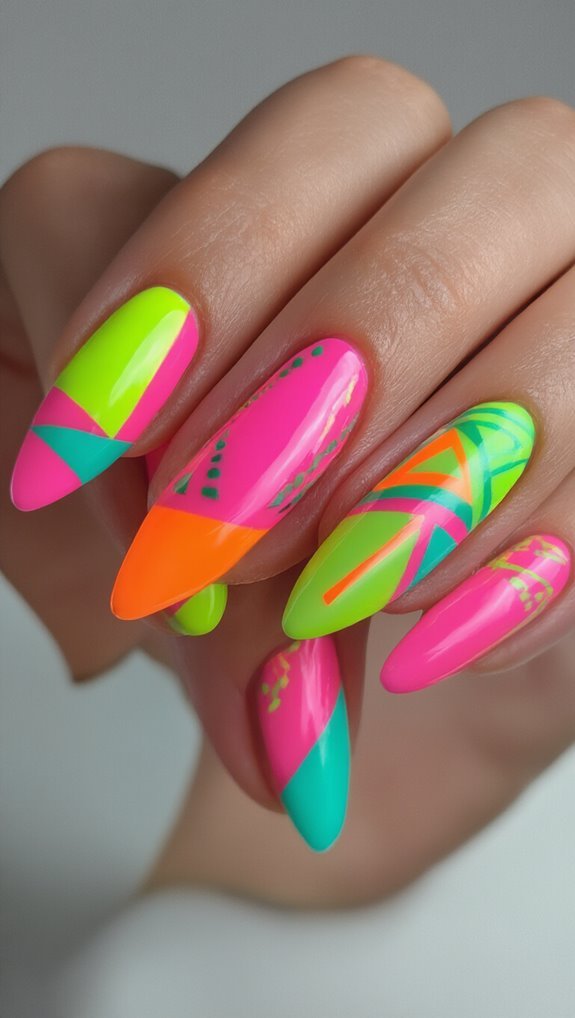
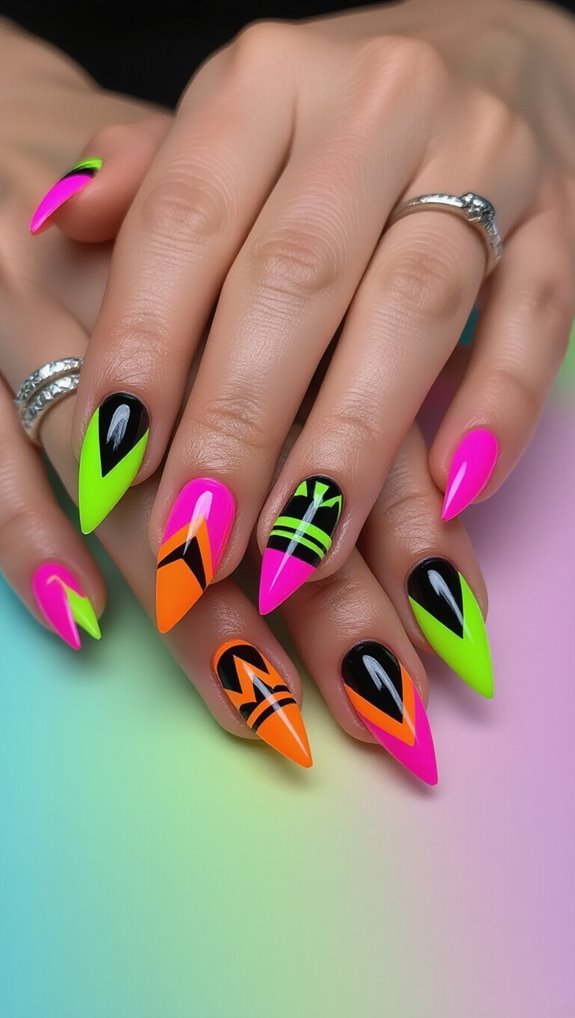
You’ll master 80s nail art by combining electric pink chevrons, lime green triangles, and shocking blue zigzags on white base coats that maximize neon intensity. Start with striping tape to create sharp geometric edges, then paint alternating sections with fluorescent polishes inspired by Miami Vice and Memphis design. Add metallic silver accents between shapes for that authentic retro flash. These bold patterns transform from basic geometric shapes into show-stopping nail statements with the right techniques.
Key Takeaways
- Use white base coat under neon polishes to maximize fluorescent intensity and vibrancy of 80s geometric designs.
- Create chevron stripes, triangle clusters, and diamond grids using striping tape for sharp edges and alternating neon colors.
- Apply electric pink, lime green, and shocking blue as core colors, removing tape while polish is wet for crisp lines.
- Add metallic silver or gold thin lines between geometric sections for authentic 80s dimension and reflective accents.
- Seal designs with quick-dry glossy topcoat to achieve the signature high-shine finish characteristic of 80s nail art.
Essential Neon Color Palettes That Defined the Decade
When you dive into 80s nail art, you’ll discover that neon colors weren’t just popular—they dominated every manicure trend of the decade. You’d find electric pinks, radioactive greens, and blazing oranges on fingertips everywhere. These fluoro colorways weren’t subtle—they screamed for attention and perfectly captured the era’s bold aesthetic.
You’ll recognize the classic combinations that defined the period: hot pink paired with electric blue, lime green mixed with vibrant purple, and shocking yellow contrasted with magenta. The acid wash hues that appeared on denim translated directly to nail art, creating softer neon gradients that you’d layer for dimensional effects.
Miami Vice influenced your color choices too, bringing coral and turquoise combinations to mainstream nail fashion. You’d often see these shades applied in full coverage or as French tip accents. The decade’s palette wasn’t about restraint—it celebrated excess, encouraging you to mix multiple neons in one manicure for maximum impact.
Signature Geometric Patterns and Shape Combinations
Those vibrant neon palettes found their perfect canvas in the geometric patterns that became synonymous with 80s nail art. You’ll recognize these designs from MTV music videos and fashion magazines that defined the era’s aesthetic. The neon chevron pattern dominated nail salons, creating zigzag electricity across fingertips. Artists layered asymmetric polygons to build dimensional looks that caught disco ball reflections.
| Pattern Type | Color Combo | Visual Effect |
|---|---|---|
| Chevron Stripes | Pink/Green | Electric Zigzag |
| Triangle Clusters | Yellow/Purple | Kaleidoscope Burst |
| Diamond Grid | Orange/Blue | Retro Checkerboard |
| Hexagon Overlay | Coral/Teal | Honeycomb Glow |
| Square Blocks | Magenta/Lime | Tetris Flash |
You’d combine these shapes using thin striping brushes and geometric stencils. The key wasn’t perfection—it was bold contrast. Mix triangles with squares, overlap circles with diamonds, and don’t shy away from clashing angles. These combinations created the signature visual chaos that made 80s nails instantly recognizable.
Tools and Materials for Creating Authentic 80s Tips
The right tools transform modern nails into authentic 80s masterpieces. You’ll need fine-tipped acrylic brushes for precise geometric lines and sharp angles that defined the decade’s nail art. Select brushes in sizes 0 and 00 for detailed work, while flat brushes create bold stripes and color blocks.
Stock your kit with neon polishes in electric pink, lime green, and shocking blue. You can’t achieve that retro glow without quality fluorescent formulas. Add metallic silver and gold for accent details that catch the light.
Latex barriers protect your skin during complex designs. Apply them around nail edges before painting, then peel away for clean, professional results. You’ll also need striping tape for perfect lines, dotting tools for circles, and makeup sponges for gradient effects.
Don’t forget a white base coat—it makes neons pop with maximum intensity. Quick-dry topcoat seals your geometric artwork while adding that glossy 80s finish.
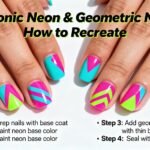
Step-by-Step Guide to Classic Triangle and Zigzag Designs
With your tools ready and neons at hand, you’re set to create the bold geometric patterns that ruled 80s nail art. Start with clean, dry nails and apply your base coat. For triangles, use striping tape to mask off diagonal sections, then paint with your chosen neon. Remove tape while polish is wet for crisp lines.
| Step | Triangle Design | Zigzag Design |
|---|---|---|
| 1 | Apply base coat | Apply base coat |
| 2 | Place tape diagonally | Create V-shaped tape pattern |
| 3 | Paint neon sections | Fill alternating sections |
| 4 | Remove tape immediately | Peel tape while wet |
Zigzags require V-shaped tape placement across the nail. Paint alternating sections to create the pattern, incorporating negative space for contrast. You’ll achieve the sharpest edges by removing tape before the polish dries. For added dimension, try a neon gradient within each geometric section—blend two colors while wet using a small brush. Seal everything with a quick-dry top coat.
Memphis-Inspired Nail Art Techniques
Beyond basic geometric shapes, Memphis design brings playful chaos to your nail art through squiggles, dots, and abstract forms that defined the radical 80s aesthetic movement. You’ll capture this iconic style by combining random patterns with bold, unexpected color combinations that refuse to follow traditional design rules.
Start with playful colorblocking across your nails using tape to section off irregular shapes. Paint each block in contrasting neons—hot pink against electric blue, lime green beside purple. Don’t overthink the placement; Memphis thrives on spontaneity.
Add abstract squiggles using a thin brush or toothpick. Draw wavy lines that dance across the colorblocked sections, breaking boundaries between colors. Layer black squiggles over bright backgrounds or white ones over dark bases for maximum impact.
Finish with scattered dots in varying sizes. Use a dotting tool or bobby pin to place them randomly, avoiding uniform patterns. This controlled chaos perfectly embodies Memphis design’s rebellious spirit.
Mixing Neon Shades for Maximum Visual Impact
Clash your neons fearlessly—that’s the secret to achieving authentic 80s nail art that demands attention. You’ll create the boldest looks by pairing electric pink with lime green or combining hot orange with cobalt blue. Don’t shy away from contrast blocking—it’s essential for that retro punch.
| Color Combo | Visual Effect | Best For |
|---|---|---|
| Pink + Yellow | High Energy | Party Nails |
| Blue + Orange | Bold Contrast | Statement Look |
| Green + Purple | Electric Vibe | Festival Style |
When you’re crafting a neon gradient, blend three to four shades that sit opposite on the color wheel. Start with your lightest shade at the cuticle and transition to the darkest at the tip. You can also reverse this for an unexpected twist. Apply thin layers to prevent streaking, and always use a white base coat—it’ll make your neons pop like they’re under blacklight. The key isn’t subtlety; it’s maximum visual chaos that screams 1980s rebellion.
Modern Updates to Vintage Geometric Styles

Those bold neon combinations set the stage for another 80s staple that’s getting a fresh spin today—geometric patterns that defined the decade’s aesthetic. You’ll find modern nail artists reimagining classic triangles, zigzags, and grids with sophisticated twists that honor retro futurism while feeling completely current.
Transform vintage patterns by incorporating negative space into your designs. Instead of covering every millimeter with color, leave strategic areas bare to create breathing room between geometric elements. This technique makes busy 80s patterns feel minimalist and refined.
Try updating traditional chevrons with asymmetrical angles or breaking up solid blocks with thin metallic lines. You can modernize Memphis-style squiggles by using matte topcoats alongside glossy sections for textural contrast. Replace the era’s typical color-blocking with gradient transitions within geometric shapes. These subtle adjustments maintain the decade’s bold spirit while appealing to contemporary tastes. The key is balancing nostalgic elements with current nail art trends.
Celebrity and Pop Culture Influences on 80s Nail Trends
You couldn’t escape Madonna’s influence on 80s nail trends, from her lace glove-inspired nail art to the bold red lips and matching crimson nails that became her signature.
Dynasty’s glamorous characters set the standard for luxury manicures, making French tips with gold accents and jewel-toned polishes symbols of wealth and sophistication.
These pop culture icons didn’t just wear nail trends—they created movements that transformed what you’d ask for at the salon.
Madonna’s Bold Style Impact
Madonna burst onto the music scene and revolutionized nail fashion with her fearless approach to beauty and self-expression. You couldn’t ignore her impact when she’d flash those perfectly manicured hands during her iconic stage choreography. She’d pair blood-red talons with lace gloves, creating looks that you desperately wanted to recreate.
The Madonna influence extended beyond music videos into everyday fashion. You’d see her sporting metallic silver nails one day, then switching to jet-black polish with rhinestone accents the next. She made it acceptable to experiment with edgy nail art that matched your mood. Her “Like a Virgin” era introduced you to nude and soft pink shades worn extra long, while her “Material Girl” phase showcased hot pink and gold combinations that became salon favorites.
Dynasty TV Show Trends
Dynasty regularly transformed Wednesday nights into nail inspiration sessions as you’d watch Alexis and Krystle face off in designer suits and flawless manicures.
The show’s Dynasty aesthetics defined luxury nail trends throughout the decade, making long, sculpted nails a status symbol you’d crave.
Power dressing extended beyond shoulder pads to your fingertips with these signature looks:
- Deep burgundy polish with gold accents
- French manicures with subtle shimmer
- Nude elongated tips with pearl details
- Rich jewel tones matching statement jewelry
You’d book salon appointments requesting “Dynasty nails,” knowing these sophisticated styles meant business.
The characters’ polished appearances taught you that manicured nails weren’t just accessories—they’re weapons of feminine power.
Every catfight scene showcased perfectly lacquered talons that you’d recreate for your own boardroom battles.
Professional Tips for Long-Lasting Neon Applications
You’ll need the right base coat to make those electric neon shades pop and stay put for weeks.
Choose a sticky base formula specifically designed for bright pigments, as regular bases won’t grip neon polishes properly.
Let each layer cure for at least 90 seconds under UV light or follow the bottle’s recommended timing to prevent chipping and ensure your retro manicure lasts through multiple dance parties.
Base Coat Selection
A quality base coat acts as the foundation between your natural nail and those vibrant neon polishes that defined the 80s aesthetic. You’ll need a product that creates the perfect canvas for those electric shades while ensuring polish compatibility with your chosen neon formula.
Consider these essential base coat features:
- Ridge-filling properties – Smooths nail imperfections for even color application
- Adhesion technology – Bonds polish to prevent chipping and peeling
- Brightening agents – White-tinted formulas make neons pop more vibrantly
- Quick-dry capabilities – Speeds up your multi-layer application process
Don’t skip the nail primer before your base coat—it’ll dehydrate excess oils that compromise adhesion. You’re looking for a tacky finish that grips neon pigments without yellowing over time.
Curing Time Techniques
Master the art of proper curing to transform your neon manicure from fleeting to fabulous—because nothing ruins that radical 80s vibe faster than chipped polish.
You’ll achieve optimal results by using quick flashes under your LED lamp for 30 seconds between coats, ensuring each layer bonds completely before applying the next.
For gel-based neon shades, employ timed exposures of 60 seconds for your final cure.
Don’t rush this step—incomplete curing leads to peeling within days.
If you’re working with traditional polish, let each coat dry for three full minutes before proceeding.
Apply thin layers rather than thick ones; they’ll cure faster and won’t bubble.
Remember to cap your nail tips during application, then cure those edges with an extra 10-second flash for maximum durability.
Pairing Geometric Neon Nails With Contemporary Fashion
When you’re sporting geometric neon nails inspired by the 80s, you’ve got a bold statement piece that demands thoughtful styling choices. Your vibrant nail art can elevate modern outfits when paired correctly.
Master streetwear balance by mixing your electric nails with neutral basics. Here’s how to style them:
- Monochrome outfits – Let your nails pop against all-black or white ensembles
- Denim pieces – Classic blue jeans or jackets complement neon without competing
- Athletic wear – Match the 80s energy with contemporary sporty looks
- Minimalist accessories – Choose simple jewelry to avoid visual overload
Smart accessory coordination means selecting pieces that echo your nail colors without matching exactly. Try neon-accented sneakers, subtle geometric earrings, or bags with color-blocked details.
You’ll find these retro-inspired nails work surprisingly well with today’s fashion trends. They’re conversation starters that show you’re confident enough to embrace bold beauty choices while maintaining overall style sophistication.
Frequently Asked Questions
How Do I Remove Stubborn Neon Polish Without Damaging My Nails?
You’ll need patience to remove stubborn neon polish safely.
Start with an acetone free remover and gentle soak method – saturate cotton pads, press them onto each nail, and wait five minutes.
Don’t scrape aggressively.
Instead, use light buffering techniques with a fine-grit file to lift remaining color.
Protect your cuticle care routine by applying oil around the nail bed first.
This prevents drying and keeps your nails healthy throughout removal.
Can I Achieve This Look With Regular Polish Instead of Gel?
Yes, you can create this look with regular polish! You’ll need thin brushes or striping tape for clean geometric lines.
Apply a white base coat first to make neon colors pop. Use quick-dry topcoat between layers to prevent smudging.
Try DIY tricks like using scotch tape for sharp edges or toothpicks for precise details. Work quickly since regular polish dries faster than gel, and seal everything with a glossy topcoat.
What’s the Average Cost for Professional 80S Geometric Nail Art?
You’ll typically spend $50-$120 for professional 80s geometric nail art, depending on salon pricing and artist experience.
Entry-level nail techs might charge $50-$70, while seasoned artists with advanced skills command $80-$120.
The complexity of your chosen geometric patterns, number of colors, and whether you’re adding extras like rhinestones or foil affects the final cost.
High-end salons in major cities often charge premium rates for this intricate retro style.
How Long Does It Take to Complete a Full Set?
You’ll typically spend 90-120 minutes for a complete 80s geometric nail art set.
Your technician needs about 30 minutes for prep steps including cuticle work, filing, and base coat application.
The intricate neon geometric designs take 45-60 minutes to paint precisely.
You’ll wait another 15-20 minutes for proper dry time between layers and top coat.
Some salons offer quick-dry options that can reduce your total appointment time by 10-15 minutes.
Are Neon Nail Polishes Safe for Pregnant Women?
You’ll want to check each neon ingredient carefully during pregnancy. Most neon polishes are safe, but some contain chemicals that raise concerns about prenatal exposure.
Look for “3-free” or “pregnancy-safe” labels that exclude formaldehyde, toluene, and DBP. You’re better off choosing water-based formulas when possible. If you’re unsure about specific brands, consult your doctor.
Ensure good ventilation while applying polish and consider taking breaks between manicures.
Conclusion
You’ve now mastered the bold, electric world of 80s neon geometric nail art. Whether you’re recreating classic triangle tips or experimenting with Memphis-style patterns, you’ll turn heads with these retro designs. Don’t forget to seal your neon masterpieces with quality topcoat and pair them confidently with modern outfits. Your geometric tips aren’t just nail art—they’re wearable nostalgia that bridges decades. Go ahead, embrace those vibrant colors and sharp angles that made the 80s unforgettable.