You’ll need steady hands and brush control before attempting complex nail art. Master one-color applications and clean-up techniques through daily practice on nail tips. Invest in professional-grade detail brushes and dotting tools, maintaining them properly with acetone. Set up an ergonomic workspace with daylight LED lamps at multiple angles to eliminate shadows. Budget two hours for intricate designs and understand color theory’s 60-30-10 rule. These fundamentals transform amateur attempts into salon-worthy creations.
Key Takeaways
- Master basic brush control and thin line techniques through daily practice before attempting complex nail art designs.
- Invest in quality detail brushes, dotting tools, and proper LED lighting to achieve professional precision and reduce eye strain.
- Apply thin gel coats and cure for 30-60 seconds per layer to prevent soft, dented, or brittle nail results.
- Schedule intricate designs for your non-dominant hand first when energy levels are highest for steadiest work.
- Follow the 60-30-10 color rule using dominant, secondary, and accent shades to create balanced, harmonious nail art compositions.
Your Basic Skills Need to Be Rock Solid Before Moving Forward
Before you dive into complex nail art designs, you’ll need to master the fundamentals that every professional artist relies on.
Your hand strength determines how steady you can hold your tools during intricate work. Without it, you’ll struggle with shaky lines and uneven patterns that ruin your designs.
Brush control is equally critical. You must learn to manipulate different brush sizes with precision, adjusting pressure to create varying line weights.
Practice basic strokes daily—thin lines, dots, and curves—until they become second nature. Your dominant hand needs to move fluidly while your non-dominant hand remains perfectly still.
Don’t rush past these basics. Spend weeks perfecting one-color applications, ensuring smooth coverage without pooling or streaking.
Master clean-up techniques around the cuticles. Learn to work ambidextrously since you’ll need equal skill on both hands.
These foundational abilities separate amateur attempts from professional-quality nail art that actually impresses.
Quality Tools Make the Difference Between Amateur and Professional Results
You’ll quickly discover that professional-grade tools transform your nail art from shaky attempts to crisp, clean designs.
Start by investing in quality detail brushes for precise lines, a set of dotting tools for perfect circles and patterns, and files with the right grit for your specific shaping needs.
While drugstore tools might seem tempting, spending extra on professional equipment now saves you from frustration and redoing work later.
Essential Brush Types
While you might be tempted to grab any small brush and start painting, investing in the right nail art brushes will transform your designs from shaky attempts to crisp, professional artwork. You’ll need specific brushes for different techniques—a detail brush won’t create smooth gradients, and a striping brush can’t produce precise dots.
| Brush Type | Best For |
|---|---|
| Detail/Liner | Fine lines, intricate patterns |
| Flat Shader | Color blocking, gradient blends |
| Angled Liner | French tips, geometric shapes |
Your flat shader becomes essential for applying base colors evenly and blending ombré effects. The angled liner excels at creating clean diagonal lines and sharp corners. Start with these three basics, then expand your collection as you master new techniques. Quality synthetic brushes maintain their shape better than natural hair options.
Investing in Dotting Tools
Transform your polka dots from wobbly blobs to perfect circles by choosing professional-grade dotting tools over makeshift alternatives like bobby pins or toothpicks. You’ll achieve consistent sizing and cleaner edges when working with properly weighted metal tips that distribute polish evenly.
Look for sets offering multiple ball sizes ranging from 0.5mm to 5mm, letting you create everything from tiny accent dots to bold statement circles.
Prioritize tools featuring ergonomic grips that reduce hand fatigue during extended nail sessions. These rubberized or textured handles provide better control, especially when you’re working on intricate designs.
Proper tool maintenance extends their lifespan significantly—wipe tips immediately after use, store them upright, and occasionally clean with acetone to prevent polish buildup that affects performance.
Proper File Selection
When you’re reaching for a nail file, the grit number determines whether you’ll achieve salon-quality results or damage your nails beyond repair. You’ll need different files for various tasks, and choosing wrong can split, weaken, or thin your nails permanently.
Here’s what each grit level accomplishes:
- 80-100 grit: Coarse grit files shape acrylics and gels only—they’ll destroy natural nails
- 180-240 grit: Perfect for shaping natural nails and removing length safely
- 400-600 grit: Foam buffers at this level smooth ridges without over-thinning
- 1000+ grit: Creates glass-like shine for the final polish-ready surface
Don’t use coarse grit files on natural nails—you’ll regret the irreversible damage. Instead, invest in quality foam buffers that flex with your nail’s curve. They’re gentler, last longer, and deliver consistent results every time you prep for nail art.
Gel Polish Systems Require Different Techniques Than Regular Polish
You’ll need to master specific techniques when switching from regular to gel polish systems.
The base coat application requires a thinner, more precise layer since thick coats won’t cure properly and can cause peeling.
Each layer must cure completely under UV or LED light for the recommended time, as under-curing leads to soft, dented nails while over-curing creates brittleness.
Curing Under UV Light
Unlike regular nail polish that air-dries naturally, gel polish systems demand specific curing techniques with UV or LED lamps to properly harden and set. You’ll need to understand proper UV exposure times and lamp compatibility with your chosen gel brand before starting.
Here’s what you should know about curing:
- 30-60 seconds per coat – You’ll feel accomplished watching each layer transform from wet to perfectly hardened
- Keep fingers still – Any movement creates frustrating smudges you’ll need to redo
- Check wattage requirements – Your lamp’s power determines whether you’ll achieve salon-quality results
- Apply thin coats – Thick layers won’t cure properly, leaving you disappointed with sticky, wrinkled polish
Don’t skip proper curing times. You’re investing in long-lasting nails, so follow manufacturer guidelines exactly for professional results.
Base Coat Application
Because gel base coats bond differently to the nail plate than traditional polish, you’re working with a completely different application method that requires specific preparation and technique.
You’ll need to dehydrate your nails thoroughly and push back cuticles before applying the base coat in thin, even strokes.
Don’t flood the cuticle area or sidewalls—precision matters for longevity.
Apply the gel base coat from the center outward, capping the free edge to prevent chipping.
If you’re planning intricate designs with striping tape later, ensure your base coat’s completely smooth without ridges or bumps.
Skip cuticle oil until after your entire manicure’s finished, as oils prevent proper adhesion.
Practice Designs on Nail Tips Before Working on Clients or Yourself
When you’re eager to create intricate nail art, it’s tempting to jump straight into working on actual nails, but practicing on nail tips first will save you time, money, and frustration.
You’ll build muscle memory and perfect techniques without the pressure of working on someone’s actual hands.
Set up regular practice schedules to develop consistency in your designs.
Here’s why you’ll benefit from this approach:
- Mistakes won’t cost you clients – You can experiment freely without damaging relationships
- Your confidence will skyrocket – Master complex designs before showcasing them professionally
- You’ll save expensive products – Perfect your technique using minimal polish and supplies
- Your speed will improve dramatically – Repetition on tips builds efficiency
Create mock clientations by timing yourself and working through complete sets.
You’ll discover which designs take longest and where you need improvement.
Store your practice tips as portfolio pieces to show potential clients your skill range.
Proper Workspace Setup and Lighting Are Non-Negotiable
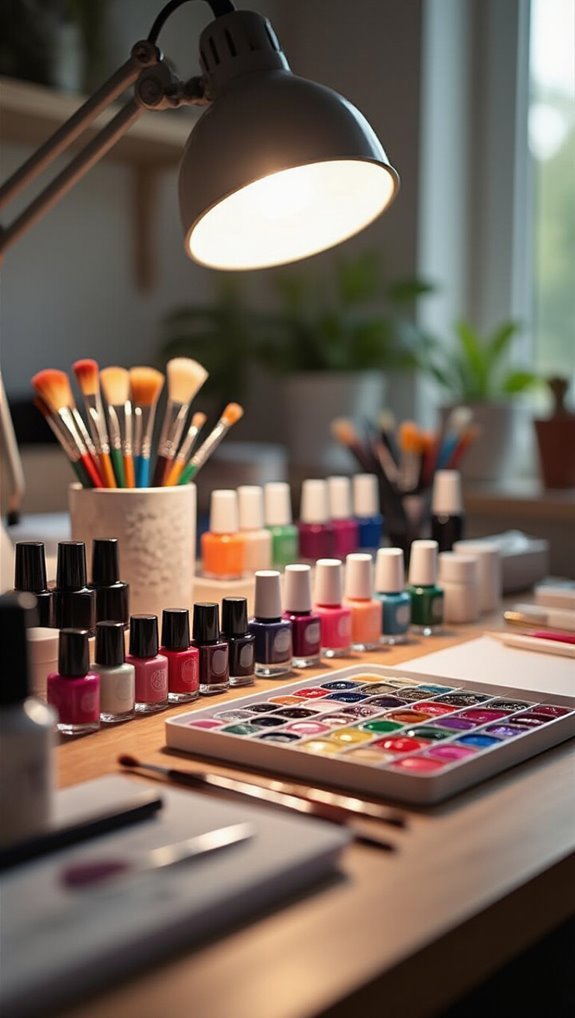
While you might manage basic manicures in dim conditions, creating professional nail art demands a properly lit and organized workspace that’ll protect both your eyesight and your sanity. You’ll need daylight LED lamps positioned at multiple angles to eliminate shadows on the nail surface. An ergonomic layout keeps your tools within arm’s reach while maintaining proper posture during lengthy sessions.
Your desk should sit at elbow height when you’re seated, preventing shoulder strain. Install adjustable task lighting that won’t create glare on wet polish. Ambient control matters too—you’ll want consistent room temperature to prevent polish from thickening or becoming runny.
| Setup Element | Impact on Your Work |
|---|---|
| Poor lighting | Eye strain, missed details |
| Cluttered space | Lost time, frustration |
| Wrong desk height | Back pain, shaky hands |
Don’t compromise on these fundamentals. They’re the difference between amateur attempts and professional results that’ll keep clients returning.
Time Management Becomes Critical With Complex Designs
As nail art complexity increases, you’ll discover that a simple manicure’s 30-minute timeline explodes into multi-hour sessions that can test your patience and skill. You’ll need strategic time budgeting to prevent rushed work and smudged designs. Design sequencing determines whether you’ll finish with professional results or tear-inducing mistakes.
Master these time-saving strategies:
- Break designs into 15-minute segments – You’ll maintain focus without cramping hands
- Apply base colors first on all nails – You’ll maximize drying efficiency between layers
- Prep all tools beforehand – You’ll avoid frantic searching mid-design
- Schedule complex art for non-dominant hand first – You’ll tackle hardest work with fresh energy
Don’t underestimate drying time between layers. What looks dry isn’t always cured, and impatience ruins hours of work.
Set realistic expectations: intricate florals need two hours, geometric patterns require 90 minutes, and gradient effects demand at least an hour. You’re building wearable art, not racing against time.
Understanding Color Theory and Design Balance Elevates Your Work
Time management keeps your sessions productive, but color choices and design placement determine whether your nails look amateur or artistic. You’ll transform basic manicures into compelling designs once you grasp color psychology and its impact on visual appeal. Warm tones energize while cool shades calm—understanding these principles helps you create intentional moods through nail art.
| Color Combination | Visual Effect |
|---|---|
| Complementary | Maximum contrast harmony |
| Analogous | Subtle, cohesive flow |
| Triadic | Balanced vibrancy |
| Monochromatic | Sophisticated depth |
Your design balance depends on proportional elements. Place focal points on accent nails rather than overwhelming every finger. You’re creating wearable art, so consider how patterns interact across all ten nails. Contrast harmony works best when you pair bold designs with negative space or combine intricate details with solid colors. Practice the 60-30-10 rule: dominant color covers 60%, secondary takes 30%, and accent fills 10%. This formula prevents chaotic compositions while maintaining visual interest throughout your design.
Frequently Asked Questions
How Much Should I Charge Clients for Intermediate Nail Art Services?
You’ll want to charge $35-65 for intermediate nail art services, depending on your location and experience level.
Consider your pricing strategies carefully – factor in design complexity, time investment, and material costs.
You can increase profits through service bundling by offering packages that combine nail art with manicures or pedicures.
Don’t undervalue your skills; research competitors’ rates and position yourself competitively while ensuring you’re compensated fairly for your artistic work.
What Certifications or Licenses Do I Need for Advanced Nail Art?
You’ll need a state cosmetology or nail technician license to legally perform advanced nail art.
Most states require 300-600 training hours and passing written and practical exams covering cosmetic safety protocols.
You should also obtain business insurance to protect against liability claims.
Some states mandate additional certifications for specific techniques like electric filing or chemical applications.
Check your state’s board requirements, as regulations vary significantly across different jurisdictions.
How Do I Photograph Nail Art for Social Media Portfolios?
You’ll capture stunning nail art photos by positioning your hands near a window for soft natural lighting during golden hour.
Use macro lenses or your phone’s macro mode to highlight intricate details.
Keep your background simple and neutral.
Stabilize your camera with a tripod, and shoot multiple angles.
Edit minimally to maintain true colors, and you’ll create scroll-stopping portfolio images that showcase your artistic skills perfectly.
Which Nail Art Trends Are Most Requested by Clients Currently?
You’ll find minimalist negative space designs dominating client requests right now, offering clean geometric patterns that showcase natural nails.
Holographic chrome finishes rank second, creating that mirror-like effect everyone’s obsessed with.
French manicures have evolved into colorful tip variations, while abstract art and micro florals round out the top five.
You’re also seeing increased demand for glazed donut nails and subtle shimmer overlays that photograph beautifully for social media.
How Do I Prevent Hand Fatigue During Lengthy Nail Art Sessions?
You’ll prevent hand fatigue by investing in ergonomic tools with cushioned grips that reduce strain on your fingers and wrists.
Practice microbreak techniques every 20 minutes—stretch your fingers, rotate your wrists, and flex your hands.
Keep your work surface at elbow height and maintain proper posture.
Switch between detailed and simple tasks to vary muscle use.
Rest your elbows on padded supports and avoid gripping tools too tightly during application.
Conclusion
You’ve learned the essential foundations that’ll transform your nail art from basic to brilliant. When you master these seven principles, you’re not just creating designs – you’re building a professional practice. Don’t rush the process. Perfect your basics, invest in quality tools, and respect the technical differences between systems. Your workspace, time management, and design knowledge will set you apart. Now you’re ready to take your nail artistry to the next level with confidence.