Start your Y2K nail art journey by prepping nails with a base coat, then apply metallic polish as your foundation. You’ll create chrome effects using mirror powders on tacky gel or add holographic shimmer with iridescent foils. Master colorful French tips with electric blues and hot pinks, then embellish with rhinestones using nail glue and tweezers. Seal everything with two thin topcoat layers to lock in your nostalgic design that’ll transport you back to the millennium.
Key Takeaways
- Start with proper nail prep: file, push back cuticles, apply base coat to protect natural nails from staining
- Build your essential polish collection: metallic silvers, hot pinks, electric blues, and iridescent top coats for authentic Y2K shine
- Master basic Y2K motifs like butterflies, stars, and flames using thin detail brushes and dotting tools
- Apply rhinestones and glitter while polish is tacky, securing with nail glue and sealing with multiple topcoat layers
- Create signature Y2K French tips by replacing white with neon colors or metallics, using tape for crisp lines
Essential Tools and Products for Y2K Nail Art
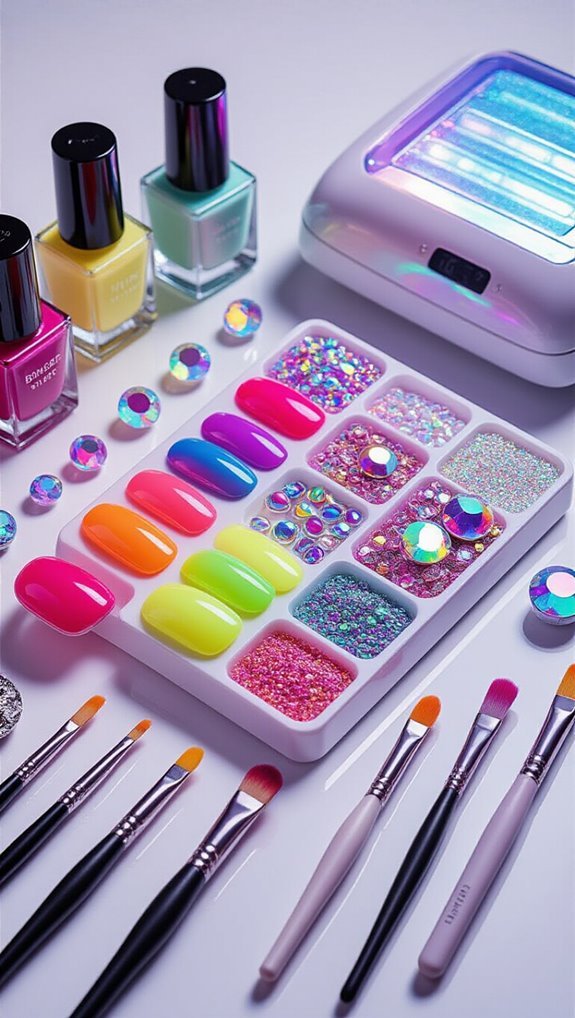
Before you can create those iconic Y2K nail looks, you’ll need to stock up on the right supplies that defined the era’s aesthetic.
Start with a quality base coat and glossy top coat to ensure your designs last. You’ll want metallic polishes in silver, hot pink, and electric blue—the decade’s signature shades.
Retro decals are essential for authentic Y2K vibes. Look for butterflies, stars, hearts, and tribal patterns that dominated the early 2000s.
Iridescent foils add that futuristic shimmer the era loved, transforming basic manicures into eye-catching statements.
Don’t forget rhinestones in various sizes for that extra bling factor. You’ll need fine-tipped brushes for detailed work and dotting tools for perfect circles.
Grab holographic powders to achieve that coveted chrome finish. A UV or LED lamp isn’t mandatory but helps if you’re using gel products.
Finally, invest in quality nail glue and tweezers for precise application of embellishments.
Preparing Your Nails for Y2K Designs
Before you can create those iconic Y2K designs, you’ll need to properly prep your nails through a few basic steps.
You’ll start by removing old polish, filing your nails into your desired shape, and pushing back your cuticles for a clean canvas.
Keep your nail file, buffer, cuticle pusher, and nail dehydrator handy—these tools will ensure your Y2K art adheres perfectly and lasts longer.
Basic Nail Prep Steps
Strip away old polish completely and wash your hands with soap and warm water to create the perfect canvas for your Y2K nail art. You’ll need to push back your cuticles gently using a wooden stick after softening them with warm water. Apply cuticle oil treatment and perform a gentle cuticle massage for 30 seconds per nail to boost circulation and hydration.
| Step | Emotional Benefit |
|---|---|
| Remove old polish | Fresh start feeling |
| Shape nails | Confidence boost |
| Buff surface | Smooth satisfaction |
| Apply base coat | Protected peace |
File your nails into your desired shape—square, round, or stiletto work beautifully for Y2K designs. Buff the nail surface lightly to remove ridges. Finally, apply a thin base coat to protect your natural nails from staining.
Essential Tools Needed
Three essential tool categories will transform your Y2K nail dreams into reality: preparation tools, application tools, and decorative elements. You’ll need quality nail files, buffers, and cuticle pushers for proper nail hygiene before starting any design. Don’t skip investing in good base and top coats—they’re crucial for longevity.
For application, grab thin detail brushes, dotting tools, and striping tape. These help you achieve precise lines and patterns that define Y2K aesthetics. Your decorative arsenal should include rhinestones, metallic foils, chrome powders, and holographic glitters. Stock up on butterfly stickers and star-shaped gems too.
Consider seasonal trends when selecting colors—pastels for spring, neons for summer. Keep acetone, cleanup brushes, and cotton swabs nearby for quick corrections. With these tools ready, you’re set to create authentic Y2K masterpieces.
Creating the Perfect Chrome and Metallic Base
When you’re ready to capture that authentic Y2K metallic finish, you’ll need to start with a flawlessly smooth nail surface. File your nails evenly and buff away ridges before applying a sticky base coat designed for chrome overlays. This foundation ensures mirror pigments adhere properly and won’t chip within days.
Apply your chosen metallic base color in thin, even strokes.
For dimensional effects, try these techniques:
- Layer iridescent powders over wet polish using a silicone applicator
- Create metallic gradients by blending two chrome shades with a makeup sponge
- Dust mirror pigments directly onto tacky gel polish for maximum shine
You’ll achieve the best results by working in natural light where you can spot any streaks or bare patches.
Seal everything with a no-wipe top coat that won’t dull your chrome finish. Remember, patience during application beats rushing through steps—Y2K nails demand precision for that futuristic gleam.
Mastering Colorful French Tips With a Y2K Twist
You’ll transform the classic French manicure into a Y2K statement by swapping traditional white tips for electric blues, hot pinks, and lime greens that defined the era.
Start with properly shaped and buffed nails as your canvas, then select polishes with the right finish—think glossy, pearlescent, or even glittery formulas that catch the light.
Apply your chosen colors using steady brush strokes or striping tape for crisp lines, and don’t forget to experiment with asymmetrical tips or color-blocking techniques that make each nail unique.
Essential Polish Colors
Transform your classic French manicure into a Y2K masterpiece by swapping traditional white tips for vibrant, eye-catching hues.
You’ll need specific shades to capture that nostalgic millennium aesthetic perfectly.
Stock your collection with these must-have Y2K colors:
- Metallic silvers and holographic toppers – They’ll add futuristic dimension to any base
- Hot pinks and electric blues – Perfect for creating bold neon gradients across your tips
- Baby blues and lilac purples – Essential for soft pastel ombrés that scream early 2000s
Don’t forget iridescent whites and shimmery champagnes for layering effects.
You’ll also want a quality clear base coat and glossy topcoat to protect your designs.
Mix these shades freely—Y2K style celebrates maximalism, so you can’t go wrong combining unexpected colors for tips that pop.
Shape and Prep
Now that you’ve gathered your vibrant polish collection, proper nail preparation sets the foundation for those statement-making French tips. You’ll want medium to long nail length for authentic Y2K vibes—think past your fingertips for maximum impact. Start by filing into squared or coffin shapes, the era’s signature silhouettes.
| Step | Action |
|---|---|
| File | Shape edges with 180-grit file |
| Buff | Smooth surface ridges gently |
| Push | Ease back cuticles with orange stick |
| Trim | Remove excess skin carefully |
Don’t skip cuticle care—it’s crucial for clean lines. Apply cuticle oil, massage it in, then push back gently. Remove any hangnails with nippers. Buff your nail beds lightly to create the perfect canvas. Finally, cleanse with rubbing alcohol to remove oils before applying your base coat.
Design Application Techniques
While classic French manicures dominated the ’90s, Y2K fashion rebels reimagined them with electric blues, hot pinks, and metallic silvers that screamed futuristic glam. You’ll master this iconic look by ditching traditional white tips for bold statement colors.
Start with these essential techniques:
- Apply thin coats using steady, horizontal strokes across your nail tips
- Create edgy gradients by blending two contrasting colors where they meet
- Use striping tape for razor-sharp lines between base and tip colors
For neon ombrés, you’ll sponge your chosen shades directly onto tips, building intensity gradually. Blend the colors downward while they’re still wet. Don’t forget to seal everything with a high-shine topcoat that’ll make your Y2K French tips look wet and glossy—exactly how the era intended.
Adding Rhinestones, Gems, and 3D Elements
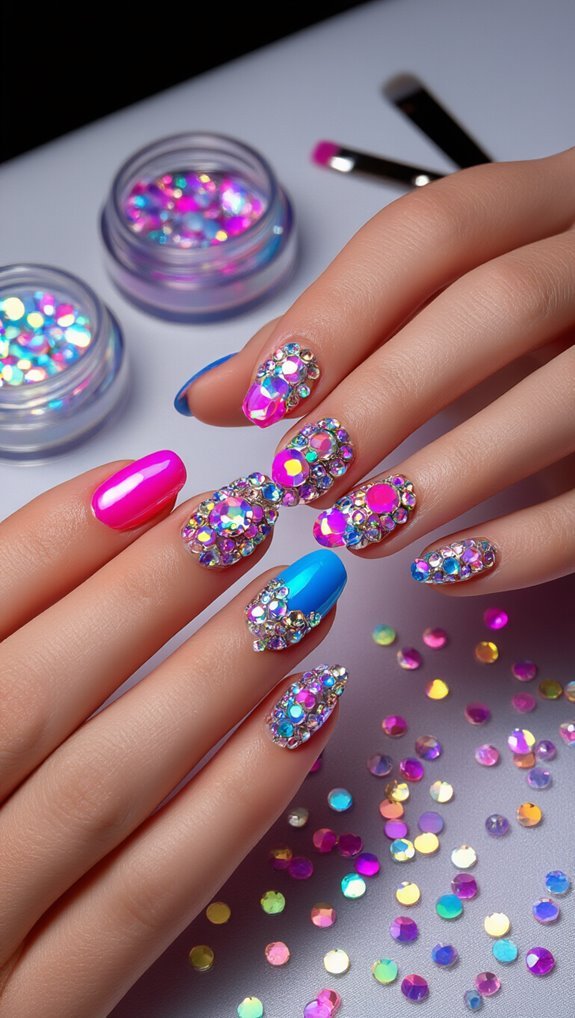
After you’ve mastered the base colors and patterns of Y2K nail art, you’re ready to explore the dimensional elements that truly defined the era’s maximalist aesthetic. These embellishments transform flat designs into eye-catching statements that capture the early 2000s’ “more is more” philosophy.
Start with rhinestone adhesives specifically formulated for nail art. Apply a tiny dot where you want each gem, then use tweezers to place rhinestones precisely. Work quickly before the adhesive sets, but don’t rush—accurate placement matters more than speed.
For larger elements like sculpted charms, you’ll need stronger gel adhesive. Cure these under UV light for maximum durability. Popular Y2K choices include butterflies, hearts, stars, and tiny logos.
Layer different sizes of gems to create depth. Combine flat-back crystals with pearl accents and metallic studs. Remember to seal everything with a thick top coat, encapsulating smaller pieces completely while carefully working around larger charms.
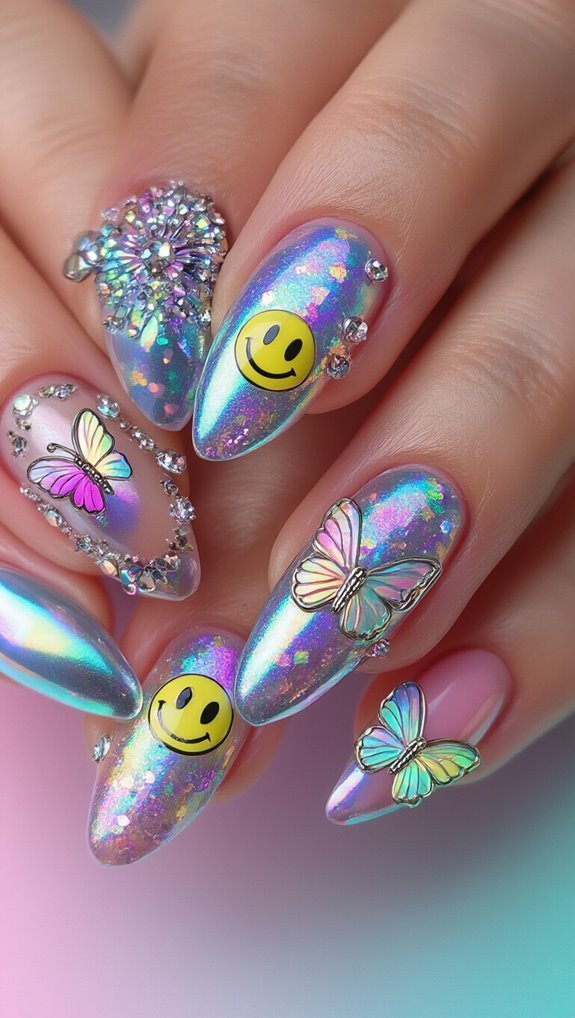
Painting Butterfly and Flower Motifs
You’ll need thin liner brushes, dotting tools, and a steady hand to create Y2K’s signature butterfly and flower designs.
Start with a base of pastel polishes—baby pink, lilac, and sky blue—then use white and black for outlining and detail work.
Master the basic petal-and-wing technique by practicing simple shapes first, then layer them to build more complex motifs.
Essential Tools and Colors
Most Y2K butterfly and flower nail designs require just a few specialized tools to achieve that nostalgic early-2000s look. You’ll need thin detail brushes for painting delicate petals and wings, plus dotting tools for creating perfect circles and flower centers.
Your essential toolkit should include:
- Fine liner brushes (sizes 0-2) for intricate butterfly wings
- Flat brushes for applying neon gradients smoothly
- Silicone tools for placing holographic foils precisely
For colors, stock up on hot pinks, electric blues, and lime greens—the brighter, the better. Don’t forget iridescent topcoats and shimmer polishes that capture Y2K’s futuristic vibe. White and black polishes are crucial for outlining and adding definition to your designs.
These basics will help you recreate authentic millennium-era nail art effortlessly.
Basic Technique Steps
When you’re ready to paint Y2K butterflies and flowers, start by applying a bright base color and letting it dry completely.
Create neon gradients by blending two contrasting shades while the polish is still tacky.
Use a thin brush dipped in white polish to outline butterfly wings, then fill them with metallic accents.
For flowers, dot five petals around a center point using a toothpick.
Add dimension with darker shades on petal edges.
You’ll achieve the authentic Y2K look by incorporating pixel decals between motifs—simply peel and press them onto dry polish.
Seal everything with a glossy top coat, ensuring you cap the nail edges.
Work on one nail at a time to prevent smudging.
Practice these techniques on fake nails first if you’re unsure about your steady hand.
Achieving the Iconic Flame Design
Because flame designs epitomized Y2K’s rebellious spirit, they became the ultimate statement nail art for anyone wanting to channel that era’s fierce energy. You’ll start by painting your base coat in black or deep blue to make those retro flames pop dramatically.
Create your flame shapes using these essential techniques:
- Draw thin, wavy lines from the nail tip downward with a detail brush
- Layer neon gradients from yellow to orange to red for authentic depth
- Add white highlights along flame edges for dimensional effects
You’re working with quick-drying polish, so move confidently when sketching each flame. Start at your nail’s edge and pull the brush downward in fluid S-curves. Don’t worry about perfect symmetry—Y2K flames thrived on chaotic energy.
Build your neon gradients while the polish is still tacky, blending colors where they meet. Finish with a glossy topcoat to seal your fierce creation and enhance those vibrant colors.
Working With Glitter and Holographic Effects
The chunky glitter and holographic finishes that defined Y2K nail art transform basic manicures into futuristic masterpieces. You’ll achieve maximum sparkle through strategic glitter layering—start with fine particles as your base, then add medium chunks, finishing with statement pieces on accent nails. Apply each layer while the previous coat’s still tacky for better adhesion.
| Effect Type | Application Tool | Best Placement |
|---|---|---|
| Chunky Glitter | Dotting Tool | Tips & Accents |
| Holo Powder | Sponge Applicator | Full Coverage |
| Iridescent Flakes | Tweezers | Feature Nail |
For holographic placement, you’re working with light-reactive materials that shift colors at different angles. Press holo powder into sticky base coat using silicone tools—never your fingers. Seal everything with two thin topcoat layers rather than one thick application. This prevents dulling your holographic finish while locking in loose glitter. Remember: Y2K nails weren’t subtle, so don’t hold back on the shine factor.
Combining Multiple Y2K Elements in One Design
While mastering individual Y2K techniques builds your foundation, you’ll create truly authentic looks by layering multiple elements strategically. You’ll want to balance bold features without overwhelming your design. Start with a base element like neon gradients, then add complementary details that enhance rather than compete.
Consider these effective combinations for maximum impact:
- Cyber-tech fusion: Apply holographic topcoat over pixel motifs for dimensional digital effects
- Neon chrome: Layer metallic french tips over gradient bases for futuristic edge
- Glitter graphics: Add fine glitter accents to geometric shapes or butterfly wings
You’ll achieve cohesion by limiting yourself to three main elements per nail. Choose one dominant feature, then support it with two subtle additions. For example, if you’re featuring bold pixel motifs, pair them with minimal chrome accents rather than competing patterns.
Remember that negative space helps busy designs breathe. Test combinations on practice wheels first to perfect your layering technique before committing to your final look.
Sealing and Maintaining Your Y2K Nail Art
After investing time in your intricate Y2K designs, you’ll need proper sealing techniques to preserve their nostalgic brilliance. Apply a quality gel or quick-dry top coat in thin, even strokes from base to tip. Don’t forget to cap the nail’s edge by swiping horizontally across the tip—this prevents chipping and ensures top coat longevity.
For designs with chunky glitter or rhinestones, you’ll need two to three layers. Let each layer dry completely before adding the next. This builds a protective dome over raised elements without creating bubbles or cloudiness.
Maintain your art with a daily cuticle oil routine. Massage oil into your cuticles and under your nails each night. This prevents lifting and keeps the surrounding skin healthy. Reapply top coat every three days, focusing on high-wear areas like tips and corners. When doing dishes or cleaning, wear gloves to protect your Y2K masterpiece from harsh chemicals and water damage.
Frequently Asked Questions
How Much Does a Complete Y2K Nail Art Manicure Typically Cost at Salons?
You’ll typically spend $50-$120 for a complete Y2K nail art manicure at salons, depending on design complexity and location.
Most salon packages include base prep, intricate designs like flames or butterflies, gems, and chrome finishes. You’re looking at higher prices in major cities versus suburban areas.
Don’t forget gratuity expectations—you should add 15-20% for your nail technician’s artistic work, bringing your total cost to approximately $60-$145.
Can Y2K Nail Designs Work on Short or Bitten Nails?
Yes, you can absolutely rock Y2K nail designs on shorter nails! Your short friendly length actually makes intricate details like tiny stars and flames easier to manage.
You’ll find that biteable chic nails showcase chrome finishes and glitter accents beautifully without overwhelming your nail bed. Try simple butterfly decals, mini rhinestones, or metallic French tips that won’t require much length.
Short nails make Y2K’s bold colors and patterns perfectly wearable for everyday style.
Which Y2K Nail Trends Should I Avoid for Conservative Work Environments?
You’ll want to skip neon chrome finishes and bedazzled tips for conservative workplaces. These bold Y2K statements can appear unprofessional in traditional settings. Avoid extreme lengths, pierced nails, and overly chunky 3D embellishments.
Flame designs, graffiti-style art, and ultra-bright color combinations won’t fly either. Instead, you can channel Y2K subtly through nude bases with minimal metallic accents or simple French tips with a slight shimmer for work-appropriate nostalgia.
How Long Does It Take to Master Basic Y2K Nail Art Techniques?
You’ll need about 2-3 weeks to master basic Y2K nail art techniques if you’re practicing 3-4 times weekly. Your practice frequency directly impacts how quickly you develop steady hands for creating flames, stars, and geometric patterns.
Tool familiarity comes faster—you’ll feel comfortable with dotting tools and striping brushes after just 4-5 sessions. Start with simple designs like dots and hearts before attempting complex butterfly motifs or chrome effects.
Are Y2K Nail Designs Suitable for Men or Gender-Neutral Styles?
Yes, you’ll find Y2K nail designs work perfectly for gender neutral and masculine friendly styles. You can adapt classic Y2K elements like metallic chrome, geometric patterns, and minimal stars into understated looks.
Skip the ultra-feminine butterflies and opt for flame designs, tribal patterns, or sleek silver accents instead. You’re essentially taking the core Y2K aesthetic—futuristic and bold—and tailoring it to match your personal style preferences without the frills.
Conclusion
You’ve now mastered the essentials of Y2K nail art, from chrome bases to flame designs and holographic effects. Don’t be afraid to mix techniques and make each design your own. Start with simpler looks and gradually add more complex elements as you build confidence. Remember, Y2K style’s all about bold self-expression and having fun. Keep practicing, experiment with color combinations, and you’ll be creating nostalgic masterpieces that capture that iconic early 2000s energy perfectly.